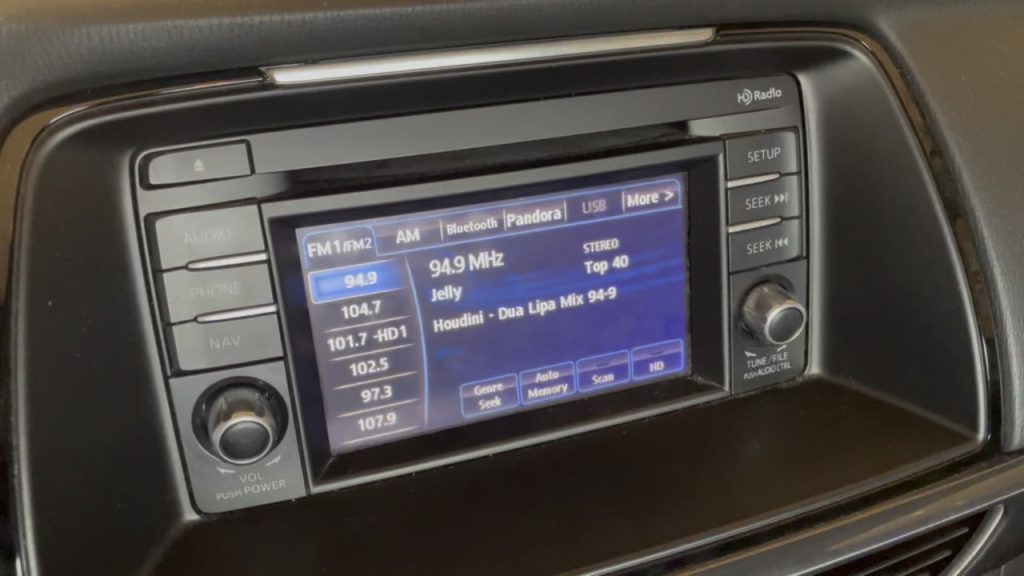
I have driven a 2015 Mazda 6 Touring with the non-Bose stereo since it was new and the number one complaint I have had is the stock radio. Mazda only offered this style of deck in the 2014 and 2015 model year 6 and then replaced it with a better, more capable unit in 2016. To say this deck is bad is an understatement. The only redeeming quality of this deck is that it is a double din sized unit that can be replaced at all. Even at the time of release this deck was a bit behind on technology including support for Pandora, iPod and USB sticks with music. Everything other than the CD player and FM/AM radio was very poorly implemented. iPods were already almost entirely replaced by smart phones at time of release yet it could rarely actually load music from an iPod or an iPhone running Music.app. Reading music from a USB took ages and browsing the music cumbersome, not to mention who wants to manage music on a USB stick? Pandora? I don’t know anyone who uses it. The CD player did work but showed the bare minimum information on the screen. Contrast this to my wife’s Toyota van which could often show cover art and just looked much more slick overall.
It would have been ok if the bluetooth implementation wasn’t riddled with bugs and annoyances. Starting the car and waiting for bluetooth to connect to your phone took minutes, sometimes several. Once it did connect, it would often fail to play music properly by either refusing to do anything or acting like it was playing but lacking any audio. If you were on a call when you started the car you would be presented with a crash/boot loop where the car would take over the call, crash sending the call back to your phone only to steal it away again when it started. This would loop forever until you ended the call. Once it was playing music it couldn’t tell you what track number you were on or the amount of time spent playing. The track number was something random and the timer always sat at 0:00. Moving between tracks was glacial with at least a second spent waiting for the song to change, including the title shown on the display. Overall the experience was subpar in every way.
All that said, I felt trapped into keeping the deck because it was responsible for controlling some configuration settings of the car including daytime running lights, door locking behavior and more. I had basically given up all hope of replacing it because I didn’t want to create new issues or lose steering wheel controls.
It wasn’t until 2024 that I learned there are devices that allow you to better integrate aftermarket decks with modern cars allowing you to keep your steering wheel controls and continue to access vehicle settings. I decided it was time to finally replace the stock deck. In this post I will detail what products I used to replace the stock radio in my 2015 Mazda 6 and what I learned throughout the installation process.
Products Used
Since its introduction I have known that I wanted a vehicle that supports CarPlay. This isn’t simply about being an iPhone user, if I were an Android user then I would want Android Auto instead. Rather, what I really want is my phone interface extended to the car because I know that my phone and my software can be updated and upgraded which keeps my in car entertainment updated as well. Relying on car makers to create great software has never proven to work out well.
With that in mind, I set out looking for a total solution that would:
- Allow me to retain the steering wheel controls.
- Allow me to retain existing USB ports.
- A fast, responsive device. I didn’t want to replace the bad deck with an equally poor experience. It needed to boot fast and feel responsive to inputs.
- Provide wireless CarPlay and Android Auto.
- Do all of the above without hacking up the car.
In the end I landed on the products listed below. I have included links to specific place I purchased from for the exact product I purchased. I am also including Amazon affiliate links.
- Sony XAV-AX6000 ($550) – Sony Direct / Amazon – The main head unit.
- iDatalink Maestro RR ($170) – Crutchfield / Amazon – Provides integration between in car systems and the head unit.
- iDatalink HRN-HRR-MA1 ($55) Crutchfield / Amazon – iDatalink Maestro car specific cable for Mazda.
- iDatalink ACC-HU-SON1 ($10) – Crutchfield / Amazon – iDatalink Maestro adapter cable for Sony head units.
- Metra 40-HD10 Antenna Adapter ($12) – Crutchfield / Amazon
- Metra 95-7522B Dash Kit ($18) – Crutchfield / Amazon
- Micro HDMI to HDMI Adapter ($9) – Amazon
- HDMI Panel Flush Mount Cable ($8) – Amazon
- USB-C to USB-A ($8) – Amazon
- Car Radio Factory USB Port Cable Wiring Adapter ($15) – Amazon – Adapts Mazda USB port to regular USB
- Total $855 + tax/shipping
That is a lot of parts but each piece plays a significant role. I am not going to describe every part in the list but I will discuss the main two items, the Sony XAV-AX6000 and the iDatalink Maestro RR, and one of the adapters.
Sony XAV-AX6000
After some research, I went with the Sony because reviews stated it started quickly, had an extremely responsive capacitance based touch screen display and wireless CarPlay and Android Auto. This model is a step up from the Sony XAV-AX4000 which has all the same features but uses a resistance based touch screen and lacks an HDMI port. Reviews also indicated the screen was less responsive than the XAV-AX6000. Aside from the upgraded touch screen system, the XAV-AX6000 also has HDMI in. Not a feature I have an immediate use for but I will integrate it into the car as best I can anyway.
I am happy to report reviews were correct. This unit does start up extremely quickly, quicker than the stock radio and is almost immediately ready to show the backup camera after starting the car. Before I am out of the garage CarPlay is connected and ready to play music. The screen is extremely responsive and feels like an iPhone/iPad or a high quality Android phone/tablet. If you are fussy like me and want a quick radio with a responsive touch screen you can’t go wrong with the Sony.
The amplifier built into the Sony is a significant departure from what the stock Mazda head unit provides. The Mazda unit sounded very different based on what input you were using. Compared to the Sony, the stock head unit tended towards a “bass boost” presentation with exaggerated bass below 70hz or so. CDs probably sounded the best, with Bluetooth coming in second. The AUX input was a mess of added bass. Under the Sony with the stock speakers, there is almost a lack of bass but overall has better midrange, more controlled bass and acceptable treble. To my ear it just has a better presentation than the stock radio. The built in EQ has enough bands and range to get things to your liking and the time correction feature does produce noticeable changes in soundstage.
One of the top complaints about this head unit is display brightness, or the lack of it. I believe this complaint stems from the TN based display and the anti-glare coating on the display coupled with where it is located in the dash. TN based displays are not known for having good viewing angles to begin with so if the unit is located lower in your dash then it is already at a disadvantage. Combine that with the antiglare coating and you have something that quickly looks washed out before the sun even comes into play. Luckily on the Mazda, the radio is mounted near the top of the dash and I find it to be readable enough in directly sunlight. I would put it on par with the stock deck which also had a similar, if resistive based touch, anti-glare display.
Another somewhat glaring omission on the Sony is the lack of HD radio. If having HD radio is important to you then you will need to find something else.
iDatalink Maestro RR
This is the magic unit that ties the car to the Sony so that you can keep the steering wheel controls, configure vehicle settings and gain access to all of the performance metrics the car’s computer has access to like coolant temp, transmission fluid temp and a LOT more. In the Mazda, what this module provides is maybe not be as useful as other cars that have software controls for features like the HVAC system or heated seats. That said, keeping the steering wheel controls and not losing the ability to configure vehicle options was important to me and this module provides that...with one big caveat.
As it turns out, Mazda will have the last laugh in regards to how the original stereo was implemented. The original stereo is a head unit that interfaces with an external module for the bluetooth and in-car voice features. Since placing calls is controlled by the bluetooth modules, so too are the steering wheel controls. This means, as far as I know, you cannot keep or use the voice or call control buttons on the 2014-2015 Mazda 6 because they are controlled by a different module the Maestro doesn’t interface with. In other words, the biggest reason for replacing the stock radio is also the reason I can’t fully integrate the new deck into the car. That said, I may explore ways to gain access to those buttons.
UPDATE: Turns out I was not following the directions for the Mazda 6, but instead the directions for the Mazda 2. On the 6, between the Maestro and the adapter harness is a red and a green connector. These need to be connected to each other in order to work. With this connected, all of the steering wheel controls now work perfectly!
Adapters
Every thing else mentioned in the list are adapters of some kind. Each adapter should be self explanatory but all of them allow you to install everything without cutting a single wire in the car. Each item was also suggested to me by the Crutchfield site when I selected the Sony XAV-AX6000. I only bought the head unit direct from Sony because at the time I ordered, the sale price was not available on the site. Although I provided Amazon links, I do suggest ordering from Crutchfield as their support is stellar.
The one adapter Crutchfield does not provide is the one for keeping the center console USB port. Mazda uses a proprietary plug at the stock radio and the listed adapter converts from that port to a standard USB-A plug. From there, I am using a USB-C to USB-A adapter so that I can plug the in-car USB port into the Sony deck.
The flush mount HDMI port is located on the passenger side, under the glove box. If at any point I want to display something on the Sony display over HDMI this will allow for easy access.
Vehicle Disassembly
I really only cover how to take things apart as once you have it apart, it becomes rather apparent how to put it back together. The disassembly process I detail here, while specific to the 2014-2015 Mazda 6, it should also be applicable to some CX-?? models of or around the same era. They all have rather similar dash design.
Installation of everything took far longer than I expected and it was mostly due to my efforts to integrate everything without making a mess and keeping everything looking clean. I wanted to avoid having any thing overly invasive or visible. In the end, only the required microphone looks out of place in the car.
Before starting anything, you should remove the negative lead from the battery using a 10mm wrench or socket.
Removing trim
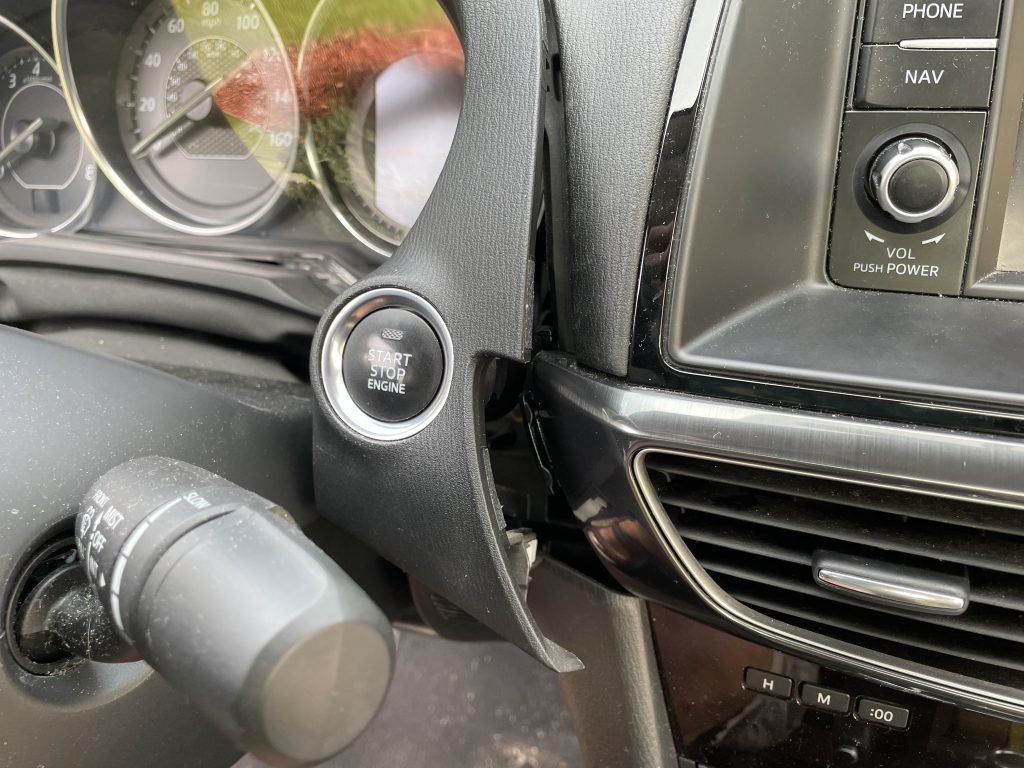
Removing the trim pieces on the Mazda is extremely simple and easy. The Metra dash kit includes picture directions on how to take the dash apart. You start with the trim piece around the gauge cluster by pulling the right side towards you. This part feels very flimsy and you will want to concentrate your efforts on the clip located below and to the right of the push start button. You only need to get this clip loose so that you can gain access to the next panel that runs across the entire dash from the push start button to the passenger door.
Similar to the gauge cluster trim piece, pull this piece, starting from the left side straight towards you. Once you have it started, you may find pulling the piece while also moving it up and down will help walk the clips out of position.
Repeat this along the full length of the trim piece being careful not to bend it too far. Always work the piece with your hands as close to the clips as possible.
Once free, you will have one plugin to remove for the hazard lights. Below is a top view of the plug but I found it much easier to release and remove by facing the vents towards the ceiling. In this position you will be looking at the push table of the white plug holding it in place. Push this in and pull the plug out.
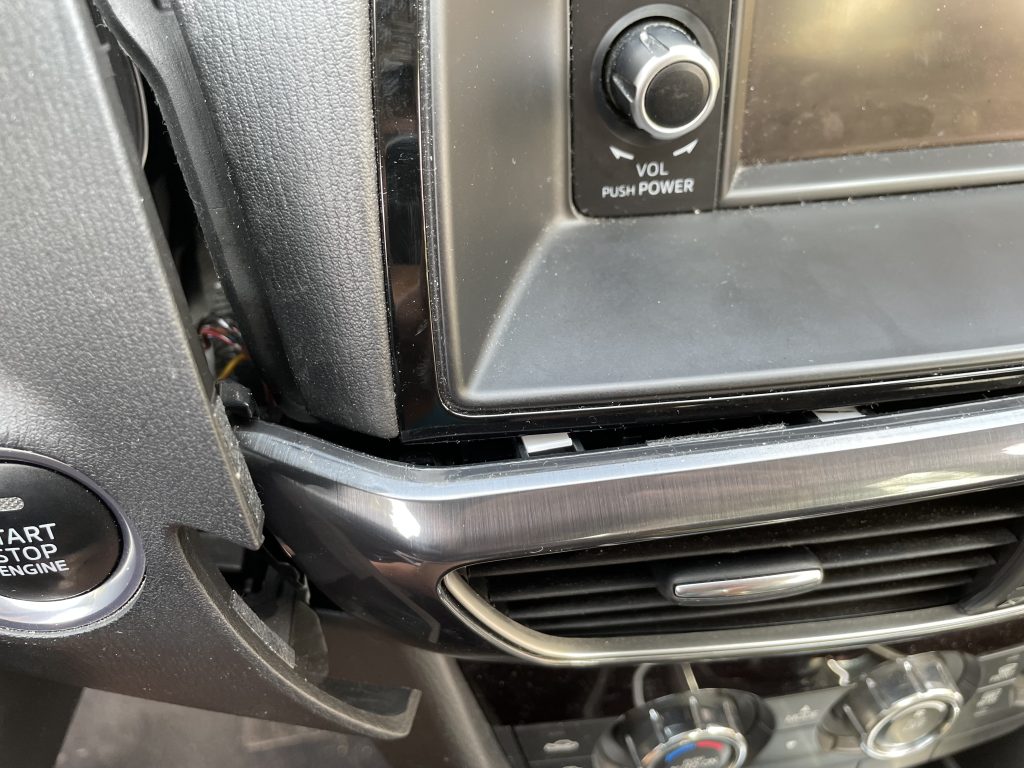
The last trim piece is around the radio itself. Like everything else so far, there are no screws. Simply pull the trim piece straight away from the dash, wiggling it a bit to help walk the clips out.
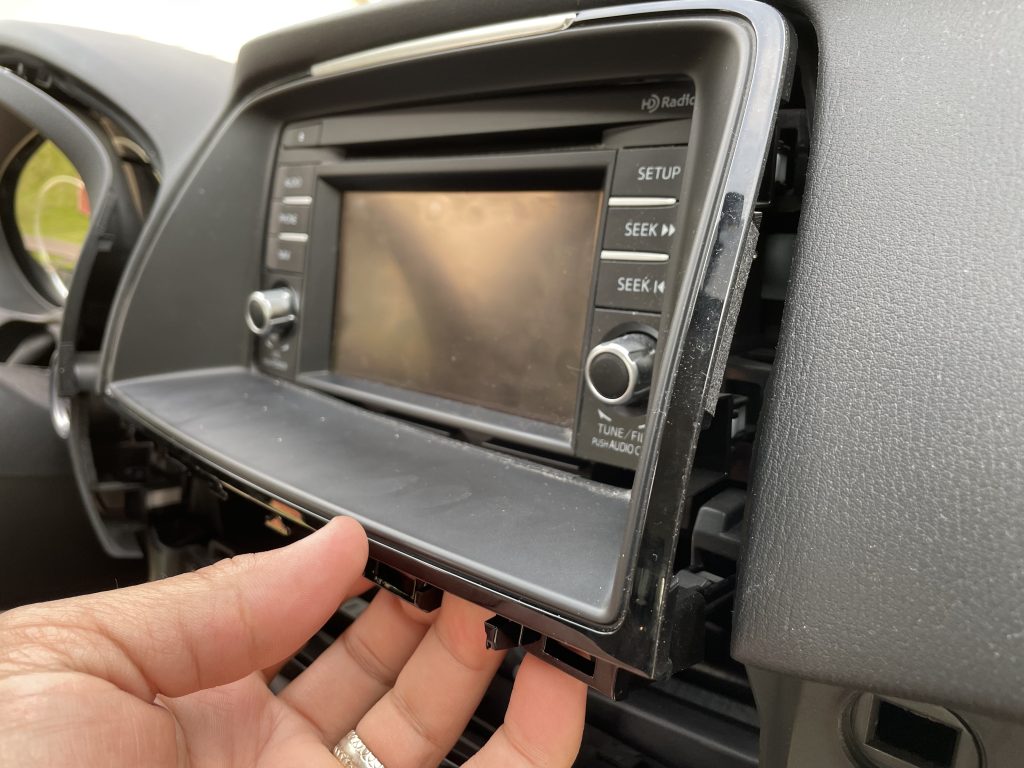
You are now at the radio itself. You will find one 10mm bolt under the stock radio and two screws on the left and right side.
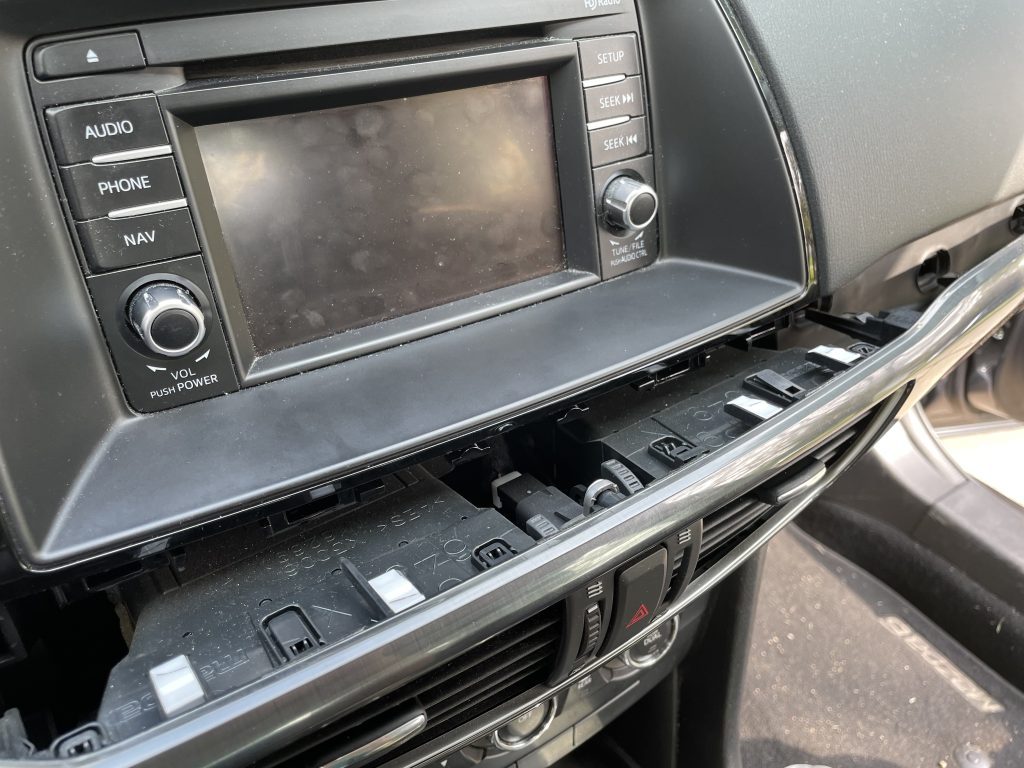
Remove the bolt and the screws. You will find that the radio is also clipped into the dash. Mazda really didn’t want this thing going anywhere and I found this took a lot more force that I was expecting. I started by pulling from the bottom straight away from the dash until it came lose. Again, more force than you might expect is required to release these clips.
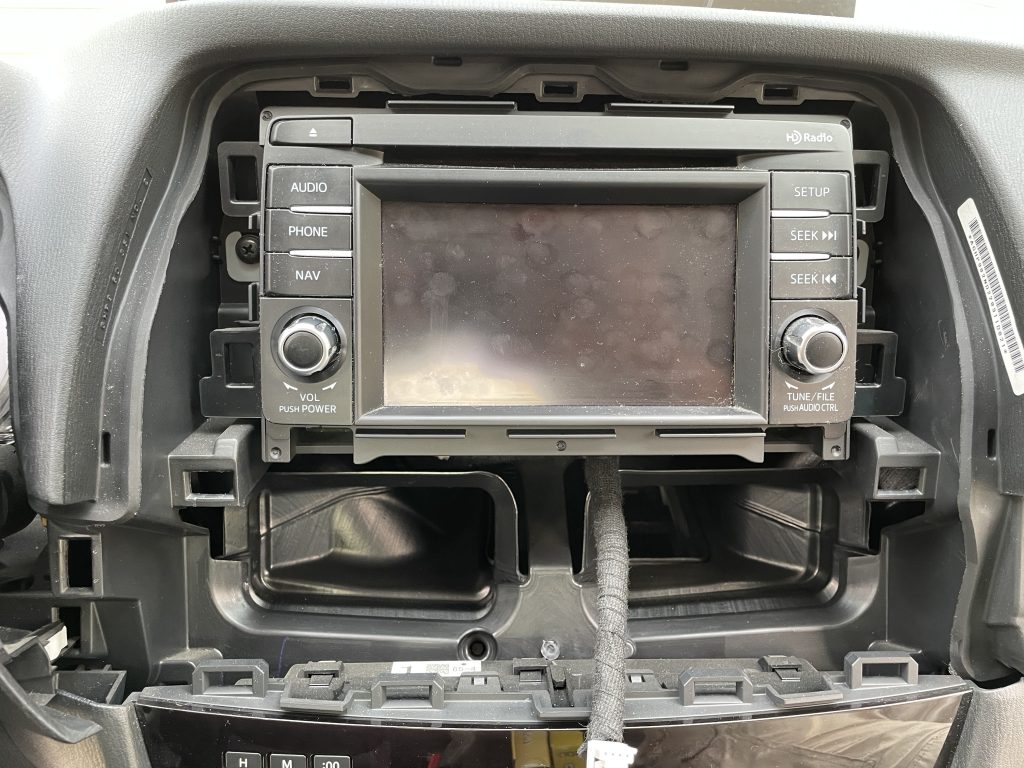
Once the stock radio is free from the dash, unplug everything in the back of it. From there, follow all directions included with the iDatalink and your deck to get everything wired up. The Metra dash kit works quite well but don’t put in the included white clips and insert it into the dash until you are absolutely sure you won’t need to pull the radio out again. I made this mistake and discovered these clips are even worse to remove.
Integration of require components
In order to provide a complete solution, the iDatalink Maestro and the Sony have specific parts that need to be routed to different parts of the car. Here I touch on those components and how I dealt with them in my Mazda 6.
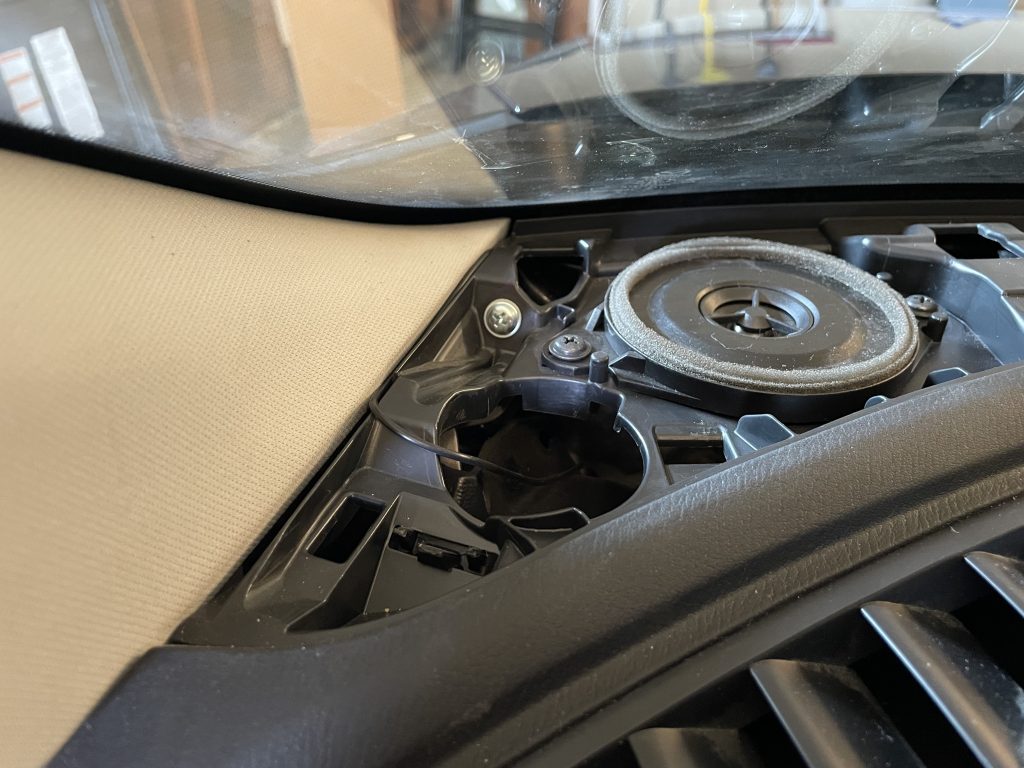
GPS Antenna
During my install process, I learned that even though my car doesn’t have navigation built it, the car still has a GPS antenna in the center of the dash. While I can’t use that antenna with the Sony, I did end up putting the included GPS antenna in the same spot. This is easily done with the stock radio removed as you have clear access to the center grill’s tabs. Remove the top grill plate above the radio push the tabs from the bottom, or you can pull from the top. Once removed you will see this:
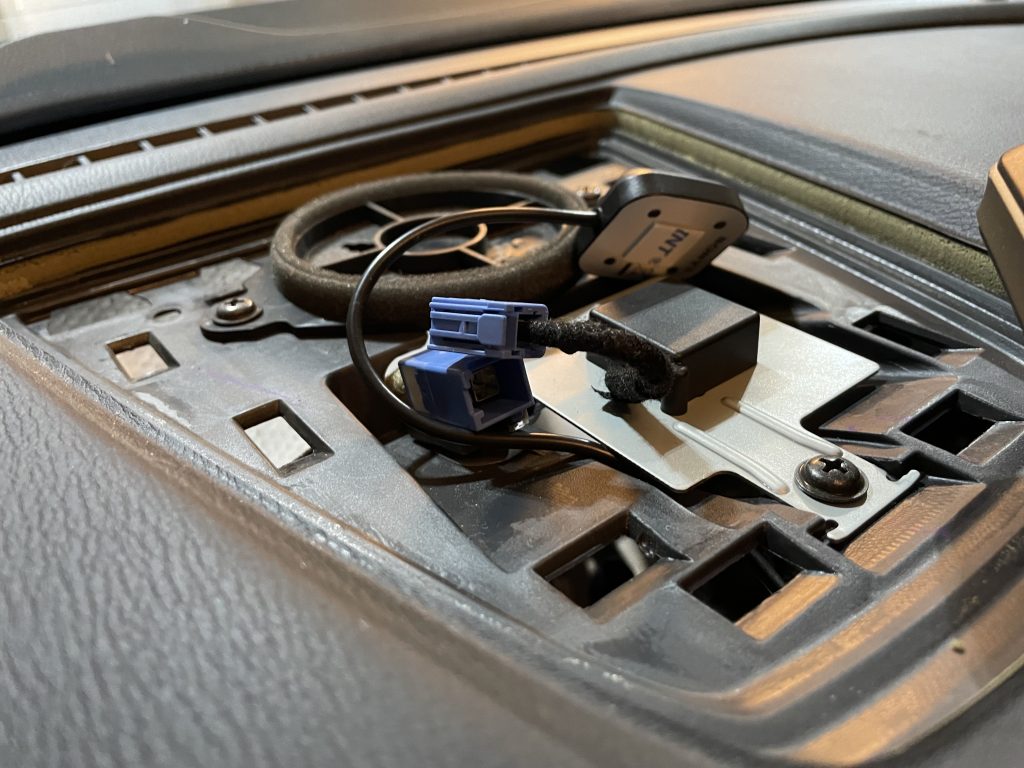
My car is the non-bose model. If it had the Bose system, there would be a speaker here instead of the blank plate. For my installation, I routed included GPS antenna as show above but removed the blank plate for the missing speaker. I put the screws back into the screw points to prevent them from rattling. Last, I used the double stick tape basically right where you see the antenna and I kept the original GPS antenna plugged in. I apologize for not taking a final photo.
Sony Microphone
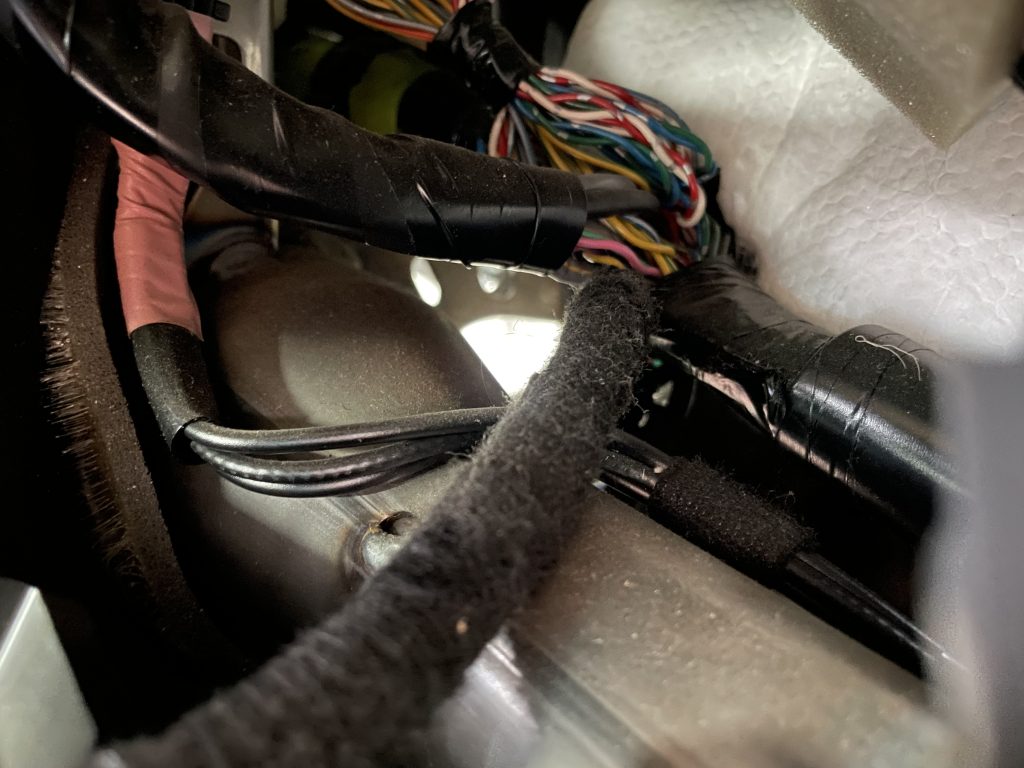
Since the stock microphone interfaced with the original radio using the Bluetooth module, it isn’t possible to use it again with the Sony and I was stuck running the included microphone. This is the only part of the installation, other than the deck itself, that is visible in the end. For this, I attached the microphone to the windshield above the rear view mirror and ran the cable along the headliner, down the driver side A pillar and then across the underside of the dash.
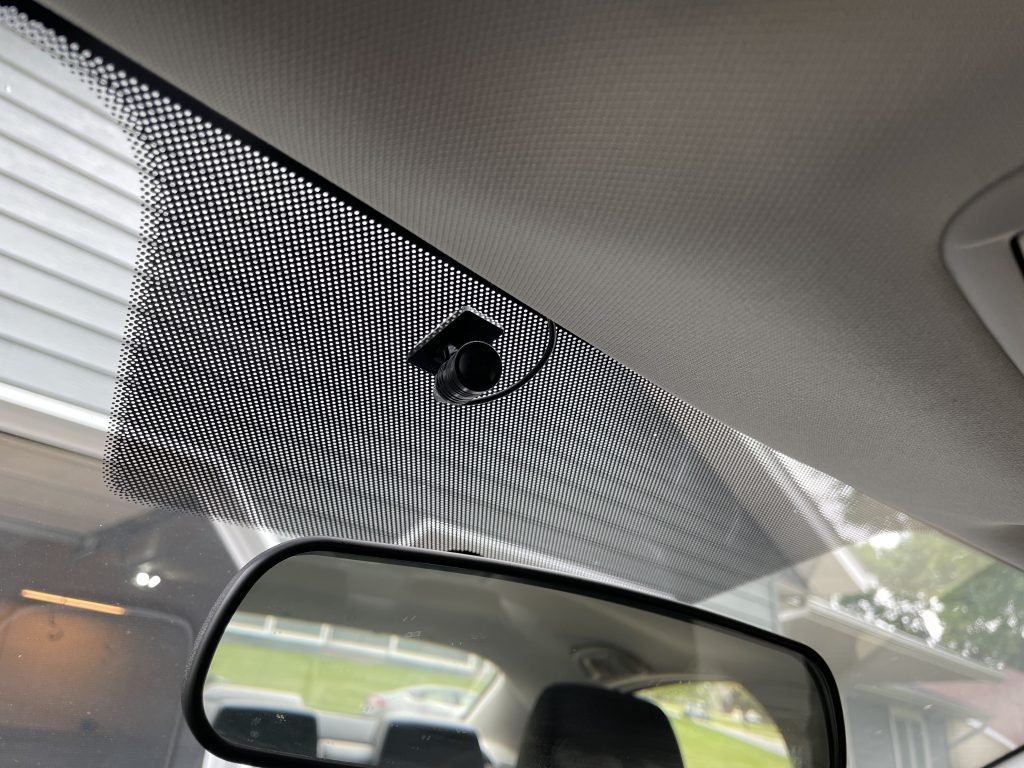
It is basically “impossible” to fully remove the A pillar trim as it is attached to the metal of the car using a strap. This keeps it from flying into your face should the airbag go off. Instead, I released as much of the A pillar trim as I could by pulling it towards me from the top and release all clips that I could and ran the thin microphone cable inside of some black clips I found above the airbag.
After the A pillar the cable was run into the dash by way of the left speaker grill. The grill can be removed by lifting the left edge and releasing all clips along the edge facing you and then hinged up towards the windshield. Last, pull the piece away from the windshield. I routed the cable through an available hole closest to me.
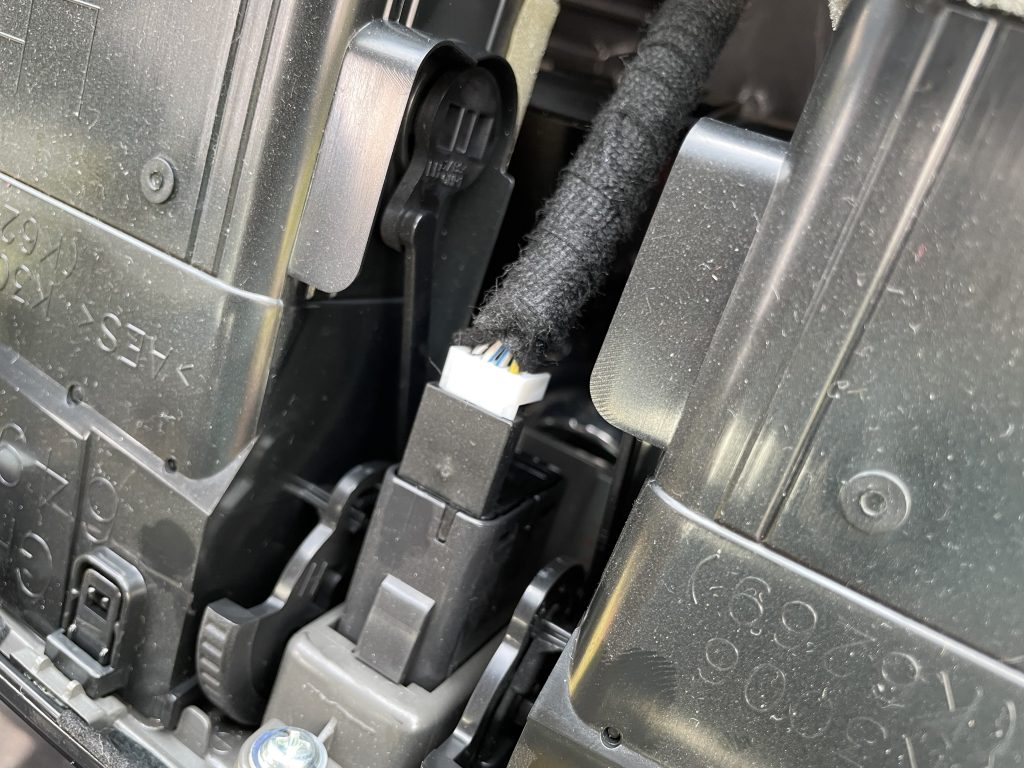
OBDII Connection
For the iDatalink Maestro to fully work it needs to be connected to the vehicle’s CAN bus via the OBDII port. This port is located under the steering wheel to the left next to the hood release.
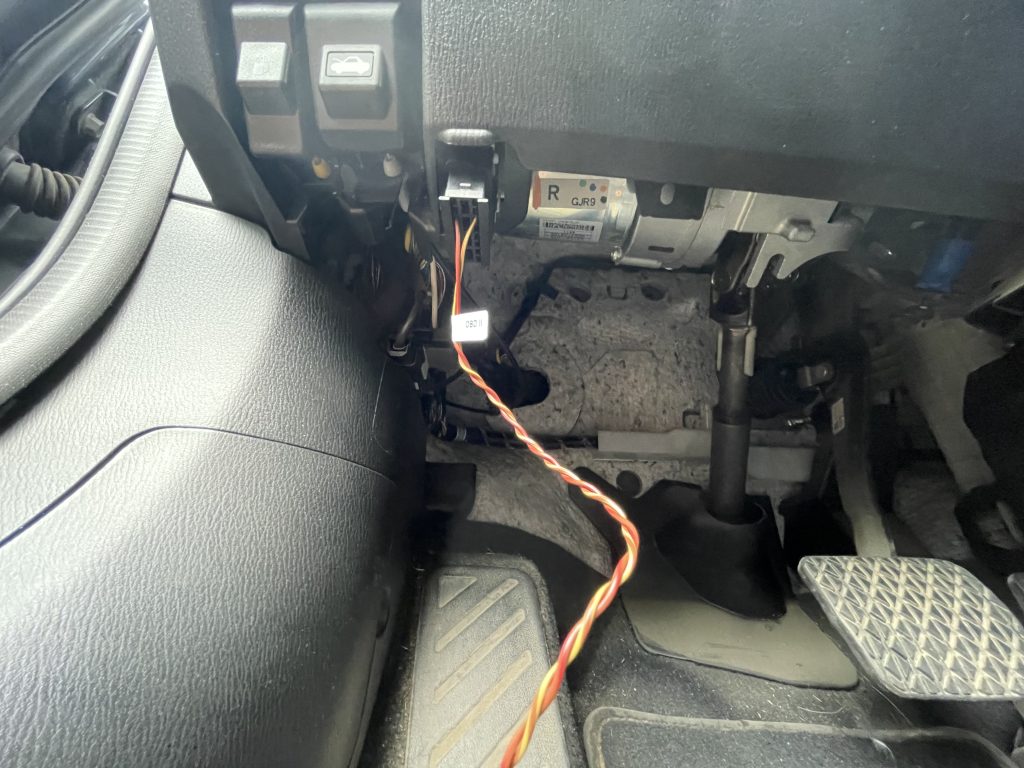
I then routed this cable, as well as the microphone cable, using zip ties along the black cable you can see in the background. This cable routes above the steering column and the brake pedal.
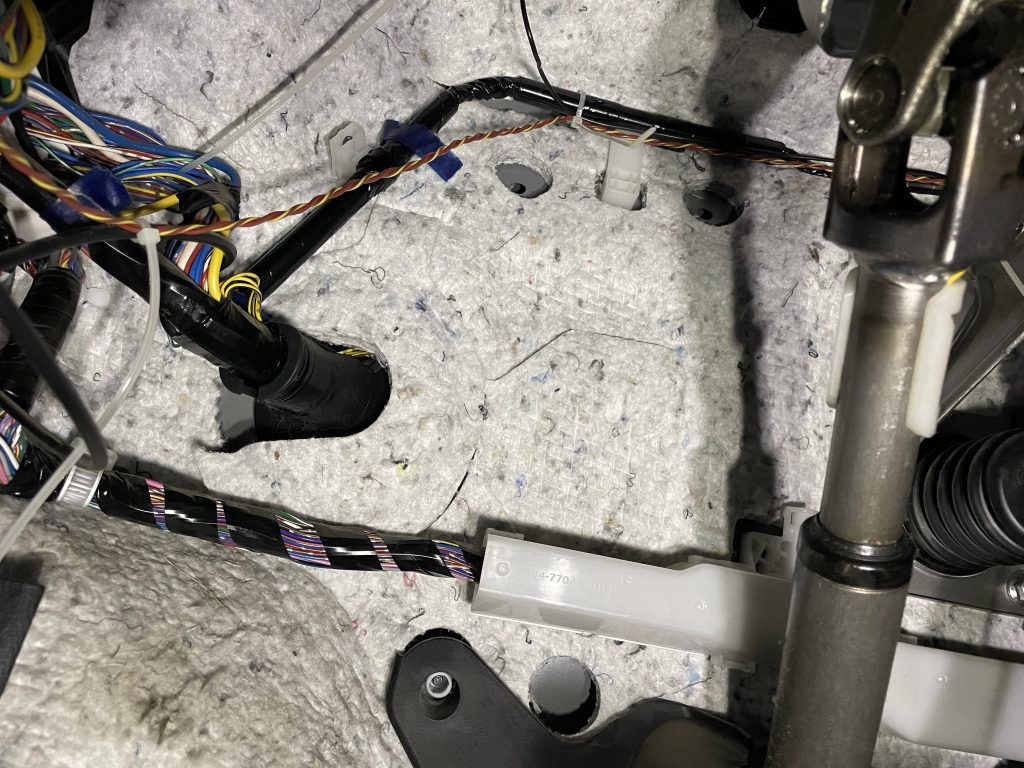
From there it is a clear shot up to the radio. I used a cable snake to assist with pulling the wire.
Once done, everything goes back together in reverse order. Final product look like this:
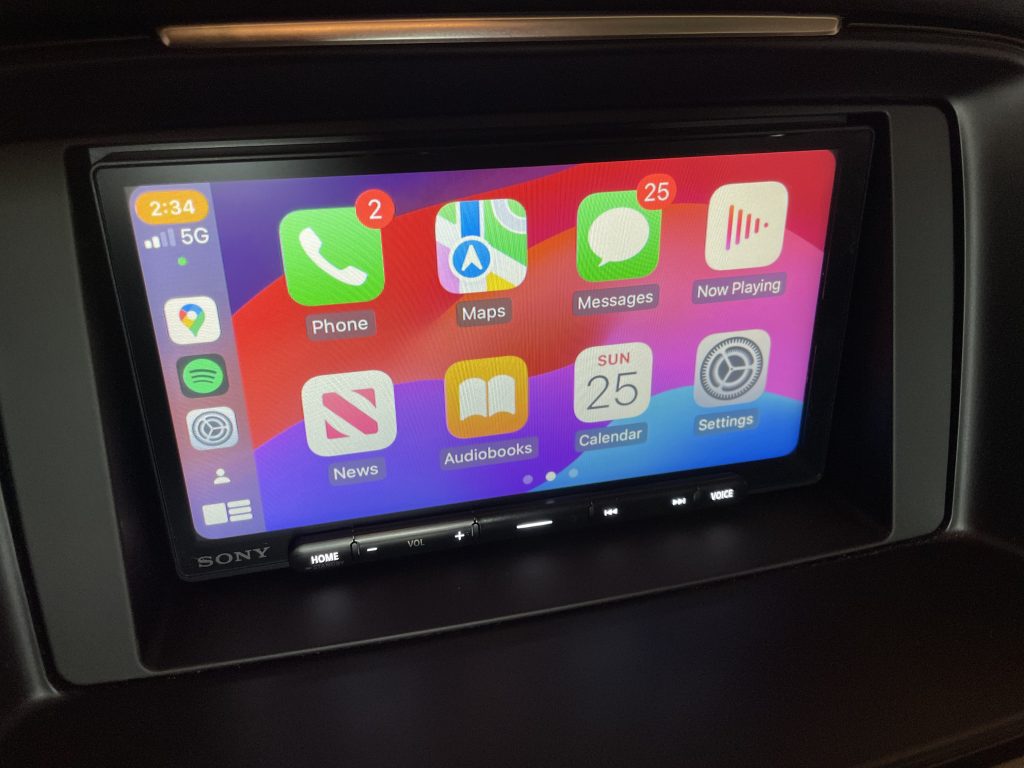
Overall the whole process took about seven hours start to finish with most of the time spent determining how to cleanly integrate this with the rest of the car. I wanted wires hidden, tied down and so on so they were not visible or wouldn’t rattle under the dash. All told, the setup works extremely well and I’m very happy with how everything works.
Disclaimer: This post contains Amazon Affiliate links. If you purchase something from Amazon using a link I provided I will likely receive a commission for that sale. This helps support the site!
Dear mr Rue,
I had one question about the mazda 6 sony headunit upgrade,
with the adapters and everything, were you still able to use the center console buttons (Buttons in the midden at the shift knob) to still work with the headunit.
Thank you in advance.
Kind regards,
Kane Ouwehand
No, the little commander knob no longer works. I am not aware of a system that will keep that on the 2014-2015 era Mazda’s. That said, I never used it and I don’t miss it.
For some reason the obd isn’t working for me
Wow.. great tutorial.. since I purchased the 2014 Mazda 6 and i’m looking for a replacement head unit. The only issue I see here is having a constant physical connection to the OBDII port.. from what I hear (particularity from Youtube Scotty Mechanic) that port wasn’t designed to have something plugged into it consistently
Does this connector only give you power to the port in the console or add the data wires for Carplay / Android Auto???
Car Radio Factory USB Port Cable Wiring Adapter
This gives you a data connection HOWEVER the CarPlay is only wireless. Anyway, you can upload firmware, photos and I believe you can do hardwired Android Auto…but that I cannot confirm.
Thanks for the write up, this will help immensely with my 2014 6. Quick question. If you look at the install options in Crutchfield, it shows your installation (expensive and fully functioning) and a cheap, basic, terrible option as the only two choices. But if you hit the show all options link, it comes to a $59 option that does everything but hook up to the OBD port with the Maestro and the parking brake. I can save close to $200 by not getting it. But are there any gauges/options the Maestro enable that make it worthwhile besides ease of installation? Thanks! Oh and did you know that if you push your gas pedal down really far it will stop, and you think that’s it. BUT push a bit harder, and it will “click” and hit the floor. This is the ZOOM ZOOM passing mode a lot of people don’t know about.
Yes! I did know about the clicky bit in the pedal. It is a bit of fun every once in a while.
For the adapter, at the time I put it all together the maestro seemed to be the best option that allowed me to configure parts of the car that the old deck could do and give me full steering wheel controls. If there is an option that avoids that extra cost, that is awesome.