Flux, or FluxCD, is a “set of continuous and progressive delivery solutions for Kubernetes that are open and extensible” and is my preferred way to do “GitOps” in my Kubernetes clusters. I like Flux because it handles Helm extremely well (I’m a big fan of Helm) and allows me to have a simple fallback if something goes wrong. In this post, I will go through the process of installing flux, k3s that can be used for testing and then creating a Flux project that adopts Flux’s documented monorepo design. I have also published a copy of the work detailed here to Github so you can use as a working starter for your own project.
Continue readingTag: helm
Basic Umami Setup Guide
Some time ago I removed Google Analytics to avoid the tracking that came along with it and it all being tied to Google. I also wasn’t overly concerned about how much traffic my site got. I write here and if it helps someone then great but I’m not out here to play SEO games. Recently, however, I heard of a new self hosted option called Umami that claims to respect user privacy and is GDPR compliant. In this post I will go through how I set it up on the site.
Umami supports both PostgreSQL and MySQL. The installation resource I used, discussed below, defaults to PostgreSQL as the datastore and I opted to stick with that. PostgreSQL is definitely not a strong skill of mine and I struggled to get things running initially. Although I have PostgreSQL installed on a VM already for my Mastodon instance, I had to take some additional steps to get PostreSQL ready for Umami. After some trial and error I was able to get Umami running.
My installation of PostreSQL is done using the official postgres.org resources which you can read about at https://www.postgresql.org. In addition to having PostgreSQL itself installed as a service I also needed to install postgresql15-contrib in order to add pgcrypto support. pgcrypto support wasn’t something I found documented in the Umami setup guide but the software failed to start successfully without it and an additional step detailed below. Below is how I setup my user for Umami with all commands run as the postgres user or in psql. Some info was changed to be very generic, you should change it to suit your environment:
- cli:
createdb umami - psql:
CREATE ROLE umami WITH LOGIN PASSWORD 'password’; - psql:
GRANT ALL PRIVILEGES ON DATABASE umami TO umami; - psql:
\c umamito select the umami database - psql:
CREATE EXTENSION IF NOT EXISTS pgcrypto; - psql:
GRANT ALL PRIVILEGES ON SCHEMA public TO umami;
With the above steps taken care of you can continue on.
Since I am a big fan of using Kubernetes whenever I can, my Umami instance is installed into my k3s based Kubernetes cluster. For the installation of Umami I elected to use a Helm chart by Christian Huth which is available at https://github.com/christianhuth/helm-charts and worked quite well for my purposes. Follow Christian’s directions for adding the helm chart repository and read up on the available options. Below is the helm values I used for installation:
ingress:
  # -- Enable ingress record generation
  enabled: true
  # -- IngressClass that will be be used to implement the Ingress
  className: "nginx"
  annotations:
    cert-manager.io/cluster-issuer: letsencrypt-production
  # -- Additional annotations for the Ingress resource
  hosts:
    - host: umami.dustinrue.com
      paths:
        - path: /
          pathType: ImplementationSpecific
  # -- An array with the tls configuration
  tls:
    - secretName: umami-tls
      hosts:
        - umami.dustinrue.com

umami:
  # -- Disables users, teams, and websites settings page.
  cloudMode: ""
  # -- Disables the login page for the application
  disableLogin: ""
  # -- hostname under which Umami will be reached
  hostname: "0.0.0.0"

postgresql:
  # -- enable PostgreSQL™ subchart from Bitnami
  enabled: false

externalDatabase:
  type: postgresql

database:
  # -- Key in the existing secret containing the database url
  databaseUrlKey: "database-url"
  # -- use an existing secret containing the database url. If none given, we will generate the database url by using the other values. The password for the database has to be set using `.Values.postgresql.auth.password`, `.Values.mysql.auth.password` or `.Values.externalDatabase.auth.password`.
  existingSecret: "umami-database-url"
The notable changes I made from the default values provided is I enabled ingress and set my hostname for it as required. I also set cloudMode and diableLogin to empty so that these items were not disabled. Of particular note, leaving hostname at the default value is the correct option as setting it to my hostname broke the startup process. Next, I disabled the postgresql option. This disables the installation of PostgreSQL as a dependent chart since I already had PostreSQL running.
The last section is how I defined my database connection information. To do this, I created a secret using kubectl create secret generic umami-database-url -n umami and then edited the secret with kubectl edit secret umami-database-url -n umami. In the secret, I added a data section with base64 encoded string for “postgresql://umami:[email protected]:5432/umami”. The secret looks like this:
apiVersion: v1
data:
  database-url: cG9zdGdyZXNxbDovL3VtYW1pOnBhc3N3b3JkQDEwLjAuMC4xOjU0MzIvdW1hbWk=
kind: Secret
metadata:
  name: umami-database-url
  namespace: umami
type: Opaque
Umami was then installed into my cluster using helm install -f umami-values.yaml -n umami umami christianhuth/umami which brought it up. After a bit of effort on the part of Umami to initialize the database I was ready to login using the default username/password of admin/umami.
I setup a new site in Umami per the official directions and grabbed some information that is required for site setup from the tracking code page.
Configuring WordPress
Configuring WordPress to send data to Umami was very simple. I added the integrate-umami plugin to my installation, activated the plugin and then went to the settings page to input the information I grabbed earlier. My settings page looks like this:

With this information saved, the tracking code is now inserted into all pages of the site and data is sent to Umami.
Setting up Umami was a bit cumbersome for me initially but that was mostly because I am unfamiliar with PostgreSQL in general and the inline documentation for the Helm chart is not very clear. After some trial and error I was able to get my installation working and I am now able to track at least some metrics for this site. In fact, Umami allows me to share a public URL for others to use. The stats for this site is available at https://umami.dustinrue.com/share/GadqqMiFCU8cSC7U/Blog.
TIL: colima + k3s will use local Docker images
When you create a k3s cluster using colima it will default to using Docker for the runtime. This means that any Docker image you build or pull will be available to k3s. This greatly simplifies testing locally built images being referenced by Helm charts or Kustomize (or whatever you are using).
This is not a feature unique to colima, but rather a feature of k3s if it is told to use the Docker runtime. You can read more at https://docs.k3s.io/advanced#using-docker-as-the-container-runtime.
TIL: This plugin for helm exists to fix left behind resources
If you have an older Kubernetes cluster with older Helm based software installs and you aren’t paying attention, it can be easy to leave some resources in a state that are impossible to update or remove. This is because of APIs that have been deprecated and then removed. While facing this issue today, I found this Helm plugin exists which can help resolve the problem – https://github.com/helm/helm-mapkubeapis
TIL: a null storageClass is not the same as no storageClass
Long title but a relatively quick TIL. In a helm chart, when specifying a storageClass in your templates, it is important that if the user does not set a storageClass that you do not output storageClass in your template for a persistent volume. That is say that this:
apiVersion: v1
kind: PersistentVolumeClaim
metadata:
  name: volume-claim
spec:
  accessModes:
    - ReadWriteOnce
  storageClassName: ""
  resources:
    requests:
      storage: 5Gi
Is not equivalent to this:
apiVersion: v1
kind: PersistentVolumeClaim
metadata:
  name: volume-claim
spec:
  accessModes:
    - ReadWriteOnce
  resources:
    requests:
      storage: 5Gi
When installed the first time, both will result in Kubernetes selecting your default storage class. When this happens, your resource is actually updated to reflect the selected storageClass in the API. When you apply the same file again during an upgrade, an empty storageClassName will be seen as a change from the default storage to “”, which is not what you want. Instead, you should not send storageClassName at all if the user did not specify one.
Colima, Kubernetes and Helm Chart Testing
If you find yourself in the business of creating and testing Helm charts, or you simply want to try one out, then Colima with its built in Kubernetes functionality may be for you. In this post I am going to walk through how to quickly get going with Colima’s Kubernetes integration and an ingress controller for basic Helm chart testing.
I assume you already have Colima and Helm installed and are familiar with the tools and Kubernetes itself. If this is you then continue reading!
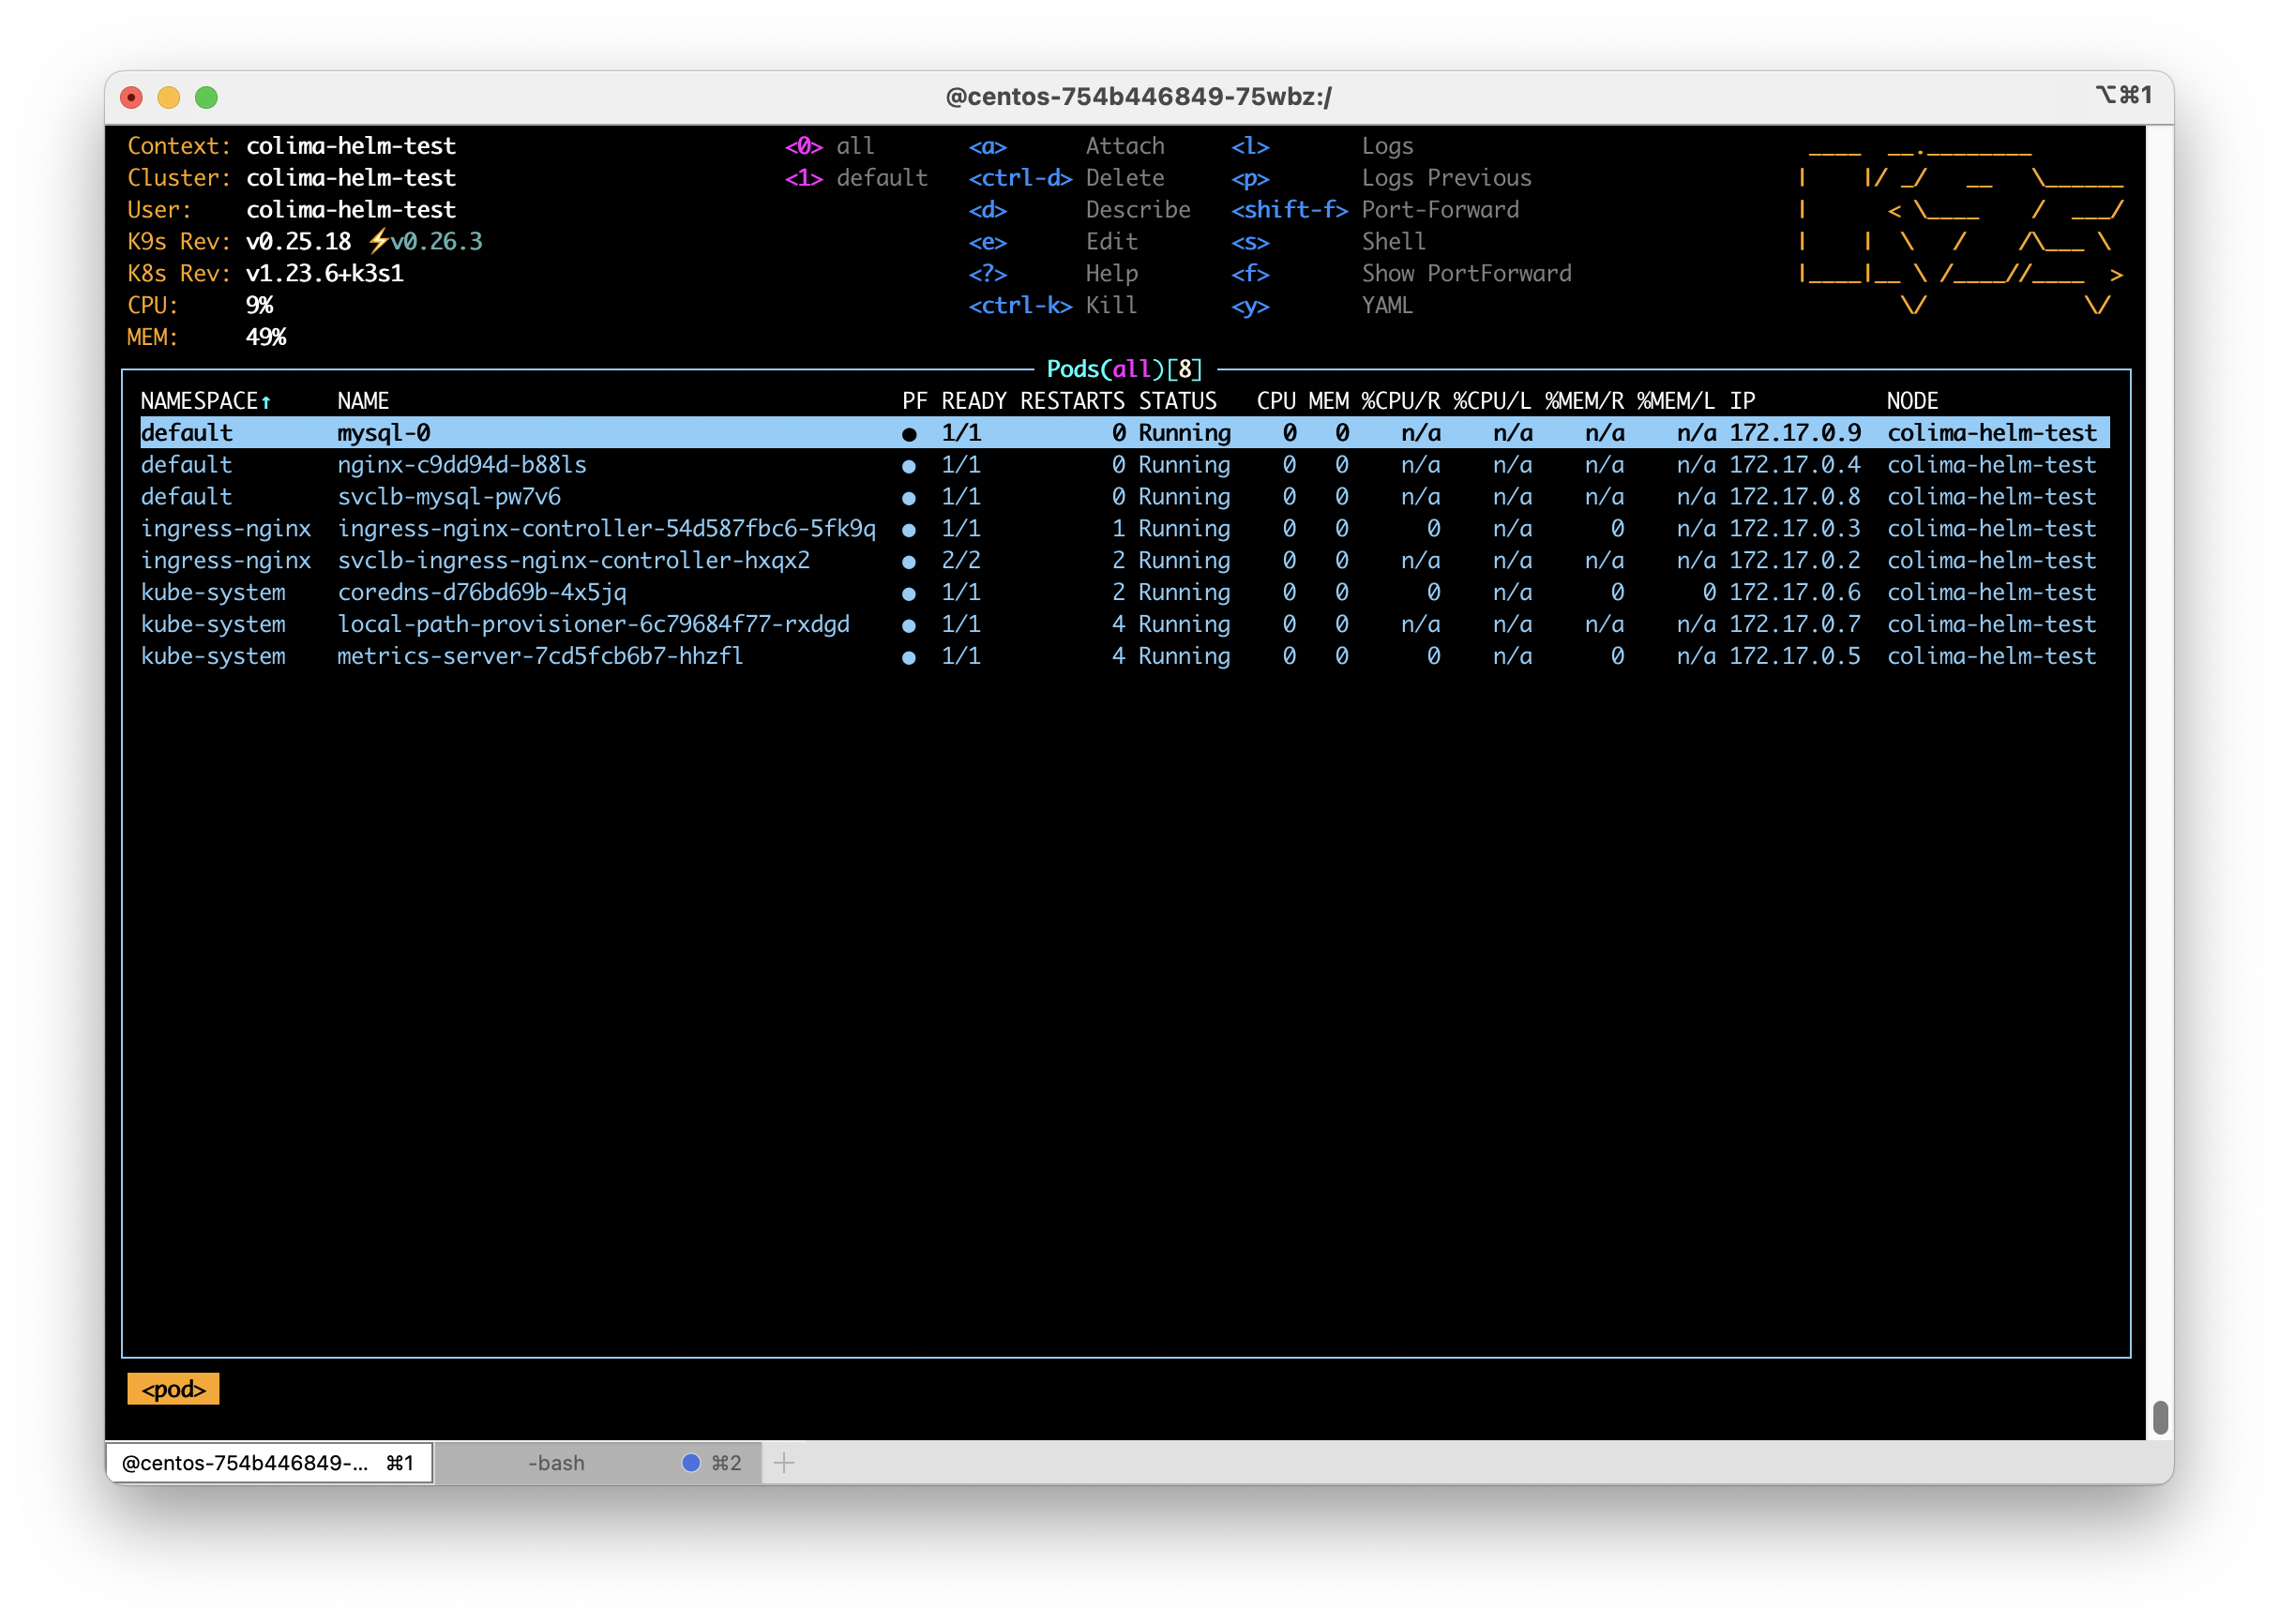
For this post I am using Colima 0.4.4, k3s v1.23.6+k3s1, helm 3.9.3 and ingress-nginx 4.2.0. I often find myself creating Helm charts and I want to test my modifications locally before committing my changes. Once in a while I also want to quickly test an available helm chart without messing up an existing Kubernetes installation. In these cases I will create a Colima instance with Kubernetes enabled and install my preferred ingress controller, nginx-ingress.
To get started, ensure that no other colima instances are running using colima list followed by a colima stop <name of profile> for any running instances. You should also ensure that there are no other services running on your system that are opening ports, especially 80, 443 and 3306. This helps ensure your test instance doesn’t interfere with any existing colima instances or other services. Then, issue colima start helm-test --kubernetes -m4 to start a colima instance with 4GB memory and Kubernetes enabled. Once colima has finished creating the instance you can add the ingress-nginx helm repository if you don’t already have it with helm repo add ingress-nginx https://kubernetes.github.io/ingress-nginx followed by helm repo update. You can now install ingress-nginx using helm install -n ingress-nginx --create-namespace --set controller.ingressClassResource.default=true ingress-nginx ingress-nginx/ingress-nginx. This command will install ingress-nginx and set it as the default ingress class for the cluster. At this point you have basic installation of Kubernetes with an ingress controller which will allow you to test most Helm charts.
As a test, you could now create a brand new helm chart with helm create nginx. Edit the resulting values.yaml file and enable ingress then install the chart into your new test cluster. You should see that it is able to download and install the default nginx image and create the proper ingress rule automatically. For my test I used helm install -n default nginx .. Before long you should see this as an ingress record:
kubectl get ingress nginx
NAME    CLASS   HOSTS                 ADDRESS        PORTS   AGE
nginx   nginx   chart-example.local   192.168.5.15   80      54s
Despite what the Address column says, the chart is now available at 127.0.0.1. Create a hosts entry and you will be able to get the default nginx page.
Of course, you can use or test other charts too. Here I will install bitnami’s MySQL chart with the following settings in a yaml file
## MySQL Authentication parameters
##
auth:
  ## MySQL root password
  ## ref: https://github.com/bitnami/bitnami-docker-mysql#setting-the-root-password-on-first-run
  ##
  rootPassword: "password"
  ## MySQL custom user and database
  ## ref: https://github.com/bitnami/bitnami-docker-mysql/blob/master/README.md#creating-a-database-on-first-run
  ## ref: https://github.com/bitnami/bitnami-docker-mysql/blob/master/README.md#creating-a-database-user-on-first-run
  ##
  database: "blog"
  username: "wordpress"
  password: "password"
##
primary:
  persistence:
    ## If true, use a Persistent Volume Claim, If false, use emptyDir
    ##
    enabled: false
  service:
    ## @param primary.service.type MySQL Primary K8s service type
    ##
    type: LoadBalancer
##
secondary:
  ## Number of MySQL Secondary replicas to deploy
  ##
  replicaCount: 0
I install the bitnami repo using helm repo add https://charts.bitnami.com/bitnami followed by helm repo update to ensure I have the latest info. To install a copy of MySQL with my settings file I use helm install -f mysql.yaml mysql bitnami/mysql. After a short while MySQL will be installed and also available on localhost through k3s’ built in LoadBalancer system. Notice in the mysql.yml file I specified I asked the chart to install the primary instance of MySQL with a LoadBalancer based service instead of the default ClusterIP.
When you are finished testing a simple colima delete helm-test will remove your testing environment and free up resources.
Hopefully you see now how quickly and easily you can get going with Colima and its Kubernetes integration to get a local Kubernetes cluster up and running for testing. The Kubernetes integration Colima uses is very capable and well suited to learning and testing. Enjoy!
What I’m Building
Chris Wiegman asks, what are you building? I thought this would be a fun question to answer today. Like a lot of people I have a number of things in flight but I’ll try to limit myself to just a few them.
PiPlex
I have run Plex in my house for a few years to serve up my music collection. In 2021 I also started paying for Plex Pass which gives me additional features. One of my favorite features or add-ons is PlexAmp which gives me a similar to Spotify like experience but for music I own.
Although I’m very happy with the Plex server I have I wondered if it would be feasible to run Plex on a Raspberry Pi. I also wanted to learn how Pi OS images were generated using pi-gen. With that in mind I set out to create a Pi OS image that preinstalls Plex along with some additional tools like Samba to make it easy to get up and running with a Plex server. I named the project PiPlex. I don’t necessarily plan on replacing my existing Plex server with a Pi based solution but the project did serve its intended goal. I learned a bit about how Pi OS images are created and I discovered that it is quite possible to create a Pi based Plex server.
ProxySQL Helm Chart
One of the most exciting things I’ve learned in the past two years or so is Kubernetes. While it is complex it is also good answer to some equally complex challenges in hosting and scaling some apps. My preferred way of managing apps on Kubernetes is Helm.
One app I want install and manage is ProxySQL. I couldn’t find a good Helm chart to get this done so I wrote one and it is available at https://github.com/dustinrue/proxysql-kubernetes. To make this Helm chart I first had to take the existing ProxySQL Docker image and rebuild it so it was built for x86_64 as well as arm64. Next I created the Helm chart so that it installs ProxySQL as a cluster and does the initial configuration.
Site Hosting
I’ve run my blog on WordPress since 2008 and the site has been hosted on Digital Ocean since 2013. During most of that time I have also used Cloudflare as the CDN. Through the years I have swapped the droplets (VMs) that host the site, changed the operating system and expanded the number of servers from one to two in order to support some additional software. The last OS change was done about three years ago and was done to swap from Ubuntu to CentOS 7.
CentOS 7 has served me well but it is time to upgrade it to a more recent release. With the CentOS 8 controversy last year I’ve decided to give one of the new forks a try. Digital Ocean offers Rocky Linux 8 and my plan is to replace the two instances I am currently running with a single instance running Rocky Linux. I no longer have a need for two separate servers and if I can get away with hosting the site on a single instance I will. Back in 2000 it was easy to run a full LAMP setup (and more) on 1GB of memory but it’s much more of a challenge today. That said, I plan to use a single $5 instance with 1 vCPU and 1GB memory to run a LEMP stack.
Cloudflare
Speaking of Cloudflare, did you know that Cloudflare does not cache anything it deems “dynamic”? PHP based apps are considered dynamic content and HTML output by software like WordPress is not cached. To counter this, I created some page rules a few years ago that forces Cloudflare to cache pages, but not the admin area. Combined with the Cloudflare plug-in this solution has worked well enough.
In the past year, however, Cloudflare introduced their automatic platform optimization option that targets WordPress. This feature enables the perfect mix of default rules (without using your limited set of rules) for caching a WordPress site properly while breaking the cache when you are signed in. This is also by far the cheapest and most worry free way to get the perfect caching setup for WordPress and I highly recommend using the feature. It works so well I went ahead and enabled it for this site.
Multi-Architecture Docker Images
Ever since getting a Raspberry Pi 4, and when rumors of an Arm powered Mac were swirling, I’ve been interested in creating multi-architecture Docker images. I started with a number of images I use at work so they are available for both x86_64 and arm64. In the coming weeks I’d like to expand a bit on how to build multi-architecture images and how to replace Docker Desktop with a free alternative.
Finishing Up
This is just a few of the things I’m working on. Hopefully in a future post I can discuss some of the other stuff I’m up to. What are you building?
Rundeck on Kubernetes
Updated Feb 2023 to remove the use of the incubator chart which has gone dead and replace it with something else. It also updates information about the persistent storage CSI I am using.
In this post I’m going to review how I installed Rundeck on Kubernetes and then configured a node source. I’ll cover the installation of Rundeck using an available helm chart, configuration of persistent storage, ingress, node definitions and key storage. In a later post I’ll discuss how I setup a backup job to perform a backup of the server hosting this site.
For this to work you must have a Kubernetes cluster that allows for ingress and persistent storage. In my cluster I am using nginx-ingress-controller for ingress and democratic-csi. The democratic-csi-iscsi is connected to my TrueNAS Core server and creates iSCSI based storage volumes. It is set as my default storage class. You will also need helm 3 installed.
With the prerequisites out of the way we can get started. First, add the helm chart repository by following the directions on located at https://github.com/EugenMayer/helm-charts/tree/main/charts/rundeck. Once added, perform the following to get the values file so we can edit it:
helm show values eugenmayer/rundeck > rundeck.yamlContinue reading