If you are in the market for a solar powered mesh radio device, maybe for Meshtastic, and like me you just want to get up and running with something that is assured to work, then you may want to consider a base station kit from https://mesh-lab.com/products/solar-base-station-kit. Made by same person behind Yeti Wurks, this base station kit has almost everything you need to get a solar powered mesh radio node up and running quickly. I say “almost everything” because, while the solar charger half of the kit includes 6 18650 cells, ideally you would insert at least one 18650 battery into the case as well. The kit was recommended to me by a local mesh group (mspmesh.org). I paid full price for the kit and this is not a sponsored post in any way. What follows is an overview of what you receive in the kit and how to use it.
What is included
The box I received contained everything described on the product listing. This includes:
- RAK4631 radio in a weather resistant case.
- Solar charger with 6 18650 cells preinstalled.
- Antenna.
- Mounting bracket that you selected at order time.
- Mounting hardware for the solar panel and more.
- Directions.
- Stickers!
Below is a look inside the weather resistant case.
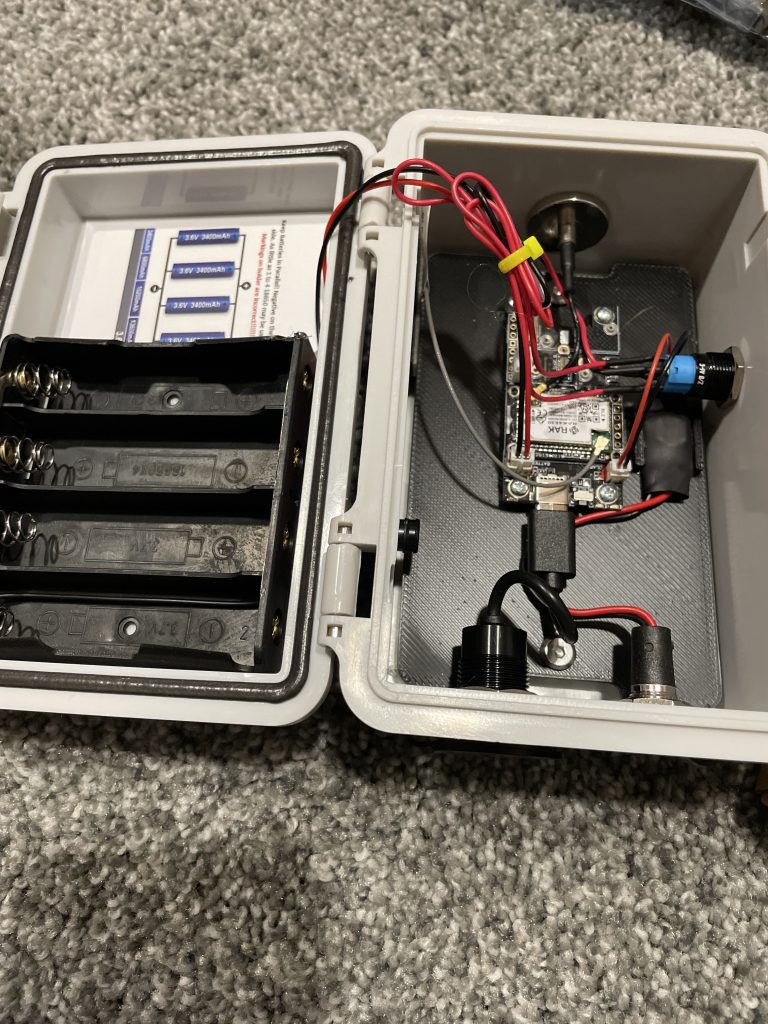
In the case is of course the RAK4631 radio and an additional 18650 cell holder capable of holding up to four additional cells. Pay special attention to the note about battery orientation as the holder is designed for parallel connections rather than serial! Additionally, when inserting the cells pay special attention that the positive side of the cell makes a connection with the contact. In my sample, the cells fit very tightly and it may not make a connection if you don’t slide it against the positive terminal.
Along the edge of the case starting from the top and working clockwise is an N-type antenna connector, a switch to connect/disconnect the four cell battery back from the RAK4631 charge controller, a power connection and USB-C port. Difficult to see in the photo on the left side of the case is a weather resistant vent to allow for pressure equalization.
Also included in the kit is this solar charger, which I’m linking to directly as it provides better photos and description – https://mesh-lab.com/products/off-grid-solar-charger-5-5-watt-5vdc-2-5a. This unit is available separately and includes 6 18650 cells. Also included in the kit is all of the mounting hardware which works perfectly with the 3d printed mount that you selected at order time. The solar panel seems surprisingly efficient and will charge the cells, albeit slowly, even in overcast conditions. Combined with a power efficient RAK4631, this solar panel and battery pack will keep it going for many days. While the panel and battery pack are great, the mounting post included with the panel seems a bit on the flimsy side and I don’t know how it will hold up to the elements over time. For the price, however, I can’t expect much more.
At order time I selected the larger 2″ PVC pipe mounting option. This integrated mount, also available in the store separately, is a 3d printed piece designed to be attached a 2″ PVC pipe using the included worm gear clamps. This all worked very well for me and I had no issues. Again, all screws, clamps and such were included with the kit. The solar panel attaches to the mount as does the weather resistant case. Then the whole unit is attached to whatever pole you have.
Mini Review
I have had the kit for all of a few days as of this writing but I am able to say that everything that is included with the kit works very well together. The RAK4631 radio included in the kit is known for being reliable and power efficient, perfect for solar applications.
If you are looking for an easy to assemble and ready to go device for joining a mesh network, I highly recommend you consider this kit by mesh-lab.com. If you don’t need a solar powered kit there are other options available as well. My thanks to the folks on the mspmesh.org Discord for helping me find a ready made kit. Now that I have something working and in the wild I will likely build additional nodes on my own and I’ll post about my experience here.
Earlier I mentioned that the kit recommends you insert up to four additional 18650 cells into the weather resistant case. This helps ensure proper operation of the RAK4631. I didn’t have any additional cells so, from the recommendation of others, I simply stole one cell from the solar panel. Doing so as easy as opening the back of the solar panel case by removing the rubber covers over the screws, undoing the screws and removing one cell. Be sure to understand how to orient 18650 cells when inserting them into the weather resistant case!