CentOS 7 is now in full maintenance mode until 2024. This means it won’t get any updates except security fixes and some mission critical bugs. In addition to being in full maintenance mode, the OS is simply beginning to show its age. It’s still a great OS, just that a lot of packages are very far behind “state of the art.” Packages like git, bash and even the kernel are missing some features that I prefer to have available. With that in mind, and an abundance of time on a Saturday, I decided to upgrade the underlying operating system hosting the site.

The choice of what operating system was not as simple as it was just a year ago. In the past I would have simply spun up the next release of CentOS, which is based off of Red Hat Enterprise Linux, and configured it for whatever duty it was to perform. However, Red Hat had a different idea and decided to make CentOS 8 a rolling release that RHEL is based off of, rather than CentOS being a rebadged clone of RHEL. The history of CentOS is a surprisingly complex and you can read about it at https://en.wikipedia.org/wiki/CentOS.

Since the change, at least a few options are now available to give people, like me, access to a Linux distribution they know and can trust. Among those, Rocky Linux appears to be getting enough traction for me to adopt it as my next Linux distribution. My needs for Linux are pretty basic and more than anything I just want to know that I can install updates without issue and keep the system going for a number of years before I have to worry about it. Rocky Linux gives me that just like CentOS did before. As of this writing, the web server hosting this site is now running Rocky Linux 8 and I’ll upgrade the database server at a later time. So far it has proven to be identical to RHEL and very familiar to anyone who has used RHEL/CentOS in the past.

If you are in the business of creating software, no matter your role, then you owe it to yourself to take a consider David Farley’s Modern Software Engineering: Doing What Works to Build Better Software Faster. I’m not in any way affiliated with the offer and I’m not getting any sort of kickback on that link. I just think it’s a good book.

This book, along with what I consider a sort of companion to it Accelerate: The Science of Lean Software and DevOps: Building and Scaling High Performing Technology Organizations will likely get you to rethink how you are approaching software development. The Accelerate book provides information backed by data that shows that the processes defined in Modern Software Engineering do in fact work to improve the pace of software development, the quality of the software and improvements in developer/employee satisfaction.

The overarching message to take away from the books is that being fast is the key. The quicker you can write and release code into production so that you can then get feedback from it the better your code quality will ultimately be. Care should be taken to remove anything that prevents developers from getting their code into production quickly and with minimal roadblocks. This doesn’t mean you are careless, however! Putting a heavy emphasis on testing, the books paint a picture of the ideal system where tests are written first and then code to satisfy the tests. This process helps ensure that your code is divided up into parts that can be tested easily which will, in essence, indirectly force you to write better, more readable and more easily understood code. These tests then have the additional benefit of allowing developers to know that the changes they made either satisfy requirements or at least didn’t break existing functionality. The difference between “I think it works” and “I know it works” pays huge dividends in developer and team satisfaction. It also provides long term benefits as people are rotated out of teams because it codifies intended behavior. Well written and described tests, when they fail, will tell the developer what the intended outcome of a function is.

This may feel counter-intuitive but the Accelerate book does a great job of showing, with data, that these things are in fact true in most if not all cases. While reading the book there were a number of times where I stopped to consider how I was approaching things and realized some of the assumptions I had made were incorrect and need to be adjusted. Much of what Farley describes sounds difficult to implement and indeed everything he describes does require a certain amount of discipline amongst the team to ensure the work they do enforces the defined ideals.

If you’re looking for a good read that will make you think about how you are approaching software development, regardless of your role in it, I highly recommend Modern Software Engineering as well as Accelerate book.

You sign into Facebook and you see some new friend notifications from people you know you are already friends with. You browse your feed and you see notes from the same people saying “don’t accept the friend request from me my account was hacked!” What’s actually happening here? Was their account hacked in the traditional sense? Why would someone do this? How can I avoid this happening to me?

To get into this we must first properly define what is happening in these cases. What a lot of people describe as “being hacked” isn’t quite right. Being hacked means someone actually broke into your account and you have now lost control of it. This would happen because you had a weak password on your account and you’re not using two factor authentication. I’ll discuss what this means further down. Most of the time what you’re seeing is known as “account cloning” where an attacker has take the publicly available information on your account and create a replica Facebook account and then try getting people to add them as their friend. You can read more about account cloning at https://connections.oasisnet.org/facebook-account-cloning-scam-what-to-do-when-you-get-a-friend-request-from-a-friend/.

Securing your account password

Ok, with some small clarifications out of the way let’s talk about what you can do to help prevent both types of attacks. Let’s start with preventing people from taking over account by guessing your password.

An important first step is to have a strong password. Passwords that contain symbols, differences in capitalization and numbers are stronger than those that don’t. You should avoid using common names and words as these are easily guessed using robotic tools that just continuously try combinations of words until it finds one that works. Once this happens, an attacker can easily take over an account and prevent you from ever getting it back. So, the first tip is to have a strong password that you don’t use anywhere else. You can change your password on Facebook at https://www.facebook.com/settings?tab=security by visiting the page and then clicking Edit for your password. What I find helps a lot is using the built in password saving feature of my browser so that I have a single password to unlock my browser which can then fill in passwords for the sites I visit.

The second tip that is equally, if not more, important is to use two factor authentication. This way, even if an attacker does guess your password they will, hopefully, not have access to your second factor of authentication which will typically be your phone. You can configure two factor authentication at https://www.facebook.com/security/2fac/settings. For simplicity I recommend having Facebook text a code to your phone number that you input into Facebook when required. For advanced users who are more comfortable with or already have an authentication app (like Google Authenticator) then using that is an even stronger choice.

Protecting yourself from account cloning

From the article (you read at least some of it right?) we know that attackers do this because they want to prey on your trust of family and friends to, usually, scam you out of money. It’s important to understand the difference between having your account taken over and your account simply being cloned.

You may not be aware of this but the default settings of Facebook allow anyone to see at least some information about you even if they are not friends with you or even signed into Facebook. Depending on how you configure your account security people can see your profile photo, background photo, some photos and your friends list. All of this is more than enough to allow an attacker to download a copy of those items and then create an account that looks just like it.

Below is what you can do to limit this type of attack. I used the website on my computer to set these settings. Many of these settings are probably available on the phone app as well but you’re on your own.

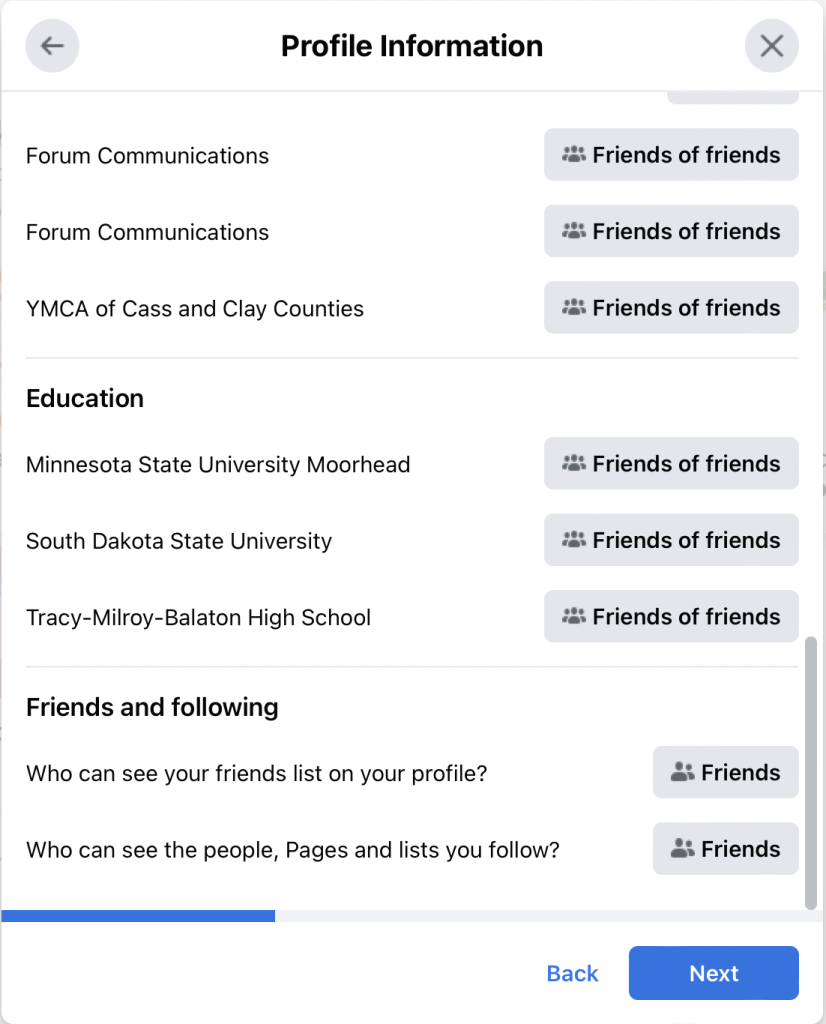
First, review your privacy settings which is located at https://www.facebook.com/privacy/checkup?source=settings. Click on “Who can see what you share” and then click continue. Scroll through the list and set each one so that it is something other than “Public.” Note that the trade off to setting these values as not public will make it harder for people to find you (even people who you might want to find you). Continue through this page, setting options as you desire.

Limiting these values go a long ways towards preventing people from getting enough information about you and creating a convincing clone of your account.

If you want to control who can post on your timeline, who can tag you and more visit https://www.facebook.com/settings?tab=timeline.

If you want to limit what people can do with your Public Posts visit https://www.facebook.com/settings?tab=followers.

The more options you set to “friends” or “friends of friends” the better.

One last thing about privacy

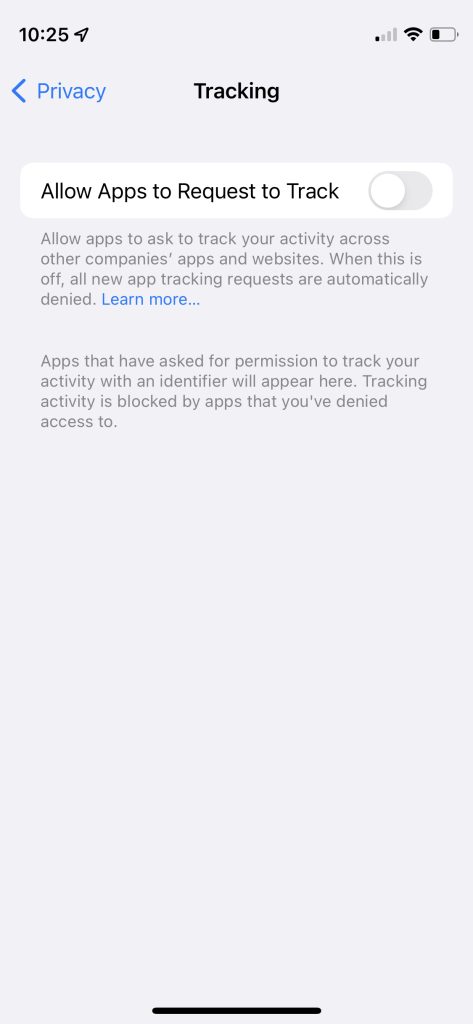
There is a saying that if a product does not charge then you are the product. Facebook is a tool for gathering your info and sharing it with advertisers so they can target you. Despite this, Facebook offers a decent number of controls for your privacy that you can leverage and I recommend you do that. This limits both their ability to track but also prevents account cloning. If you are an iPhone user with a newer phone (one that runs the latest versions of iOS) and use the Facebook app (or even if you don’t) I recommend visiting the settings of your phone and find Privacy. Tap this option. Find “Tracking”. On this screen you will find an option called “Allow Apps to Request to Track.” Ensure this option is disabled, like this:

These are just some of the steps you can take to help secure your account and reduce the amount of tracking of your information. There is a lot more you can do and if you’re interested then I recommend doing some searches on the web about ensuring Facebook and advertising privacy on your devices.

Jeff Geerling has been on fire the past year doing numerous Pi based projects and posting about them on his YouTube channel and blog. He was recently given the opportunity to take the next TuringPi platform, called Turing Pi 2, for a spin and post his thoughts. This new board takes the original Turing Pi and makes it a whole lot more interesting and is something I’m seriously thinking about getting to setup in my own home lab. The idea of a multi-node, low power Arm based cluster that lives on a mini ITX board is just too appealing to ignore.

The board is appealing to me because it provides just enough of everything you need to build a reasonably complete and functional Kubernetes system that is large enough to learn and demonstrate a lot of what Kubernetes has to offer. In a future post, I hope to detail a k3s based Kubernetes cluster configuration that provides enough functionality to mimic what you might build on larger platforms, like say an actual cloud provider like Digital Ocean or AWS.

Anyway, do yourself a favor and go checkout Jeff’s coverage of the Turing Pi 2 which can be found at https://www.jeffgeerling.com/blog/2021/turing-pi-2-4-raspberry-pi-nodes-on-mini-itx-board.

Sometimes you need to access Docker on a remote machine. The reasons vary, you just want to manage what is running on a remote system or maybe you want to build for a different architecture. One of the ways that Docker allows for remote access is using ssh. Using ssh is a convenient and secure way to access Docker on a remote machine. If you can ssh to a remote machine using key based authentication then you can access Docker (provided you have your user setup properly). To set this up read about it at https://docs.docker.com/engine/security/protect-access/.

In a previous post, I went over using remote systems to build multi-architecture images using native builders. This post is similar but doesn’t use k3s. Instead, we’ll leverage Docker’s built on context system to add multiple Docker endpoints that we can tie together to create a solution. In fact, for this I am going to use only remote Docker instances from my Mac to build an example image. I assume that you already have Docker installed on your system(s) so I won’t go through that part.

Like in the previous post, I will use the project located at https://github.com/dustinrue/buildx-example as the example project. As a quick note, I have both a Raspberry Pi4 running the 64bit version of PiOS as well as an Intel based system available to me on my local network. I will use both of them to build a very basic multi-architecture Docker image. Multi-architecture Docker images are very useful if you need to target both x86 and Arm based systems, like the Raspberry PI or AWS’s Graviton2 platform.

To get started, I create my first context to add the Intel based system. The command to create a new Docker context that connects to my Intel system looks like this:

docker context create amd64 --docker host=ssh://[email protected]

This creates a context called amd64. I can then use this context by issuing docker context use amd64. After that, all Docker commands I run will be run in that context, on that remote machine. Next, I add my pi4 with a similar command:

docker context create arm64 --docker host=ssh://[email protected]

We now have our two contexts. Next we can create a buildx builder that ties the two together so that we can target it for our multi-arch build. I use these commands to create the builder (note the optional –platform value which will mark that builder for the listed platforms):

docker buildx create --name multiarch-builder amd64 [--platform linux/amd64]
docker buildx create --name multiarch-builder --append arm64 [--platform linux/arm64]

We now have a single builder named multiarch-builder that we can use to build our image. When we ask buildx to build a multi-arch image, it will use the platform that most closely matches the target architecture to do the build. This ensures you get the quickest build times possible.

With the example project cloned, we now build an image that will work for 64bit arm, 32bit arm and 64bit x86 systems with this command:

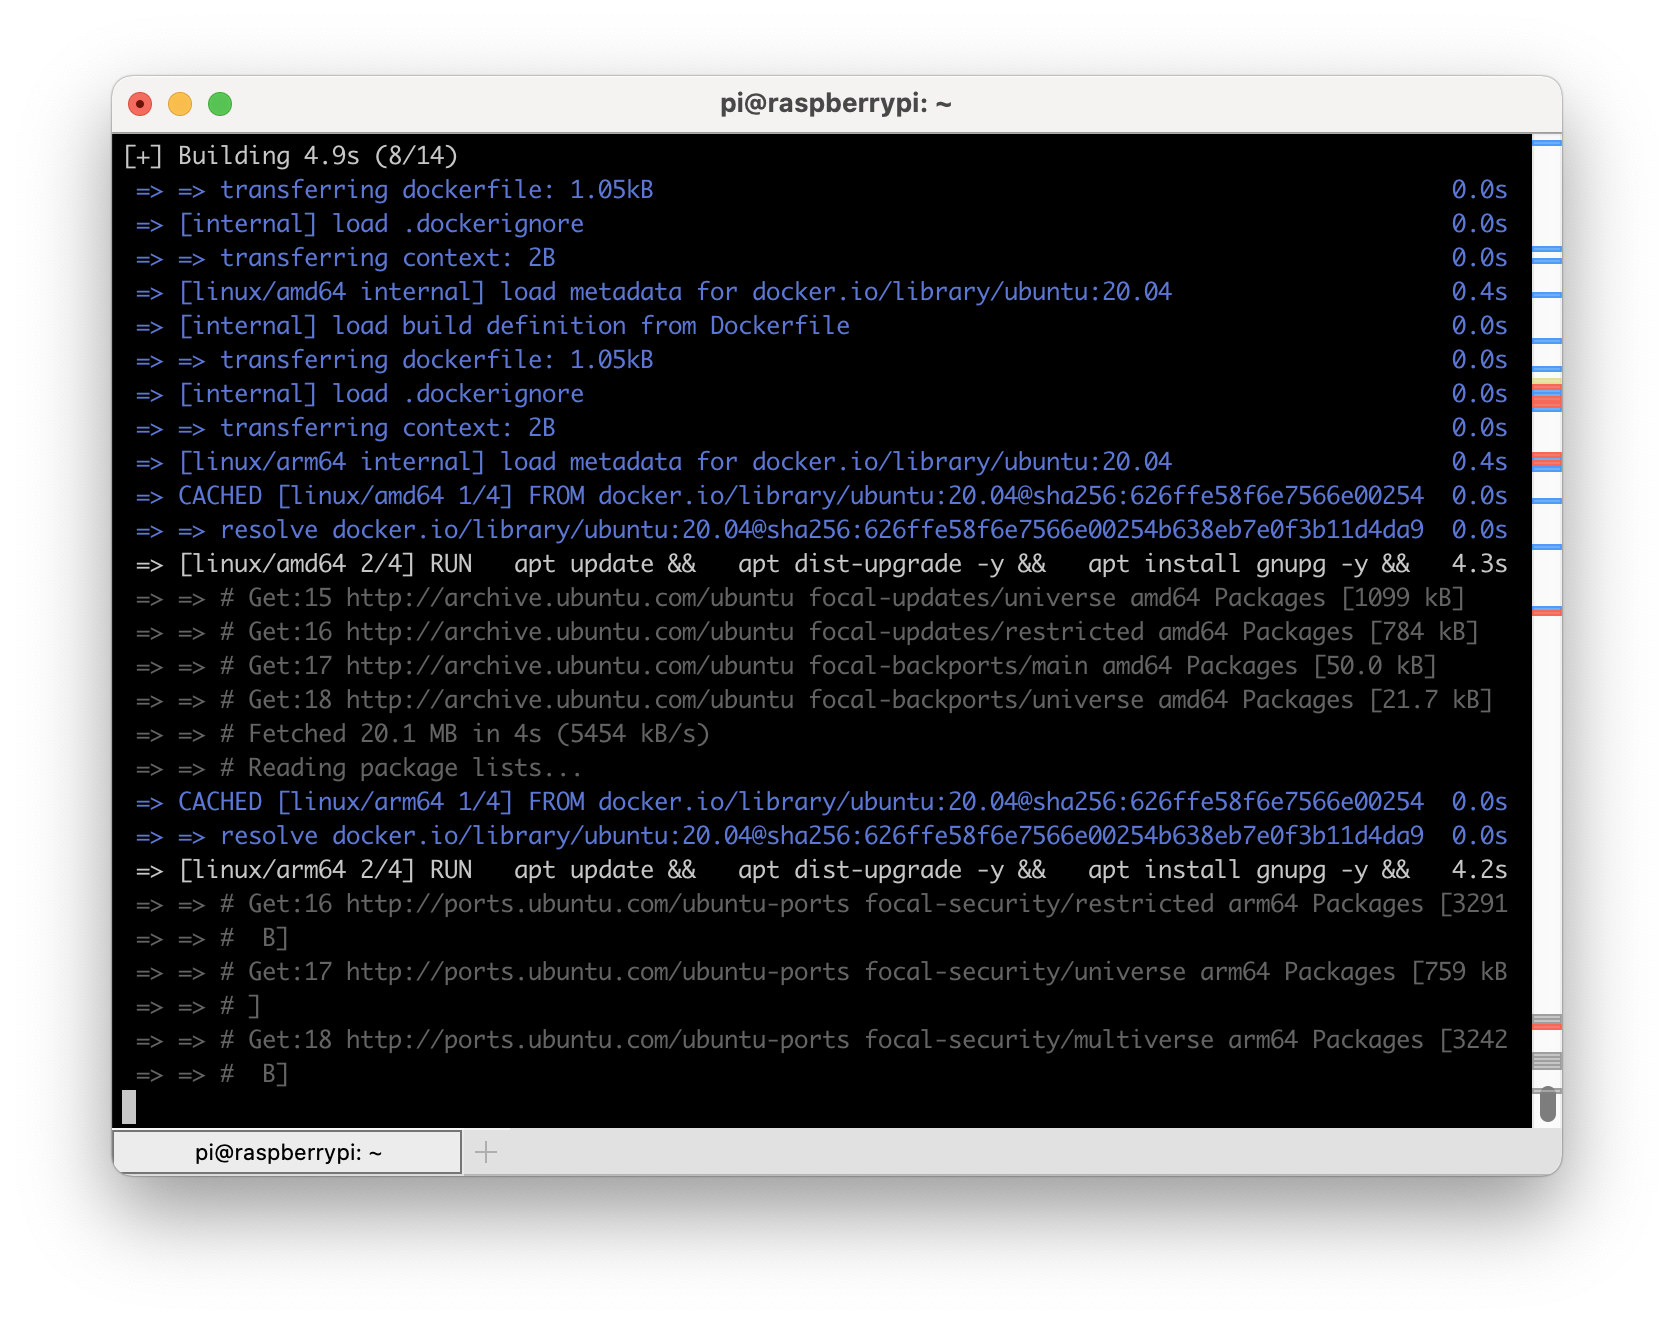
docker buildx build --builder multiarch-builder -t dustinrue/buildx-example --platform linux/amd64,linux/arm64,linux/arm/v6 .

This command will build our Docker image. If you wish to push the image to a Docker registry, remember to tag the image correctly and add --push to your command. You cannot use --load to load the Docker image into your local Docker registry as that is not supported.

Using another Mac as a Docker context

It is possible to use another Mac as a Docker engine but when I did this I ran into an issue. The Docker command is not in a path that Docker will have available to it when it makes the remote connection. To overcome this, this post will help https://github.com/docker/for-mac/issues/4382#issuecomment-603031242.

I have been running Linux as a server operating system for over twenty years now. For a brief period of time, I also ran it as my desktop solution around 2000-2001. Try as I might however, I could never really fully embrace it. I have always found Linux as a desktop operating system annoying to deal with and too limiting (for my use cases, your mileage may vary). A recent series by Linus Tech Tips doing a great job of highlighting some of the reasons why Linux as a desktop operating system has never really gone mainstream (chromebooks being a notable exception).

Check out the videos:

And

For nearly as long as I’ve been using Linux I have had some system on my home network that is acting as a server or test bed for various pieces of software or services. In the beginning this system might be my DHCP and NAT gateway, later it might be a file server but over the years I have almost always had some sort system running that acted as a server of some kind. These systems would often be configured using the same operating system that I was using in the workplace and running similar services where it made sense. This has always given me a way to practice upgrades, service configuration changes and just be as familiar with things as I possibly could.

As I’ve moved along in my career, the services I deal with have gotten more complex and what I want running at home as grown more complex to match. Although my home lab pales in comparison to what others have done I thought it would still be fun to go through what I have running.

Hardware

Like a lot of people, the majority of the hardware I’m running is older hardware that isn’t well suited for daily use. Some of the hardware is stuff I got free, some of it is hardware previously used to run Windows and so on. Unlike what seems to be most home lab enthusiasts, I like to keep things as basic as possible. If a consumer grade device is capable of delivering what I need at home then I will happily stick to that.

On the network side, my home is serviced with cable based Internet. This goes into an ISP provided Arris cable modem and immediately behind this is a Google WiFi access point. Nothing elaborate here, just a “basic” WiFi router handles all DHCP and NAT for my entire network and does a fine job with it. After the WiFi router is a Cisco 3560g 10/100/1000 switch. This sixteen year old managed switch does support a lot of useful features but most of my network is just sitting on VLAN 1 as I don’t have a lot of need for segmenting my network. Attached to the switch are two additional Google WiFi access points, numerous IoT devices, phones, laptops and the like.

Also attached to the switch are, of course, items that I consider part of the home lab. This includes a 2011 HP Compaq 8200 Elite Small Form Factor PC, an Intel i5-3470 based system built around 2012 and a Raspberry Pi 4. The HP system has a number of HDD and SSD drives, 24GB memory, a single gigabit ethernet port and hosts a number of virtual machines. The built Intel i5-3470 system has 16GB memory, a set of three 2TB HDDs and a single SSD for hosting the OS. The Pi4 is a 4GB model with an external SSD attached.

Operating Systems

Base operating system on the HP is Proxmox 7. This excellent operating system is best describe as being similar to VMware ESXi. It allows you to host as many Virtual Machines as your hardware will support, can be clustered and even migrate VMs between cluster nodes. Proxmox is definitely a happy medium between having a single system and being a full on cloud like OpenStack. I can effectively achieve a lot of a cloud stack would provide but with greater simplicity. Although I can create VMs and manually install operating systems, I have created a number of templates to make creating VMs quicker and easier. The code for building the templates is at https://github.com/dustinrue/proxmox-packer.

On the Intel i5-3470 based system is TrueNAS Core. This system acts as a Samba based file store for the entire home network including remote Apple Time Machine support, NFS for Proxmox and iSCSI for Kubernetes. TrueNAS Core is an excellent choice for creating a NAS. Although it is capable of more, I stick just to just the basic file serving functionality and don’t get into any of the extra plugins or services it can provide.

The Raspberry Pi 4 is running the 64bit version of Pi OS. Although it is a beta release it has proven to work well enough.

Software and Services

The Proxmox system hosts a number of virtual machines. These virtual machines provide:

Kubernetes

On top of Proxmox I also run k3s to provide Kubernetes. Kubernetes allows me to run software and test Helm charts that I’m working on. My Kubernetes cluster consists of a single amd64 based VM running on Proxmox and the Pi4 to give me a true arm64 node. In Kubernetes I have installed:

  • cert-manager for SSL certifications. This is configured against my DNS provider to validate certificates.
  • ingress-nginx for ingress. I do not deploy Traefik on k3s but prefer to use ingress-nginx. I’m more familiar with its configuration and have good luck with it.
  • democratic-csi for storage. This package is able to provide on demand storage for pods that ask for it using iSCSI to the TrueNAS system. It is able to automatically create new storage pools and share them using iSCSI.
  • gitlab-runner for Gitlab runner. This provides my Gitlab server with the ability to do CI/CD work.

I don’t currently use Kubernetes at home for anything other than short term testing of software and Helm charts. Of everything in my home lab Kubernetes is the most “lab” part of it where I do most of my development of Helm charts and do basic testing of software. Having a Pi4 in the cluster really helps with ensuring charts are targeting operating systems and architectures properly. It also helps me validate that Docker images I am building do work properly across different architectures.

Personal Workstation

My daily driver is currently an i7 Mac mini. This is, of course, running macOS and includes all of the usual tools and utilities I need. I detailed some time ago the software I use at https://dustinrue.com/2020/03/whats-on-my-computer-march-2020-edition/.

Finishing Up

As you can see, I have a fairly modest home lab setup but it provides me with exactly what I need to provide the services I actually use on a daily basis as well as provide a place to test software and try things out. Although there is a limited set of items I run continuously I can easily use this for testing more advanced setups if I need to.

Chris Wiegman asks, what are you building? I thought this would be a fun question to answer today. Like a lot of people I have a number of things in flight but I’ll try to limit myself to just a few them.

PiPlex

I have run Plex in my house for a few years to serve up my music collection. In 2021 I also started paying for Plex Pass which gives me additional features. One of my favorite features or add-ons is PlexAmp which gives me a similar to Spotify like experience but for music I own.

Although I’m very happy with the Plex server I have I wondered if it would be feasible to run Plex on a Raspberry Pi. I also wanted to learn how Pi OS images were generated using pi-gen. With that in mind I set out to create a Pi OS image that preinstalls Plex along with some additional tools like Samba to make it easy to get up and running with a Plex server. I named the project PiPlex. I don’t necessarily plan on replacing my existing Plex server with a Pi based solution but the project did serve its intended goal. I learned a bit about how Pi OS images are created and I discovered that it is quite possible to create a Pi based Plex server.

ProxySQL Helm Chart

One of the most exciting things I’ve learned in the past two years or so is Kubernetes. While it is complex it is also good answer to some equally complex challenges in hosting and scaling some apps. My preferred way of managing apps on Kubernetes is Helm.

One app I want install and manage is ProxySQL. I couldn’t find a good Helm chart to get this done so I wrote one and it is available at https://github.com/dustinrue/proxysql-kubernetes. To make this Helm chart I first had to take the existing ProxySQL Docker image and rebuild it so it was built for x86_64 as well as arm64. Next I created the Helm chart so that it installs ProxySQL as a cluster and does the initial configuration.

Site Hosting

I’ve run my blog on WordPress since 2008 and the site has been hosted on Digital Ocean since 2013. During most of that time I have also used Cloudflare as the CDN. Through the years I have swapped the droplets (VMs) that host the site, changed the operating system and expanded the number of servers from one to two in order to support some additional software. The last OS change was done about three years ago and was done to swap from Ubuntu to CentOS 7.

CentOS 7 has served me well but it is time to upgrade it to a more recent release. With the CentOS 8 controversy last year I’ve decided to give one of the new forks a try. Digital Ocean offers Rocky Linux 8 and my plan is to replace the two instances I am currently running with a single instance running Rocky Linux. I no longer have a need for two separate servers and if I can get away with hosting the site on a single instance I will. Back in 2000 it was easy to run a full LAMP setup (and more) on 1GB of memory but it’s much more of a challenge today. That said, I plan to use a single $5 instance with 1 vCPU and 1GB memory to run a LEMP stack.

Cloudflare

Speaking of Cloudflare, did you know that Cloudflare does not cache anything it deems “dynamic”? PHP based apps are considered dynamic content and HTML output by software like WordPress is not cached. To counter this, I created some page rules a few years ago that forces Cloudflare to cache pages, but not the admin area. Combined with the Cloudflare plug-in this solution has worked well enough.

In the past year, however, Cloudflare introduced their automatic platform optimization option that targets WordPress. This feature enables the perfect mix of default rules (without using your limited set of rules) for caching a WordPress site properly while breaking the cache when you are signed in. This is also by far the cheapest and most worry free way to get the perfect caching setup for WordPress and I highly recommend using the feature. It works so well I went ahead and enabled it for this site.

Multi-Architecture Docker Images

Ever since getting a Raspberry Pi 4, and when rumors of an Arm powered Mac were swirling, I’ve been interested in creating multi-architecture Docker images. I started with a number of images I use at work so they are available for both x86_64 and arm64. In the coming weeks I’d like to expand a bit on how to build multi-architecture images and how to replace Docker Desktop with a free alternative.

Finishing Up

This is just a few of the things I’m working on. Hopefully in a future post I can discuss some of the other stuff I’m up to. What are you building?

In late August of 2021 the company behind Docker Desktop announced their plans to change the licensing model of their popular Docker solution for Mac and Windows. This announcement means many companies who have been using Docker Desktop would now need to pay for the privilege. Thankfully, the open source community is working to create a replacement.

For those not aware, Docker doesn’t run natively on Mac. The Docker Desktop system is actually a small Linux VM running real Docker inside of it and then Docker Desktop does a bunch of magic to make it look and feel like it is running natively on your system. It is for this reason that Docker Desktop users get to enjoy abysmal volume mount performance, the process of shuffling files (especially small ones) requires too much metadata passing to be efficient. Any solution for running Docker on a Mac will need to behave the same way and will inherit the same limitations.

Colima is a command line tool that builds on top of lima to provide a more convenient and complete feeling Docker Desktop replacement and it already shows a lot of promise. Getting started with colima is very simple as long as you already have brew and Xcode command line tools installed. Simply run brew install colima docker kubectl and wait for the process to finish. You don’t need Docker Desktop installed, in fact you should not have it running. Once it is complete you can start it with:

colima start

This will launch a default VM with the docker runtime enabled and configure docker for you. Once it completes you will then have a working installation. That’s literally it! Commands like docker run --rm -ti hello-world will work without issue. You can also build and push images. It’s can do anything you used Docker Desktop for in the past.

Mounting Volumes

Out of the box colima will mount your entire home directory as a read only volume within the colima VM which makes it easily accessible to Docker. Colima is not immune, however, to the performance issues that Docker Desktop struggled with but the read only option does seem to provide reasonable performance.

If, for any reason, you need to have the volumes you mount as read/write you can do that when you start colima. Add --mount <path on the host>:<path visible to Docker>[:w]. For example:

colima start --mount $HOME/project:/project:w

This will mount $HOME/project as /project within the Docker container and it will be writeable. As of this writing the ability to mount a directory read/write is considered alpha quality so you are discouraged from mounting important directories like, your home directory.

In my testing I found that mounting volumes read/write was in fact very slow. This is definitely an area that I hope some magic solution can be found to bring it closer to what Docker Desktop was able to achieve which still wasn’t great for large projects.

Running Kubernetes

Colima also supports k3s based Kubernetes. To get it started issue colima stop and then colima start --with-kubernetes. This will launch colima’s virtual machine, start k3s and then configure kubectl to work against your new, local k3s cluster (this may fail if you have an advanced kubeconfig arrangement).

With Kubernetes running locally you are now free to install apps however you like.

Customizing the VM

You may find the default VM to be a bit on the small side, especially if you decide to run Kubernetes as well. To give your VM more resources stop colima and then start it again with colima start --cpu 6 --memory 6. This will dedicate 6 CPU cores to your colima VM as well as 6GB of memory. You can get a full list of options by simply running colima and pressing enter.

What to expect

This is a very young project that already shows great potential. A lot is changing and currently in the code base is the ability to create additional colima VMs that run under different architectures. For example, you can run arm64 Docker images on your amd64 based Mac or vice versa.

Conclusion

Colima is a young but promising project that can be used to easily replace Docker Desktop and if you are a Docker user I highly recommend giving it a try and providing feedback if you are so inclined. It has the ability to run Docker containers, docker-compose based apps, Kubernetes and build images. With some effort you can also do multi-arch builds (which I’ll cover in a later post). You will find the project at https://github.com/abiosoft/colima.

Wanted to take a moment to expand on something that Chris Wiegman wrote over on his site about how to use parameters in a make target. This post expands on a previous post of his called, “Automating WordPress Development with Make.” I was really excited about his initial post because make is a tool that I love putting to use. While Make is an older build chain tool, originally release back in 1976, it is just as useful today as ever.

In addition to the method described by Chris, there exists another method that feels a touch more natural than using ENV vars to pass parameters. It looks like this:

# If the first argument is good pass the rest of the line to the target
ifeq (good,$(firstword $(MAKECMDGOALS)))
  # use the rest as arguments for "good"
  RUN_ARGS := $(wordlist 2,$(words $(MAKECMDGOALS)),$(MAKECMDGOALS))
  # ...and turn them into do-nothing targets
  $(eval $(RUN_ARGS):;@:)
endif

.PHONY: bad good

bad:
        @echo "$(MAKECMDGOALS)"

good:
        @echo "$(RUN_ARGS)"

In this example, if we run make bad hello world you will get an error that looks like this:

make bad hello world
bad hello world
make: *** No rule to make target 'hello'.  Stop.

However, if we run make good hello world then the extra parameters are simply passed to the the command in the target. The output looks like this:

make good hello world
hello world

The magic is, of course, coming from the ifeq section of the Makefile. It checks to see if the first word of the Make command goals is the target keyword. If it is, then it removes all of the trailing words and turns them into do-nothing targets allowing them to be used elsewhere in the file.

For reference, I found this trick on https://stackoverflow.com/a/14061796 awhile back and have put it to use in some internal tools where I want to wrap some command with additional steps.

Makefiles are a great tool partly because they allow you to create documentation that remains similar across projects yet allows you to customize what is actually happening behind the scenes. This makes your project much more approachable for new people since you can simply document “run make” and take care of the difficult stuff for them. Advanced users can still get into the Makefile to see what is going on or even customize it.

I hope you find this tip useful!