This post describes how to set a “favorite node” using the PKI or remote admin functionality built into the Meshtastic firmware. It assumes that you have already setup a working remote admin system using official documentation. If you haven’t do that first and then return here for how to use the Meshtastic CLI tool to set favorite nodes.
Setting favorite nodes remotely is surprisingly easy. You will need to activate your virtual environment (. ./venv/bin/activate) or whatever name you used to create your venv. Next, you will need to know the node IDs of the remote host you want configure AND the node IDs of the nodes you wish to favorite. In my example, I know that the node ID of my remote node is a5592387 and the ID of the node I want to mark as a favorite is 0c3a3de4. With this information on hand, I can use the command below to target a5592387 with a set-favorite command to set 0c3a3de4 as a favorite using bluetooth.
You may have noticed that I have marked the Bluetooth node as a favorite node on my remote node. That is correct! In an effort to use the 0-hop feature of the 2.7.x firmware series, it is necessary to add next hop nodes as favorites so that the hop count is not reduced. This feature is detailed in a blog post over on meshtastic.org.
You can use this method to perform a number of admin tasks using the Meshtastic CLI and some options, like setting favorite nodes, can only be done using the Meshtastic CLI if you are using the iOS client. For a complete list of commands for the Meshtastic CLI, issue meshtastic and press enter.
Quick post describing the steps necessary to connect to a Meshtastic node from a Linux system, such as a Raspberry Pi, using Bluetooth. Connecting to a Meshtastic device using Bluetooth is something I struggled with initially and I am writing this both for my own reference but also in the hopes it proves helpful for someone else.
This post is from the point of view that you are using a Raspberry Pi. On my Pi, I am running Ubuntu 24.04 (64 bit). To get this working I have created a Python virtual environment (python3 -m venv meshtastic && . ./meshtastic/bin/activate) as well as the package bluez. Next, follow the steps below:
enter the Bluetooth CLI with bluetoothctl.
Issue
agent on
discoverable on
scan on
Allow the scan to run long enough for your node to appear by name
Issue scan off to stop scanning. The device should now show up if you issue devices
Copy the hardware or MAC address of the device you want to connect to. In this example, the MAC address I am connecting to is D0:9D:0C:3A:3D:E4.
Issue pair D0:9D:0C:3A:3D:E4 to pair with the device. You will be prompted for the passkey for the device. Enter either what is on the screen, pre-configured or what you already set it to if you have already performed initial setup using another app. If bluetoothctl says the device is not available, run the scan again and attempt to pair again. If you wait too long the device will be removed. Once paired, it will stay.
Issue trust D0:9D:0C:3A:3D:E4 to trust the device.
Issue disconnect D0:9D:0C:3A:3D:E4 to disconnect so that other apps can connect instead.
You are done using bluetoothctl and you can type exit or press ctrl+d to exit it.
reboot your device. I had issues with bluetoothctl staying connected to the node when it shouldn’t have.
You will now be able to use the Meshtastic CLI tool to interact with the node. To do so, ensure you have activated your virtual environment with . ./meshtastic/bin/activate and have installed the Meshtastic cli tool using pip install meshtastic. If you have issues with the CLI tool connecting, make sure any other client applications have disconnected from the device AND you have closed the app. Nodes will only allow a single connection at a time.
At this point you will be free to run client applications such as the Meshtastic CLI tool or contact, a text UI based tool.
If you are in the market for a solar powered mesh radio device, maybe for Meshtastic, and like me you just want to get up and running with something that is assured to work, then you may want to consider a base station kit from https://mesh-lab.com/products/solar-base-station-kit. Made by same person behind Yeti Wurks, this base station kit has almost everything you need to get a solar powered mesh radio node up and running quickly. I say “almost everything” because, while the solar charger half of the kit includes 6 18650 cells, ideally you would insert at least one 18650 battery into the case as well. The kit was recommended to me by a local mesh group (mspmesh.org). I paid full price for the kit and this is not a sponsored post in any way. What follows is an overview of what you receive in the kit and how to use it.
What is included
The box I received contained everything described on the product listing. This includes:
RAK4631 radio in a weather resistant case.
Solar charger with 6 18650 cells preinstalled.
Antenna.
Mounting bracket that you selected at order time.
Mounting hardware for the solar panel and more.
Directions.
Stickers!
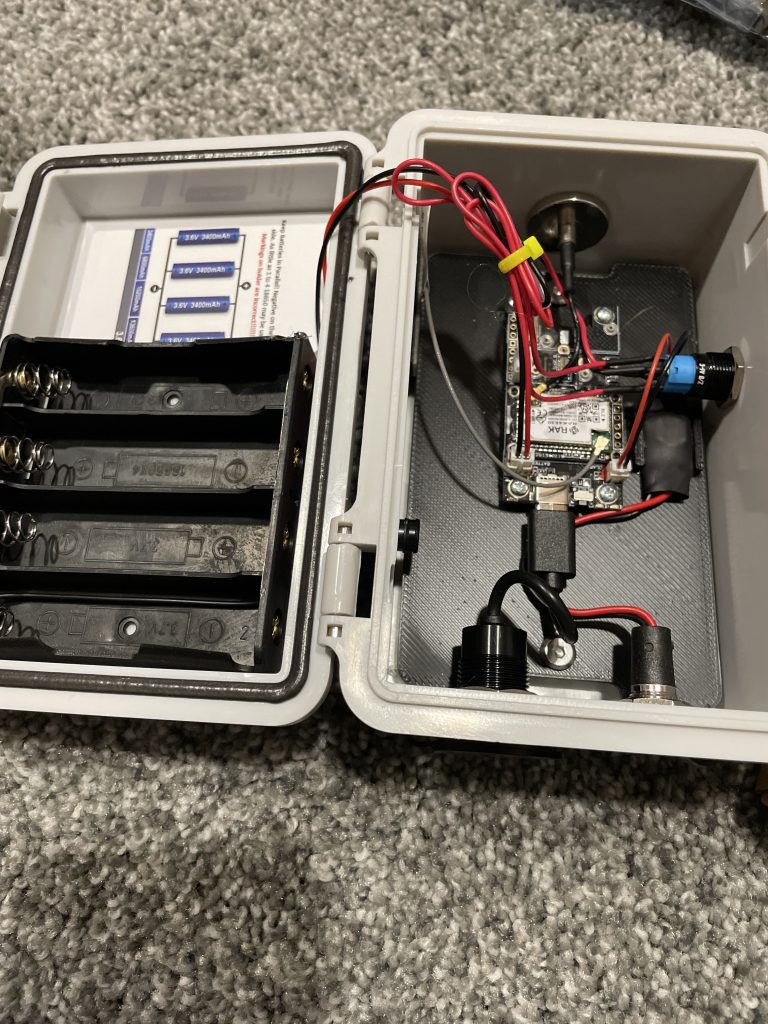
Below is a look inside the weather resistant case.
In the case is of course the RAK4631 radio and an additional 18650 cell holder capable of holding up to four additional cells. Pay special attention to the note about battery orientation as the holder is designed for parallel connections rather than serial! Additionally, when inserting the cells pay special attention that the positive side of the cell makes a connection with the contact. In my sample, the cells fit very tightly and it may not make a connection if you don’t slide it against the positive terminal.
Along the edge of the case starting from the top and working clockwise is an N-type antenna connector, a switch to connect/disconnect the four cell battery back from the RAK4631 charge controller, a power connection and USB-C port. Difficult to see in the photo on the left side of the case is a weather resistant vent to allow for pressure equalization.
Also included in the kit is this solar charger, which I’m linking to directly as it provides better photos and description – https://mesh-lab.com/products/off-grid-solar-charger-5-5-watt-5vdc-2-5a. This unit is available separately and includes 6 18650 cells. Also included in the kit is all of the mounting hardware which works perfectly with the 3d printed mount that you selected at order time. The solar panel seems surprisingly efficient and will charge the cells, albeit slowly, even in overcast conditions. Combined with a power efficient RAK4631, this solar panel and battery pack will keep it going for many days. While the panel and battery pack are great, the mounting post included with the panel seems a bit on the flimsy side and I don’t know how it will hold up to the elements over time. For the price, however, I can’t expect much more.
At order time I selected the larger 2″ PVC pipe mounting option. This integrated mount, also available in the store separately, is a 3d printed piece designed to be attached a 2″ PVC pipe using the included worm gear clamps. This all worked very well for me and I had no issues. Again, all screws, clamps and such were included with the kit. The solar panel attaches to the mount as does the weather resistant case. Then the whole unit is attached to whatever pole you have.
Mini Review
I have had the kit for all of a few days as of this writing but I am able to say that everything that is included with the kit works very well together. The RAK4631 radio included in the kit is known for being reliable and power efficient, perfect for solar applications.
If you are looking for an easy to assemble and ready to go device for joining a mesh network, I highly recommend you consider this kit by mesh-lab.com. If you don’t need a solar powered kit there are other options available as well. My thanks to the folks on the mspmesh.org Discord for helping me find a ready made kit. Now that I have something working and in the wild I will likely build additional nodes on my own and I’ll post about my experience here.
Earlier I mentioned that the kit recommends you insert up to four additional 18650 cells into the weather resistant case. This helps ensure proper operation of the RAK4631. I didn’t have any additional cells so, from the recommendation of others, I simply stole one cell from the solar panel. Doing so as easy as opening the back of the solar panel case by removing the rubber covers over the screws, undoing the screws and removing one cell. Be sure to understand how to orient 18650 cells when inserting them into the weather resistant case!
This is a quick guide to performing an over-the-air update of a RAK4631 device using iOS and the DFU application by Nordic Semiconductor. Based on known and personal experience, performing an over-the-air update of this device carries some amount of risk as the device does not have a fall back in the event of an error. If the update fails your device will be left in a state where you need physical, wired access in order to recover. If you have any other method available to you I recommend using that method rather than an over-air-update.
This guide specifically covers using the DFU app on iOS to flash the latest Meshtastic firmware to a RAK4631. Many of these steps may be the same on Android and may work for other, similar devices, but I don’t have these to test with. You will need three things to perform an over-the-air update of a RAK4631 or similar device:
iOS device with DFU software installed.
The DFU app is properly configured prior to attempting the update.
A copy of the correct firmware file you wish to apply to the device. You can find the latest release on the Meshtastic website at https://meshtastic.org/downloads/. I recommend using a “stable” release.
Optionally, if you are using iCloud drive you can download and work with the files on a Mac and place the file on your iCloud drive for easier access on the iOS side.
Configuring DFU
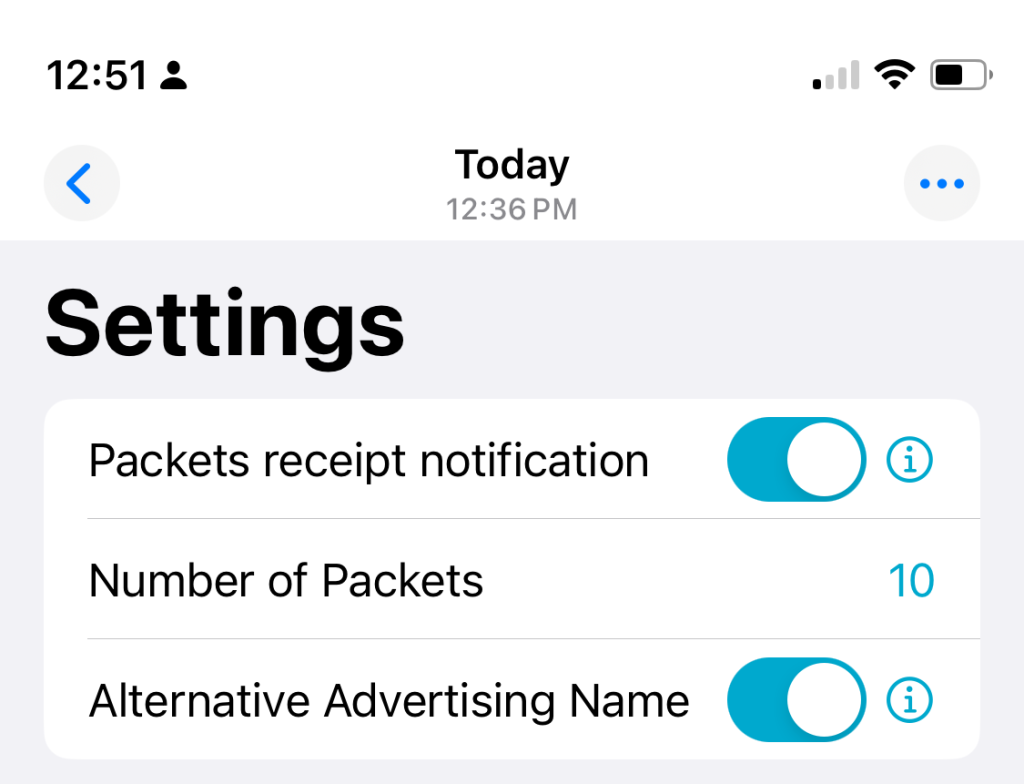
It is very important that you confirm DFU is configured properly prior to applying any update. Failure to do so on iOS will almost certainly result in a “bricked” device that you will need to take down and connect to using USB in order to recover. Configuration is simple. Open the app and tap on settings. Ensure you enable the first option and set the number of packets to 10. Your settings page should look similar to this screenshot:
Note that all options are at their default values, or disabled.
Getting the proper firmware
It is important that you download the correct firmware from the download page. If you do not, you will be unable to perform the update as the DFU app will complain there is no manifest.json file available. To find the correct firmware, use the following steps:
Extract the zip file and find the firmware specific to your device with “ota” in the name, for a 4631 it might named firmware-rak4631-2.6.4.b89355f-ota.zip. You are If using a Mac + iCloud drive, copy this file to a location you can find on the iOS device or if already on iOS select this file in the DFU app when told to.
Applying the update
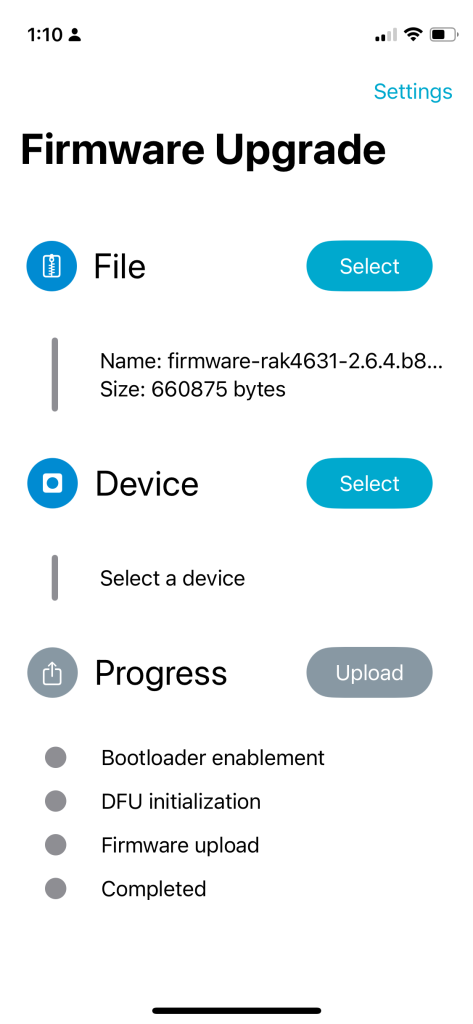
Now to apply the update to the device. Start by opening the DFU application, confirming the configuration is set properly and then tap on select file. Here you should browse to the location of your iCloud drive or the downloads section of iOS and select the firmware file with “ota” in the name.
Next in the Device section, tap on select and find your device. You can also tap on “nearby” to filter on items that are close.
Once you have selected your device, the last step is to tap upload. Be sure to ensure your screen or device does not turn off during the process!. Remember, if for any reason the update fails, you will need to connect the device directly to a computer in order to recover. After some time the update will complete and the device will restart using the new firmware. Adjust any settings that you need to adjust and enjoy your updated device.
As of this writing I have two Heltec V3 Meshtastic nodes that I use to gain access to the greater Meshtastic network in my area. One is installed at a static location, the attic of my house, while the other one is either in my office or I take it with me. I interact with it using the Meshtastic software on my phone or on my desktop computer. One of the features of Meshtastic is to advertise some node metadata including location. My more mobile node gets my current coordinates from the Meshtastic client connected to the node over Bluetooth, but the static node has no way to know its location so I must tell it. In this post, I will walk through how I advertise a static location for the node installed in my attic as it wasn’t as straightforward as I initially thought it would be.
While it isn’t necessary to advertise the location of your node, it is useful because it helps provide some indication as to how your messages are traveling. You also don’t need to advertise a perfectly precise location though you shouldn’t advertise it as being somewhere on the other side of the planet. I am making some heavy assumptions, primarily that you already know how to install the Meshtastic command line client. If not, take a look at the directions available at https://meshtastic.org/docs/software/python/cli/installation/. It is possible to configure the node without using the command line client but I don’t cover that here. I use the command line client because my static node is connected to a raspberry pi via USB which powers it and allows me to manage it that way.
Getting and setting your coordinates
Before you can set the coordinates for a Meshtastic node, you need to know what they are expressed as a latitude longitude pair. I found that the simplest way is to use google.com/maps, look for the location you want to advertise and get the latitude and longitude values from. To do so, search for the location, right click where you want to advertise and click the top pair of values which will copy them to your clip board. Next, modify the following script to suite your needs to set the values on your Meshtastic node:
Google will provide very precise coordinates but keeping 3 to 4 places of precision is plenty. One key thing to remember is that, despite what the command line help will tell you, you should set the altitude to something other than nothing or 0. You can provide a proper altitude in meters above sea level or simply setting it to 1 will suffice. Depending on your setup, you may not need to specify the port. I show my port for reference as the Pi the node is connected to has other USB devices attached.
After configuration, your node will begin to advertise its position as often as you configured it to using the gps_update_interval value. You can modify this to suit your network.
Bonus content
Keeping with our scripted methods of managing a Meshtastic node, here is a bit of bonus content. I also set a name for my static node so it is easier to identify consistently on the network. If you ever need to factory reset your node and want to set the name again (if you don’t have the config saved or whatever) then this simple script will help:
A while ago I learned about LoRa, or Long Range, protocol and some the applications of it. In short, LoRa is used on common ISM bands for sending data long distances over the air. While it sounded neat, it didn’t interest me enough to try it. More recently however I learned about Meshtastic which is an application that uses LoRa protocol to pass primarily text based information to other nodes by forming a mesh network. Meshtastic uses LoRa to pass messages between nodes and each node, depending on configured role, will continue to pass that message to up to (by default) three additional nodes within reach in an effort to get your message to the desired recipient(s). Additionally, Meshtastic can be configured to use MQTT to use as a backbone to pass messages over the local network or even the Internet.
Not to be confused with channels in radio jargon, but still similar, Meshtastic works by creating channels that you can be part of in order to interact with others using the same channel configuration. Channels are identified by name and, more importantly, by a pre-shared encryption key. Anyone with the encryption key is part of the group and can send or receive messages on that channel but a node doesn’t need the key in order to pass messages along. In this way, Meshtastic provides end-to-end secure messaging between users even of the message passes through a node that is not “part of the group.” You can create a channel and share it with a group of nodes/friends or share it with only a single other node to create a private channel. As long as there is a path between you and the target you are set. Meshtastic provides a number of additional features, almost all of the completely optional, which you can read about on the project’s documentation page at https://meshtastic.org/docs/configuration/module/.
The Meshtastic documentation provides information and links to supported hardware and all hardware is equally capable of providing the core experience. To get myself started, I opted to use two Heltec V3 modules. By getting two modules I was assured that I could test the basic functionality of Meshtastic even if there are no other nodes near me. When selecting a Meshtastic module it is important that you get the correct one for your region as the ISM band that is used is different depending on where you live. Refer to https://meshtastic.org/docs/configuration/region-by-country/ to determine what frequency module you need. How you want to use the module can also determine which module you get as modules can have different features. For example, the Heltec V3 is not as energy efficient as some others so if your plan is to create a solar powered outdoor station then a RAK WisBlock might be a better fit.
Once you have hardware you will need to flash the Meshtastic firmware to the device. The Meshtastic project has great documentation on how to do this and I recommend you follow their notes on how to do so. The documentation for flashing esp32 based hardware like the Heltec V3 can be found at https://meshtastic.org/docs/getting-started/flashing-firmware/esp32/.
After flashing the firmware you will need to perform some initial configuration. Again I recommend following the official guide on how to do this which is available at https://meshtastic.org/docs/getting-started/initial-config/. Configuring the correct settings is crucial for getting Meshtastic up and running properly and legally in your region. After the initial configuration you are immediately ready to begin communicating with other Meshtastic nodes that you have on hand or are local to you that are also using the default primary channel configuration. When starting out, you will find it is easiest to stick with the default primary channel in order to reach others with minimal fuss. You can read more about channel configuration at https://meshtastic.org/docs/configuration/radio/channels/.
Optionally, you can extend the range of your device using the internet and a tool called MQTT. This optional functionality allows your radio to leverage the internet connection of your device, or if you configure your node with a WiFi connection a direct connection, to communicate with an MQTT server. The default configuration for MQTT will use the project MQTT server and is preconfigured with the correct credentials. MQTT uses a concept known as “topics” to describe where content is posted to so that other clients can “hear” the information. By default, MQTT will use the msh/US topic which is extremely busy but is a good way to get started. You will want to configure the topic so something more local to you to lessen the noise. I will go into more detail on how to use MQTT in a future post.
For now, this is enough to get you going on Meshtastic. It can be a bit daunting and confusing at first but after some time you will get used to how it works. In future posts I will discuss channel configuration, using cli tools to configure devices and dig more deeply into using MQTT to tie areas together. In the meantime, you can find a lot of information on YouTube and I highly recommend doing a search for meshtastic there to find videos to fill in any gaps you may have.
Disclaimer: This post contains Amazon Affiliate links. If you purchase something from Amazon using a link I provided I will likely receive a commission for that sale. This helps support the site!