I previously touched on how I use CarPlay and I promised to provide some details on how I configure and use Home Assistant with CarPlay. For this to work, you must have the Home Assistant companion app installed from the App Store. Also, although I will not directly discuss the Android based app and Android Auto, it is my understanding that all of this is the same or very similar on that platform. Once the companion app is installed, Home Assistant will be shown as an icon on your car display. Opening the app will show you some (configurable) options include one for Quick Access. The Quick Access is where I am concentrating today.

My personal use case for how to use Home Assistant through CarPlay is, while limited, a huge quality of life improvement. I have also previously discussed the Rage Against the Garage Door Opener (RATGDO) device which allows me to tie my Chamberlain based garage door openers into Home Assistant. The CarPlay integration is huge because it allows me to control the garage doors extremely reliably unlike when I use the official remote. My house is wrapped in foil lined insulation as well as metal siding which greatly attenuates the RF signal from the remote leading to some very frustrating moments trying to get doors to open or close. As long as my phone has an internet connect, I can see the status of and control both garage doors on the house without issue.

Out of the box, you will see four icons across the top of the screen when you start Home Assistant. Personally, I find the default setup to be cumbersome and confusing but that would be more about how I have my Home Assistant configured than anything.

Let’s setup a Quick Action. To get started, first open the companion app and find settings. Then open CarPlay (or Android Auto)

screenshot of the CarPlay screen editor for home assistant

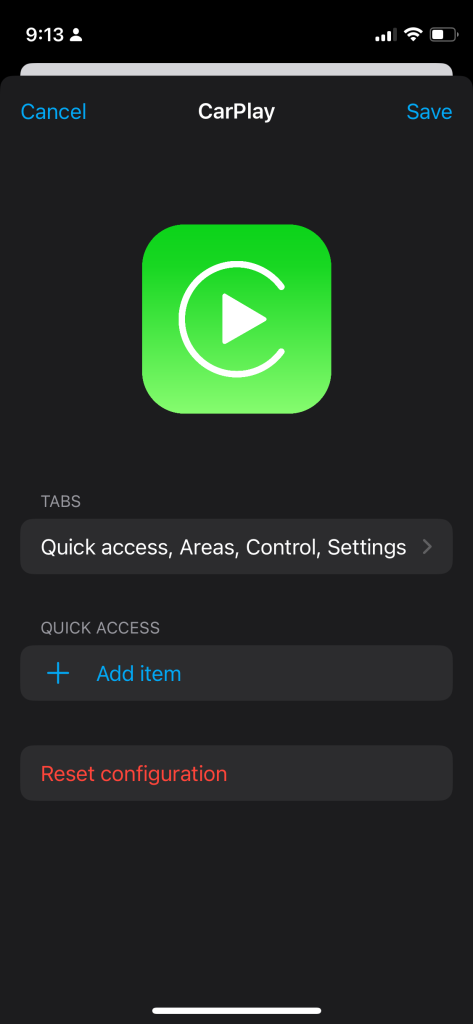
You can use the Tabs fly out to configure what tabs appear on your car display and in what order. To add an item to Quick Actions tap on Add item.

Here is where you can add specific entities, scripts, scenes or iOS Actions. iOS Actions is a deprecated way of adding items to CarPlay and unless you specifically need to have actions for your iOS device, I would avoid setting them up as it requires a lot of extra steps. For my use case, I simply want to have quick access to my garage doors so I am adding those entities directly by searching for the name of the entity.

a search field filled in with garage showing some results that match

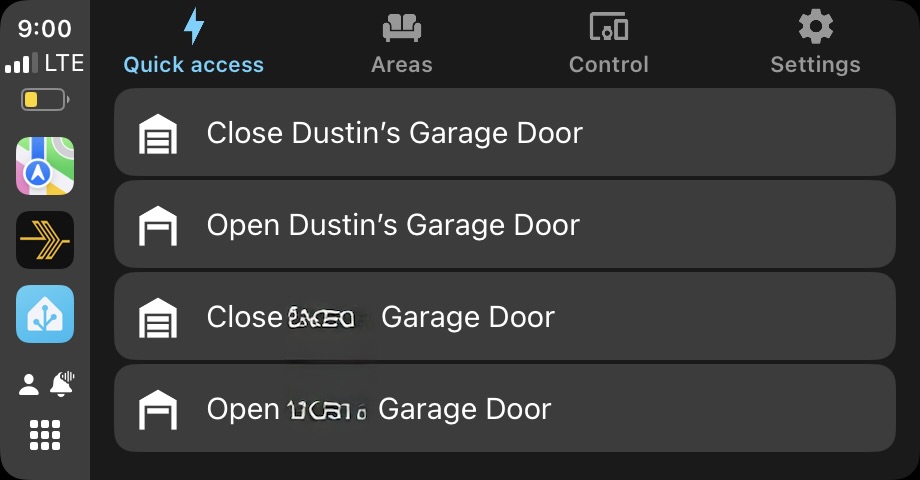
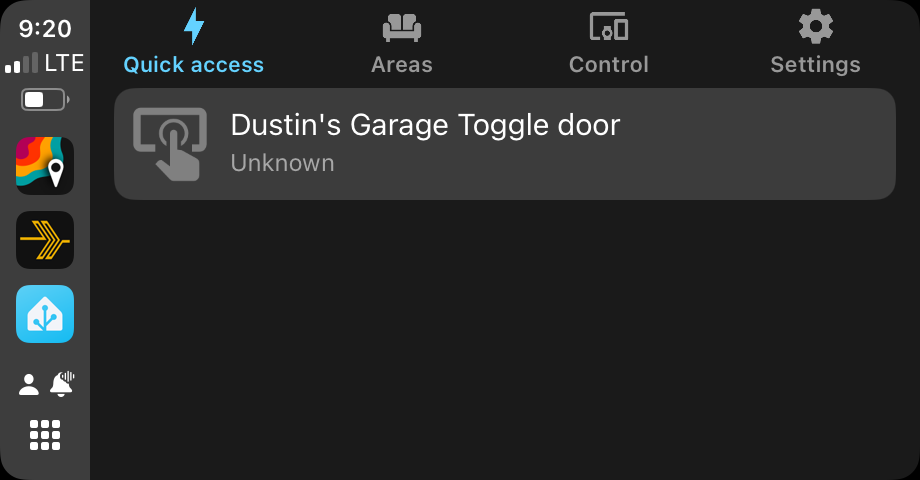
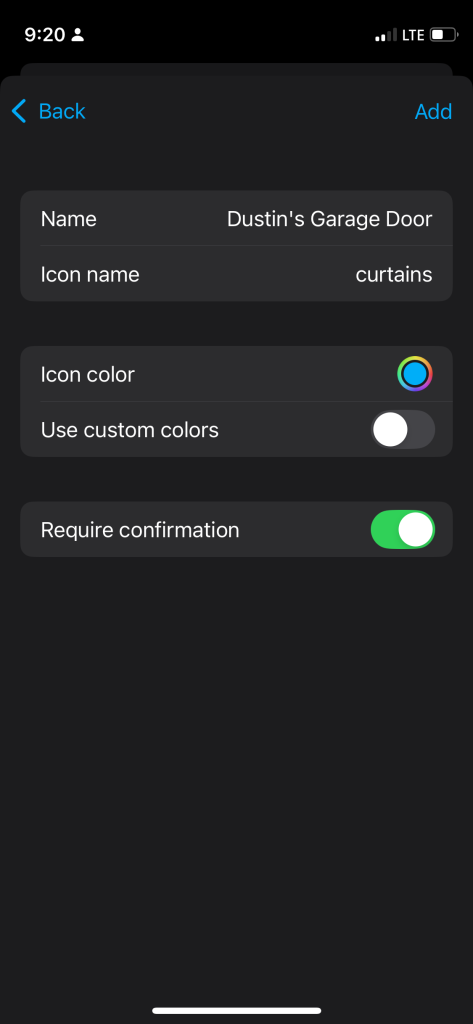
This is where it can be tricky because a number of entities can have the same name but be different resources in Home Assistant. In fact, it took me a bit of trial and error to find that I wanted to add “Dustin’s Garage Door” that had the “curtain” icon. This entity, with the oddly chosen icon, is the correct one to control the door. On this screen, you can also customize what the icon color will be as well is if you want to require confirmation before performing the action.

screenshot of iOS companion app showing the name of the item being added. The name of the item is dustin's garage door

After making your selections tap on add. Once added, save your settings and the next time you connect to CarPlay you will have access to your chosen entities. Below is a screenshot showing that I can see the status of my door as well as control it by simply tapping on it.

screenshot of CarPlay showing 3 items, two garage doors and one garage light

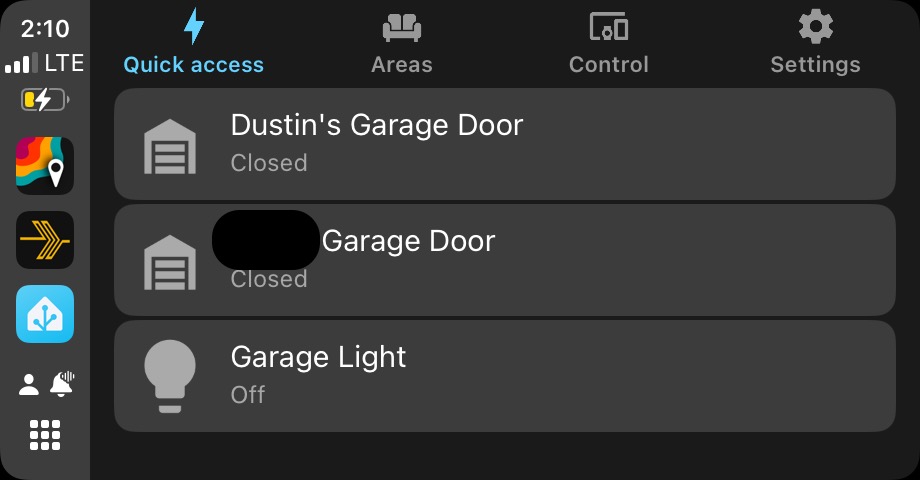
You can add any entity, script or scene to quick actions and as many as you are willing to scroll the screen through. Having Home Assistant available like this in my car has been a big quality of life improvement and I imagine anyone that has remote locks or other automations will appreciate being able to check on the status of and control those items right there on the radio.

In a previous post, I detailed the audio upgrade I did on my 2015 Mazda 6, where I replaced the stock radio with a new Sony unit that featured CarPlay and Android Auto. Today I am talking about the ways that I am getting the most out of CarPlay.

There were several reasons I wanted to upgrade the stock radio in my car to something that had CarPlay, and while I knew that CarPlay would provide a better experience, CarPlay has been far better than I imagined. The stock radio in my model-year Mazda did not have maps and had a call/texting experience that was basically unusable. The Bluetooth system was, while usable, also slow and just overall poorly executed. CarPlay, on the other hand, continues to impress me with how low-friction the experience really is. Text messages arrive and are read immediately while perfectly ducking or pausing the audio of whatever is playing. Voice commands work extremely well and are very rarely misinterpreted. Phone calls also flow into the system very well, pausing the music as expected and resuming music again when the call is over. I simply cannot explain adequately enough how good the experience is; it is something you must experience. On the surface, this sounds like what basically any stock radio does in a modern car (sans CarPlay), but it is so much smoother than I have seen before. And, based on input from a friend of mine, Android Auto is nearly identical in (as a baseline) to CarPlay in its ability to provide a seamless and well-executed experience.

Outside of the core CarPlay experience, there are two apps I want to specifically bring to light. They are Plexamp and Home Assistant. These two apps are definitely niche, as not everyone collects music and stores it on Plex. Most people are probably using a streaming service, and not everyone is running Home Assistant. However, both apps have proven indispensable.

Plexamp

First, Plexamp. Plexamp, which I have written about in the past, is software that connects to a Plex Server instance with a focus on music playback. This means Plexamp offers a more streamlined music handling experience, including easier navigation, larger cover art display, gapless playback and a lot more. These features alone make Plexamp a great music player, but what really makes it special is the inclusion of an in-car experience through CarPlay (or Android Auto). With Plexamp, I am able to rip my CD collection and make it available wherever I have an Internet connection. Alternatively, I can download albums locally to my phone and play music offline. While other streaming services exist, and I am in fact a Spotify subscriber, I prefer Plexamp in my car because I have found it is generally better at remembering what I was listening to and resuming playback whenever I get into my car. Spotify remains my preferred way to discover new music, and I do sometimes use it in the car. I just find Plexamp to be a better experience overall.

Unlike the main Plex application, Plexamp requires a Plex Pass, which is an added cost on top of the hardware and storage required to run Plex and store your music.

Home Assistant

Home Assistant is open source home automation software that I have used for years. Home Assistant is definitely a “you get what you put into it” type of platform. While it can tie together a lot of different home automation tools, and a lot of progress has been made in making it more user-friendly, some aspects of it can be a bit cumbersome. Case in point, using Home Assistant via CarPlay leans a bit more on the cumbersome side of the equation, but with a bit of effort, there is some great stuff to be done here. How I am leveraging Home Assistant in CarPlay is by creating actions that allow me to control my garage doors. In a previous post I covered Rage Against the Garage Door Opener and this takes it a step further by allowing me to control the door using a soft button on my screen. This completely solved the range issues I was having with the original controller, and it allows me to double-check the status of the door easily. Below is a screenshot of the “Quick access” interface of Home Assistant. In the app, this is called “Actions.” In a future post, I will go into detail on how these are done as it is not immediately obvious.

Screenshot of Home Assistant’s CarPlay interface

I hope you find how I use CarPlay interesting and I will expand on this more in the future, particularly how Home Assistant can be used from within the car.


In a previous post I mentioned I had recently picked up a HiLetgo ESP8266 NodeMCU module along with a DHT22 temperature and humidity sensor. In this post, I’ll describe how I combined the board, the sensor, hass.io and MQTT using the mosquito add-on for hass.io to create a temperature sensor for my home office.

I’m not going to go into detail about how to setup hass.io on a Raspberry PI, their site does an excellent job of describing how to get it installed, but I do highly recommend using that installation method if you’re on the fence. Raspberry PIs are inexpensive and Home Assistant runs quite well on the platform.

Instead, I’m going to concentrate on what it takes to get this working while going over what you need to enable in hass.io to support a small, WiFi enabled board sending temperature and humidity readings.

Continue reading