Some time ago I removed Google Analytics to avoid the tracking that came along with it and it all being tied to Google. I also wasn’t overly concerned about how much traffic my site got. I write here and if it helps someone then great but I’m not out here to play SEO games. Recently, however, I heard of a new self hosted option called Umami that claims to respect user privacy and is GDPR compliant. In this post I will go through how I set it up on the site.

Umami supports both PostgreSQL and MySQL. The installation resource I used, discussed below, defaults to PostgreSQL as the datastore and I opted to stick with that. PostgreSQL is definitely not a strong skill of mine and I struggled to get things running initially. Although I have PostgreSQL installed on a VM already for my Mastodon instance, I had to take some additional steps to get PostreSQL ready for Umami. After some trial and error I was able to get Umami running.

My installation of PostreSQL is done using the official postgres.org resources which you can read about at https://www.postgresql.org. In addition to having PostgreSQL itself installed as a service I also needed to install postgresql15-contrib in order to add pgcrypto support. pgcrypto support wasn’t something I found documented in the Umami setup guide but the software failed to start successfully without it and an additional step detailed below. Below is how I setup my user for Umami with all commands run as the postgres user or in psql. Some info was changed to be very generic, you should change it to suit your environment:

  • cli: createdb umami
  • psql: CREATE ROLE umami WITH LOGIN PASSWORD 'password’;
  • psql: GRANT ALL PRIVILEGES ON DATABASE umami TO umami;
  • psql: \c umami to select the umami database
  • psql: CREATE EXTENSION IF NOT EXISTS pgcrypto;
  • psql: GRANT ALL PRIVILEGES ON SCHEMA public TO umami;

With the above steps taken care of you can continue on.

Since I am a big fan of using Kubernetes whenever I can, my Umami instance is installed into my k3s based Kubernetes cluster. For the installation of Umami I elected to use a Helm chart by Christian Huth which is available at https://github.com/christianhuth/helm-charts and worked quite well for my purposes. Follow Christian’s directions for adding the helm chart repository and read up on the available options. Below is the helm values I used for installation:

ingress:
  # -- Enable ingress record generation
  enabled: true
  # -- IngressClass that will be be used to implement the Ingress
  className: "nginx"
  annotations:
    cert-manager.io/cluster-issuer: letsencrypt-production
  # -- Additional annotations for the Ingress resource
  hosts:
    - host: umami.dustinrue.com
      paths:
        - path: /
          pathType: ImplementationSpecific
  # -- An array with the tls configuration
  tls:
    - secretName: umami-tls
      hosts:
        - umami.dustinrue.com

umami:
  # -- Disables users, teams, and websites settings page.
  cloudMode: ""
  # -- Disables the login page for the application
  disableLogin: ""
  # -- hostname under which Umami will be reached
  hostname: "0.0.0.0"

postgresql:
  # -- enable PostgreSQL™ subchart from Bitnami
  enabled: false

externalDatabase:
  type: postgresql

database:
  # -- Key in the existing secret containing the database url
  databaseUrlKey: "database-url"
  # -- use an existing secret containing the database url. If none given, we will generate the database url by using the other values. The password for the database has to be set using `.Values.postgresql.auth.password`, `.Values.mysql.auth.password` or `.Values.externalDatabase.auth.password`.
  existingSecret: "umami-database-url"

The notable changes I made from the default values provided is I enabled ingress and set my hostname for it as required. I also set cloudMode and diableLogin to empty so that these items were not disabled. Of particular note, leaving hostname at the default value is the correct option as setting it to my hostname broke the startup process. Next, I disabled the postgresql option. This disables the installation of PostgreSQL as a dependent chart since I already had PostreSQL running.

The last section is how I defined my database connection information. To do this, I created a secret using kubectl create secret generic umami-database-url -n umami and then edited the secret with kubectl edit secret umami-database-url -n umami. In the secret, I added a data section with base64 encoded string for “postgresql://umami:[email protected]:5432/umami”. The secret looks like this:

apiVersion: v1
data:
  database-url: cG9zdGdyZXNxbDovL3VtYW1pOnBhc3N3b3JkQDEwLjAuMC4xOjU0MzIvdW1hbWk=
kind: Secret
metadata:
  name: umami-database-url
  namespace: umami
type: Opaque

Umami was then installed into my cluster using helm install -f umami-values.yaml -n umami umami christianhuth/umami which brought it up. After a bit of effort on the part of Umami to initialize the database I was ready to login using the default username/password of admin/umami.

I setup a new site in Umami per the official directions and grabbed some information that is required for site setup from the tracking code page.

Configuring WordPress

Configuring WordPress to send data to Umami was very simple. I added the integrate-umami plugin to my installation, activated the plugin and then went to the settings page to input the information I grabbed earlier. My settings page looks like this:

Screenshot of Umami settings showing the correct values for Script Url and Website ID. These values come from the Umami settings screen for a website.

With this information saved, the tracking code is now inserted into all pages of the site and data is sent to Umami.

Setting up Umami was a bit cumbersome for me initially but that was mostly because I am unfamiliar with PostgreSQL in general and the inline documentation for the Helm chart is not very clear. After some trial and error I was able to get my installation working and I am now able to track at least some metrics for this site. In fact, Umami allows me to share a public URL for others to use. The stats for this site is available at https://umami.dustinrue.com/share/GadqqMiFCU8cSC7U/Blog.
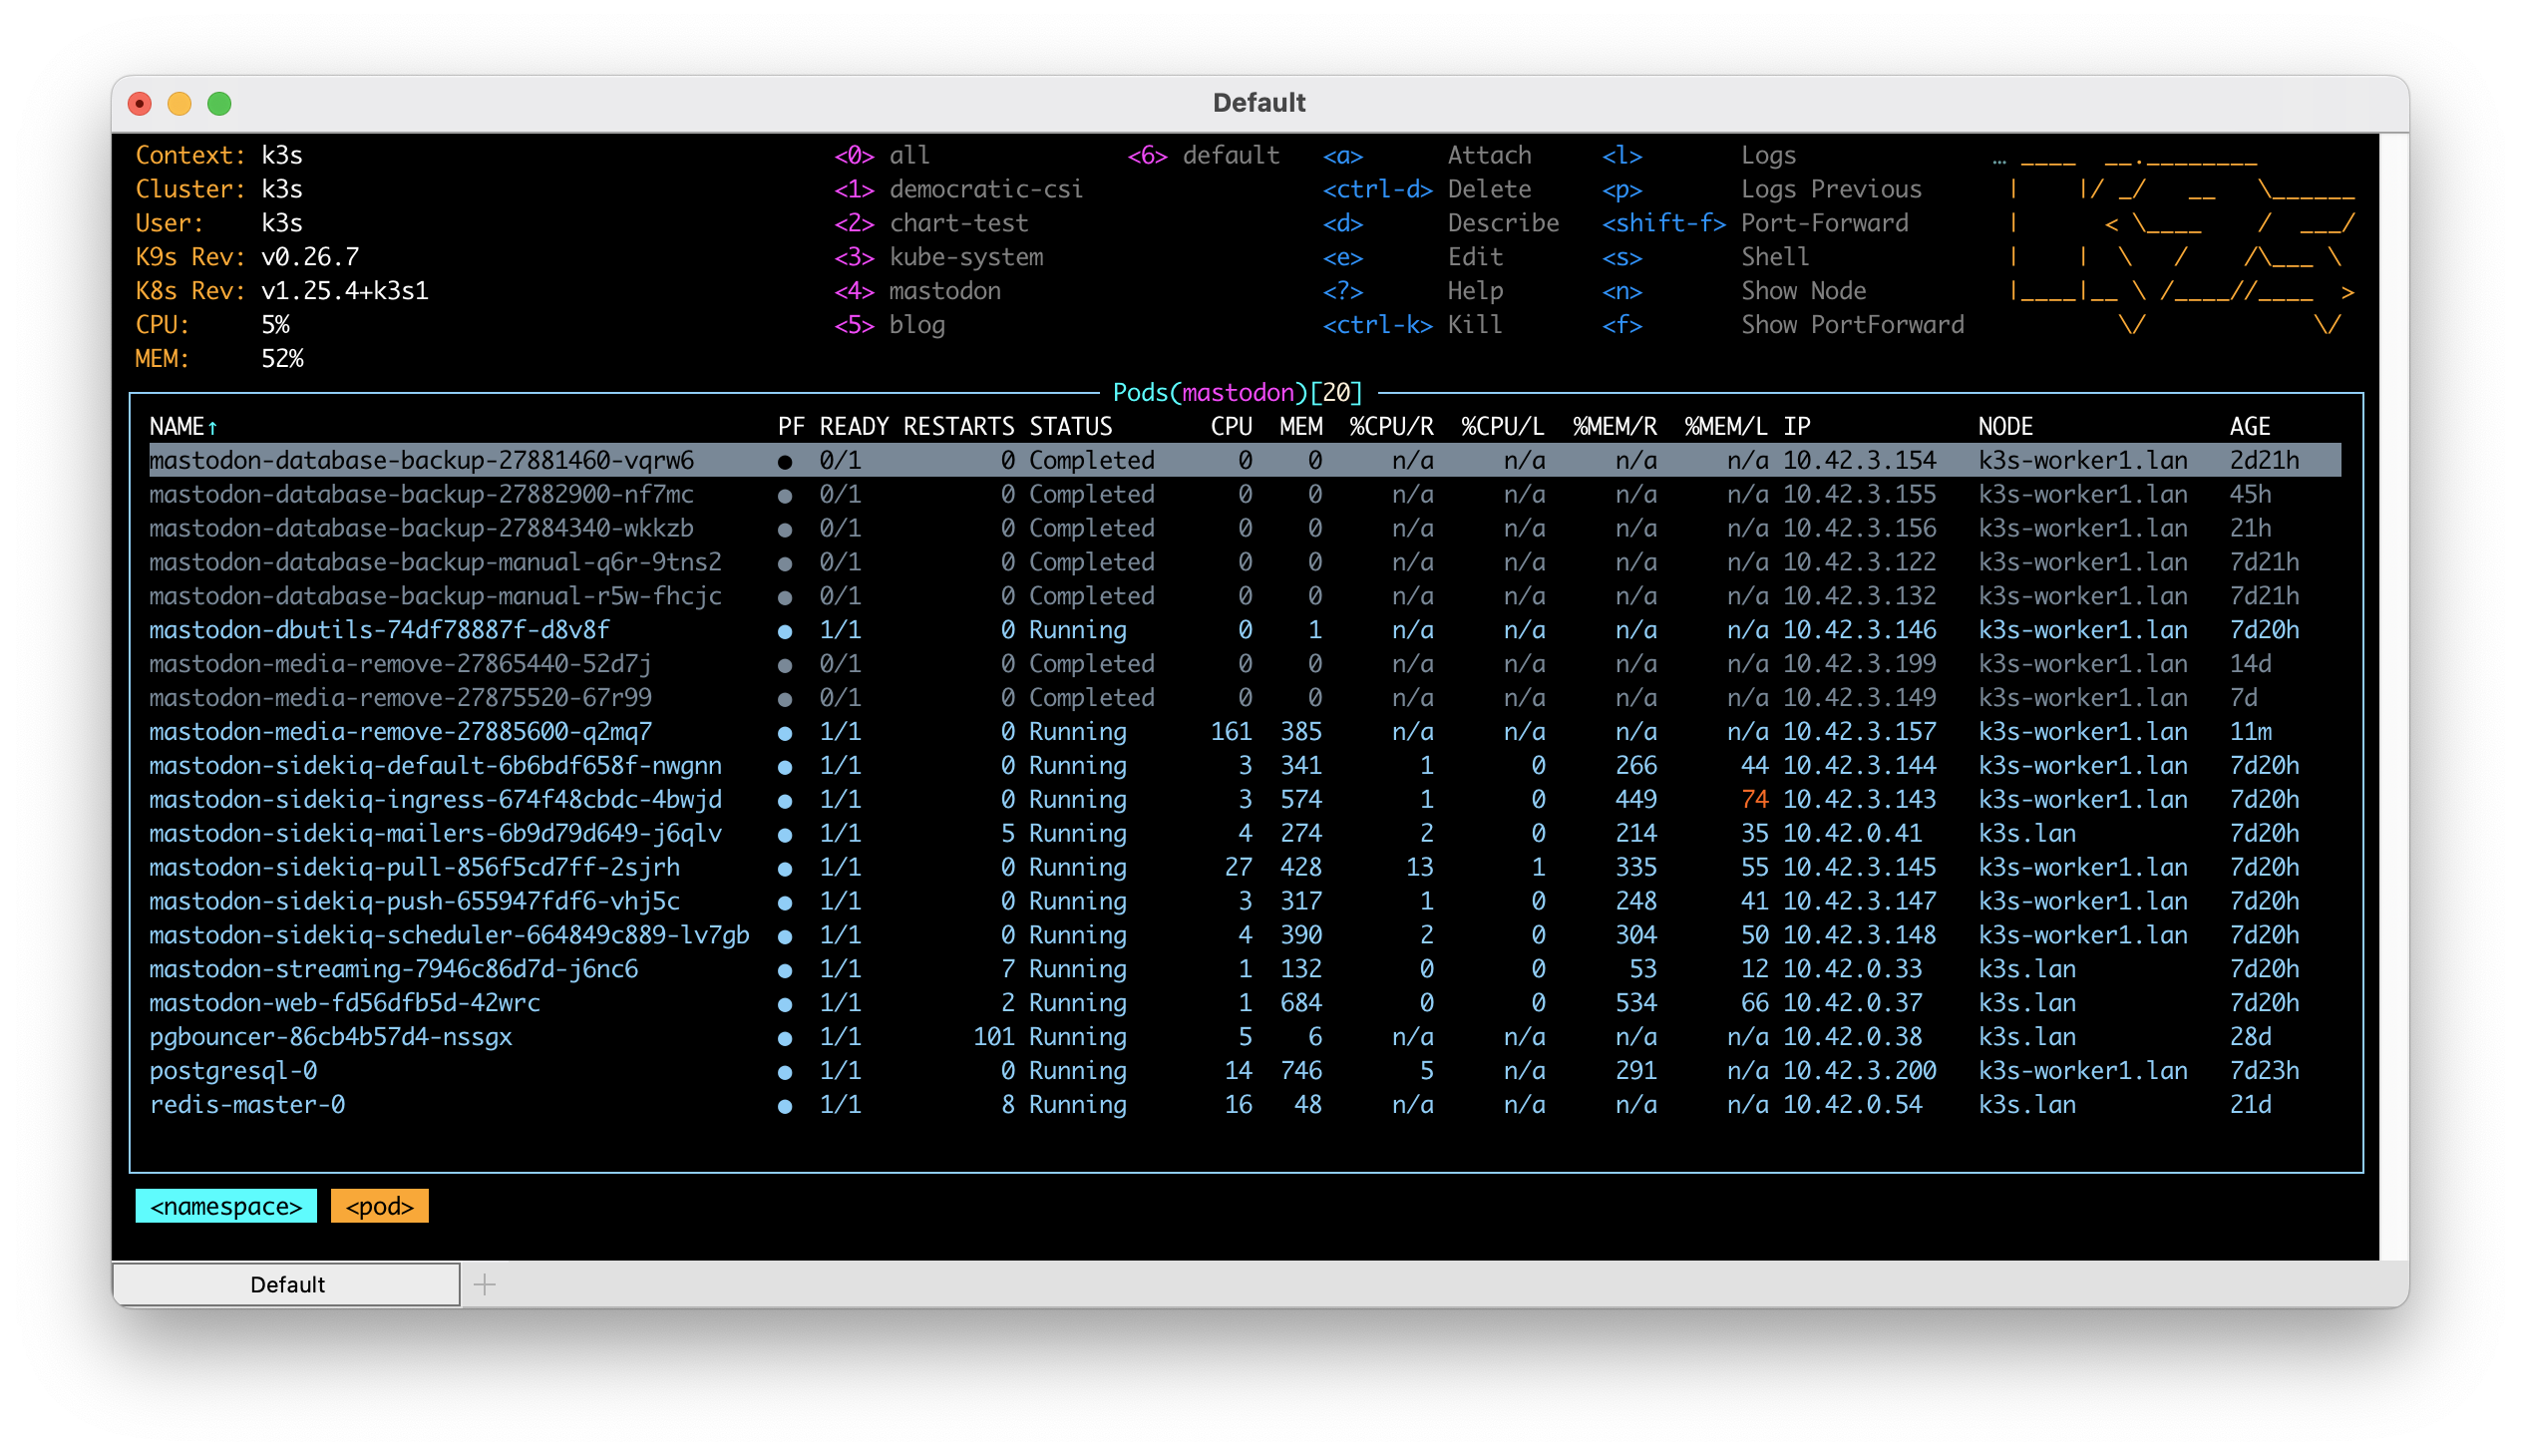
Since about mid December 2022 I have been running my own private instance of Mastodon. I thought I would detail how I did it and what it has cost me so far.

When I first learned about Mastodon I was excited to get to understand it better, particularly how it is hosted and scaled. For Mastodon, I decided right away that the best way to better my understanding was to host it myself and to do so on my favorite platform, Kubernetes. I started by creating my helm chart (https://github.com/dustinrue/mastodon-helm-chart) and installed the core software in my home lab which consists of k3s. The chart I created is based on the official helm chart (https://github.com/mastodon/chart). I created my own because I, again, wanted to learn about the moving pieces of a Mastodon installation but also because I was unhappy with the official chart integrating Redis and PostgreSQL as dependencies. In addition, it doesn’t break out the Sidekiq processes in a way that makes sense…but more on that later.

Before we can get to deep into what I did, we should probably first discuss some of the major components of a Mastodon instance or server. Mastodon is a collection of services working together to form a full solution which includes:

  • A web service which provides the user interface but is also the sort of API server for all things Mastodon. In a full production setup it is important that this be highly available.
  • A streaming service which feeds data to the web frontend as it arrives and is processed. This is almost important but doesn’t seem to be critical. In other words, you can survive a bit of downtime here, you’ll just have a less than great experience.
  • A number of Sidekiq queues. There are numerous Sidekiq queues which are the heart of how data moves in a Mastodon instance. These queues, as of this writing, include a scheduler, ingress, mailer, push, pull and default. Each queue has a specific purpose and each queue is again not absolutely critical to the availability of your Mastodon instance. This means that you can easily take down each queue temporarily to deal with some issue. While a queue is down know that nothing that queue is responsible for will be processed. The special scheduler queue, if not running, will likely prevent most other queues from doing anything at all.
  • Redis is a glue that keeps data flowing between processes. It is also a critical piece to keep running though losing data within it, while not ideal, is ok. Keeping it running is critical because all of the other Mastodon processes expect it to be available and will fail to start without it. In a full production setup I recommend ensuring it is running in a highly available fashion.
  • PostgreSQL is the last required piece of software when running Mastodon. Like Redis, it is what I could consider to be critical to your setup. If running a full production setup you will want to cluster it to maintain availability first with performance a secondary consideration.
  • You need some system for dealing with email. Mastodon needs to send email for account confirmation and some administrative or moderation work. For my system I am using Send In Blue (https://www.sendinblue.com) which has a free tier.

Mastodon also supports other, optional services which you can read about at https://docs.joinmastodon.org/admin/optional/.

As you can likely see, running Mastodon is not simple yet it isn’t overwhelming either. I believe running Mastodon can be done inexpensively, especially a private instance, but to run it in production correctly, there is definitely a base cost you need to consider so that you can remove as much failure points as possible. In addition, there are many other pieces you will likely want if running a large installation like how to monitor metrics, keeping track of Sidekiq queue depth and processing times and more.

Having spent some time on Mastodon during the great Twitter migration I witnessed some of the struggles of a number of instance admins as a their instances struggled to meet the demands of new users and users who had created accounts before but were suddenly active. I saw a few notable patterns emerge that contributed to their scaling woes including:

  • Not using a CDN or object storage system initially
  • Not installing pgbouncer in front of PostgreSQL
  • Not installing Sidekiq into separate processes running each queue

There are some really excellent guides and references on how to scale Mastodon (https://hazelweakly.me/blog/scaling-mastodon/ to name but one) but many of the recommendations will require you to do or have done one, if not all, of the above mentioned steps. Each of these items are disruptive in a way that you probably do not want to be trying to handle them while in a panic of trying to get your instance running again. If you are running or plan to run a public instance where you allow anyone to sign up then I highly recommend getting at least those three items out of the way from day one. Doing so will help ensure that scaling up from there is much, much easier as most items will then become adding additional servers to run more Sidekiq processes or tuning parameters.

When I created my helm chart, I took these lessons and applied them as conscious decisions in the design of the chart. Though not at all necessary for a small or single user instance, my chart breaks out all of the current Sidekiq queues into separate processes. This layout ensures the hard work of separating the processes out is done and the rest is a matter of scaling and tuning.

As of this writing, my helm chart also installs a weekly cronjob to clean up media files and, optionally, a cronjob for backing up the database to some shared storage in your Kubernetes cluster. Though it is ultimately incomplete, I feel the helm chart is a good start.

As for actually running Mastodon for myself I created a subdomain for my instance to live at. I then installed Mastodon, using my helm chart, into my k3s cluster. Ignoring the cost of my ISP and the computers I have, running Mastodon is quite minimal. My home lab provides everything I need to make Mastodon work including persistent storage using TrueNAS. For media storage, I created a Cloudflare R2 bucket and URL for public access. Mastodon is configured to send media content to R2 which is then served from the CDN URL. This keeps all of the heavy storage separate from the rest of the system. My last bill for R2 was just $0.06 which was for the approximately 20GB of content I have stored there. I do expect my next bill to be more because the average amount of data stored in R2 will be higher.

Since my installation is just a private one, I installed PostgreSQL and Redis as single instances within my k3s cluster. Both instances are extremely basic Bitnami based installed using their available helm charts. PostgreSQL is backed by persistent storage provided by TrueNAS. For email, my k3s cluster runs an installation of Postfix. Postfix is configured to send email through Send In Blue and services that I run in my cluster are configured to talk to Postfix. This allows me to have a single mail relay that I need to maintain the configuration for.

Ingress is provided by Cloudflare and cloudflared tunnels. A tunnel is configured on a different VM I have running and then configured in the Cloudfare side on how to route traffic to the Kube cluster with the correct hostname included.

All said, this setup has proven reliable for me since mid December. In a future post I’ll discuss how I got my private instance to feel a bit more included in the Fediverse by adding relays. Please leave a comment if you feel I missed something or got something wrong.