Some time ago I removed Google Analytics to avoid the tracking that came along with it and it all being tied to Google. I also wasn’t overly concerned about how much traffic my site got. I write here and if it helps someone then great but I’m not out here to play SEO games. Recently, however, I heard of a new self hosted option called Umami that claims to respect user privacy and is GDPR compliant. In this post I will go through how I set it up on the site.

Umami supports both PostgreSQL and MySQL. The installation resource I used, discussed below, defaults to PostgreSQL as the datastore and I opted to stick with that. PostgreSQL is definitely not a strong skill of mine and I struggled to get things running initially. Although I have PostgreSQL installed on a VM already for my Mastodon instance, I had to take some additional steps to get PostreSQL ready for Umami. After some trial and error I was able to get Umami running.

My installation of PostreSQL is done using the official postgres.org resources which you can read about at https://www.postgresql.org. In addition to having PostgreSQL itself installed as a service I also needed to install postgresql15-contrib in order to add pgcrypto support. pgcrypto support wasn’t something I found documented in the Umami setup guide but the software failed to start successfully without it and an additional step detailed below. Below is how I setup my user for Umami with all commands run as the postgres user or in psql. Some info was changed to be very generic, you should change it to suit your environment:

  • cli: createdb umami
  • psql: CREATE ROLE umami WITH LOGIN PASSWORD 'password’;
  • psql: GRANT ALL PRIVILEGES ON DATABASE umami TO umami;
  • psql: \c umami to select the umami database
  • psql: CREATE EXTENSION IF NOT EXISTS pgcrypto;
  • psql: GRANT ALL PRIVILEGES ON SCHEMA public TO umami;

With the above steps taken care of you can continue on.

Since I am a big fan of using Kubernetes whenever I can, my Umami instance is installed into my k3s based Kubernetes cluster. For the installation of Umami I elected to use a Helm chart by Christian Huth which is available at https://github.com/christianhuth/helm-charts and worked quite well for my purposes. Follow Christian’s directions for adding the helm chart repository and read up on the available options. Below is the helm values I used for installation:

ingress:
  # -- Enable ingress record generation
  enabled: true
  # -- IngressClass that will be be used to implement the Ingress
  className: "nginx"
  annotations:
    cert-manager.io/cluster-issuer: letsencrypt-production
  # -- Additional annotations for the Ingress resource
  hosts:
    - host: umami.dustinrue.com
      paths:
        - path: /
          pathType: ImplementationSpecific
  # -- An array with the tls configuration
  tls:
    - secretName: umami-tls
      hosts:
        - umami.dustinrue.com

umami:
  # -- Disables users, teams, and websites settings page.
  cloudMode: ""
  # -- Disables the login page for the application
  disableLogin: ""
  # -- hostname under which Umami will be reached
  hostname: "0.0.0.0"

postgresql:
  # -- enable PostgreSQL™ subchart from Bitnami
  enabled: false

externalDatabase:
  type: postgresql

database:
  # -- Key in the existing secret containing the database url
  databaseUrlKey: "database-url"
  # -- use an existing secret containing the database url. If none given, we will generate the database url by using the other values. The password for the database has to be set using `.Values.postgresql.auth.password`, `.Values.mysql.auth.password` or `.Values.externalDatabase.auth.password`.
  existingSecret: "umami-database-url"

The notable changes I made from the default values provided is I enabled ingress and set my hostname for it as required. I also set cloudMode and diableLogin to empty so that these items were not disabled. Of particular note, leaving hostname at the default value is the correct option as setting it to my hostname broke the startup process. Next, I disabled the postgresql option. This disables the installation of PostgreSQL as a dependent chart since I already had PostreSQL running.

The last section is how I defined my database connection information. To do this, I created a secret using kubectl create secret generic umami-database-url -n umami and then edited the secret with kubectl edit secret umami-database-url -n umami. In the secret, I added a data section with base64 encoded string for “postgresql://umami:[email protected]:5432/umami”. The secret looks like this:

apiVersion: v1
data:
  database-url: cG9zdGdyZXNxbDovL3VtYW1pOnBhc3N3b3JkQDEwLjAuMC4xOjU0MzIvdW1hbWk=
kind: Secret
metadata:
  name: umami-database-url
  namespace: umami
type: Opaque

Umami was then installed into my cluster using helm install -f umami-values.yaml -n umami umami christianhuth/umami which brought it up. After a bit of effort on the part of Umami to initialize the database I was ready to login using the default username/password of admin/umami.

I setup a new site in Umami per the official directions and grabbed some information that is required for site setup from the tracking code page.

Configuring WordPress

Configuring WordPress to send data to Umami was very simple. I added the integrate-umami plugin to my installation, activated the plugin and then went to the settings page to input the information I grabbed earlier. My settings page looks like this:

Screenshot of Umami settings showing the correct values for Script Url and Website ID. These values come from the Umami settings screen for a website.

With this information saved, the tracking code is now inserted into all pages of the site and data is sent to Umami.

Setting up Umami was a bit cumbersome for me initially but that was mostly because I am unfamiliar with PostgreSQL in general and the inline documentation for the Helm chart is not very clear. After some trial and error I was able to get my installation working and I am now able to track at least some metrics for this site. In fact, Umami allows me to share a public URL for others to use. The stats for this site is available at https://umami.dustinrue.com/share/GadqqMiFCU8cSC7U/Blog.

TLDR; The fix for this is to ensure you are forcing your CDN to properly handle “application/activity+json” in the Accept header vs anything else. In other words, you need to Vary on Accept, but it’s best to limit it to “application/activity+json” if you can.

With the release of ActivityPub 1.0.0 plugin for WordPress I hope we’ll see a surge in the number of WordPress sites that can be followed using your favorite ActivityPub based systems like Mastodon and others. However, if you are hosting your WordPress site on Cloudflare (and likely other CDNs) and you have activated full page caching you are going to have a difficult time integrating your blog with the greater Fediverse. This is because when an ActivityPub user on a service like Mastodon performs a search for your profile, that search will land on your WordPress author page looking for additional information in JSON format. If someone has visited your author page recently in a browser then there is the chance Mastodon will get HTML back instead resulting in a broken search. The reverse of this situation can happen too. If a Mastodon user has recently performed a search and later someone lands on your author page, they will see JSON instead of the expected results.

The cause of this is because Cloudflare doesn’t differentiate between a request looking for HTML or one looking for JSON, this information is not factored into how Cloudflare caches the page. Instead, it only sees the author page URL and determines that it is the same request and returns whatever it has. The good news is, with some effort, we can trick Cloudflare into considering what type of content the client is looking for while still allowing for full page caching. Luckily the ActivityPub has a nice undocumented feature to help work around this situation.

To fix this while keeping page caching you will need to use a Cloudflare worker to adjust the request if the Accept header contains “application/activity+json”. I assume you already have page caching in place and you do not have some other plugin on your site that would interfere with page caching, like batcache, WP SuperCache and more. For my site I use Cloudflare’s APO for WordPress and nothing else.

First, you will want to ensure that your “Caching Level” configuration is set to standard. Next, you will need to get setup for working with Cloudflare Workers. You can follow the official guide at https://developers.cloudflare.com/workers/. Next, create a new project, again using their documentation. Next, replace the index.js file contents with:

export default {
  async fetch(req) {
    const acceptHeader = req.headers.get('accept');
    const url = new URL(req.url);

    if (acceptHeader?.indexOf("application/activity+json") > -1) {
      url.searchParams.append("activitypub", "true");
    }

    return fetch(url.toString(), {
      cf: {
        // Always cache this fetch regardless of content type
        // for a max of 5 minutes before revalidating the resource
        cacheTtl: 300,
        cacheEverything: true,
      },
    });
  }
}

You can now publish this using wrangler publish. You can adjust the cacheTtl to something longer or shorter to suite your needs.

Last step is to associate the worker with the /author route of your WordPress site. For my setup I created a worker route of “*dustinrue/author*” and that was it. My site will now cache and return the correct content based on whether or not the Accept header contains “application/activity+json”.

Remember that Cloudflare Workers do cost money though I suspect a lot of small sites will easily fit into the free tier.

One thing I dislike in WordPress is that it makes numerous external http requests while in the admin. This happens even if you have disabled any auto update systems in wp-config.php and can cause small pauses while loading admin pages while you wait for the requests to finish. Since I manage my site through a Gitlab based CI/CD workflow, auto updates don’t make a lot of sense for me and I would prefer to not have WordPress core or themes phoning home and slowing down the admin experience.

There is an existing option for blocking http requests in WordPress and it presented as a pair of defines you can use to block all requests and then allow some. These defines are WP_HTTP_BLOCK_EXTERNAL and WP_ACCESSIBLE_HOSTS which are describe in more depth at https://developer.wordpress.org/reference/classes/wp_http/block_request/. This a great way to block requests and generally the way to do something like this, block everything and then allow what you want. However, for my situation there is a much smaller set of domains I want to block and then allow everything else. In other words, I want to do the opposite of what these defines can do you for you. This is because there are a number of external services I do want to interact with like Cloudflare and Mastodon.

What I came up with was an mu-plugin that reverses the logic of defines above. It is an almost 1:1 copy/paste of the code that is used to block some requests. I then define a list of domains I wish to block. The code is very simple:

<?php
function block_urls( $preempt, $parsed_args, $uri ) {

    if ( ! defined( 'WP_BLOCKED_HOSTS' ) ) {
      return false;
    }

    $check = parse_url( $uri );
    if ( ! $check ) {
      return false;
    }

    static $blocked_hosts = null;
    static $wildcard_regex   = array();
    if ( null === $blocked_hosts ) {
        $blocked_hosts = preg_split( '|,\s*|', WP_BLOCKED_HOSTS );
        if ( false !== strpos( WP_BLOCKED_HOSTS, '*' ) ) {
          $wildcard_regex = array();
          foreach ( $blocked_hosts as $host ) {
            $wildcard_regex[] = str_replace( '\*', '.+', preg_quote( $host, '/' ) );
          }
          $wildcard_regex = '/^(' . implode( '|', $wildcard_regex ) . ')$/i';
        }
    }

    if ( ! empty( $wildcard_regex ) ) {
      $results = preg_match( $wildcard_regex, $check['host'] );
      if ($results > 0) {
        error_log(sprintf("Blocking %s://%s%s", $check['scheme'], $check['host'], $check['path']));
      } else {
        error_log(sprintf("Allowing %s://%s%s", $check['scheme'], $check['host'], $check['path']));
      }

      return $results > 0;
    } else {
      $results = in_array( $check['host'], $blocked_hosts, true ); // Inverse logic, if it's in the array, then block it.

      if ($results) {
        error_log(sprintf("Blocking %s://%s%s", $check['scheme'], $check['host'], $check['path']));
      } else {
        error_log(sprintf("Allowing %s://%s%s", $check['scheme'], $check['host'], $check['path']));
      }
      return $results;
    }
}

add_filter('pre_http_request', 'block_urls', 10, 3);

With this code saved in your mu-plugins directory as blocked-urls.php, you can then add a define like this to block those URLs from being loaded by WordPress:

define( 'WP_BLOCKED_HOSTS', 'api.wordpress.org,themeisle.com,*.themeisle.com' );

When WordPress attempts to load URLs from these domains, they will be blocked. You’ll also notice that this plugin is outputting all http requests that pass through WordPress core’s remote_get function. Using this information, you can block additional domains if you need to.

Update – I have also posted an alternative method that preserves the ability to have full page caching enabled. Please find it at WordPress ActivityPub and Cloudflare.

In a previous post I discussed how to deal with the fact the ActivityPub plugin for WordPress must return author pages in a different format depending on the value of the Accept header. A browser hitting an author page is going to be looking for HTML to be returned, while Mastodon will expect a JSON instead. If you use any kind of caching system be it a CDN, special plugin or combination of the two then you may run into an issue where the wrong content is being cached for each Accept header type. You might see this in your site health report with:

Your author URL does not return valid JSON for application/activity+json. Please check if your hosting supports alternate Accept headers.

In this post I will discuss a method for dealing with this while not totally losing the ability to cache the response. This is useful for busy sites or as a way to help mitigate some forms of DoS attack. The example I provide here is meant for Nginx with php-fpm but you can apply this same sort of thinking anywhere else where you have enough control over the configuration to make it work.

Assuming you followed the previous post and have created an exception for your author URL in your CDN then it is on your server to render author pages each time a request is made. This is a waste of resources and doesn’t provide an ideal experience for end users. To enable caching on this endpoint, we will leverage Nginx’s built in caching capability while setting the cache key based on the Accept header.

To start, let’s setup basic Nginx caching. At the top of your configuration file, outside of the server{} block, (advanced users can adjust as desired) add the following:

fastcgi_cache_path /etc/nginx/cache levels=1:2 keys_zone=wordpress:100m inactive=10m max_size=100m;

You can adjust the path if you want but in essence we are defining a path of /etc/nginx/cache with a name of wordpress. We are limiting it to 100MB and saying delete anything older than 10 minutes if it hasn’t been accessed. /etc/nginx/cache must exist and must be owned by the same user that runs Nginx. If you have multiple servers know that this cache is unlikely to be shared so each server will have a unique cache.

Next, add a map that to define what Accept headers we want to Vary on:

map $http_accept $vary_key {
  default "default";
  "~application/activity\+json" "json";
}

This block will create a new variable we can use later called $vary_key. Notice here that we will only create a different cache entry when application/activity+json is sent included in the list.

Now inside the server{} block for your site, let’s add a nice header we can use to ensure our caching is working properly. Adding add_header X-Nginx-Cache $upstream_cache_status; to this section will cause Nginx to output a header we can see to know the cache status. It will be BYPASS, MISS or HIT in response headers.

Next, inside the location block that is handling PHP requests, add the following config options:

# cache key
fastcgi_cache_key "$vary_key$host$request_method$request_uri";

# matches keys_zone in fastcgi_cache_path
fastcgi_cache wordpress;

# don't cache pages defined earlier
fastcgi_no_cache $no_cache;

#defines the default cache time
fastcgi_cache_valid any 10m;

# misc additional settings
fastcgi_cache_use_stale updating error timeout invalid_header http_500;
fastcgi_cache_lock on;
fastcgi_cache_lock_timeout 10s;

The next settings depend on what you want to do. If you are using a CDN and are only exposing author pages then you can use the following settings

# Cache nothing by default
set $no_cache 1;

# Only cache author pages
if ($request_uri ~* "/author/") {
  set $no_cache 0;
}

If instead, you want to cache everything your CDN might miss then you can use this (this is what I use):

# Cache everything by default
set $no_cache 0;

# Don't cache logged in users or commenters
if ( $http_cookie ~* "comment_author_|wordpress_(?!test_cookie)|wp-postpass_" ) {
  set $no_cache 1;
}

# Don't cache the following URLs
if ($request_uri ~* "/(wp-admin/|wp-login.php)") {
  set $no_cache 1;
}

If done correctly then hitting an author page will result in different results depending on the Accept header being used. To verify, take an author page and load it up in a browser. You should get a proper HTML page. Copy the URL out and, using curl, send the following:

curl -I https://dustinrue.com/author/ruedu/ -H "Accept: application/activity+json"

x-nginx-cache: MISS

Your Nginx cache status may already be HIT if someone recently searched for you. It should be HIT if you send the request again.

Debugging

It is important that you debug and properly resolve this endpoint. Failing to do so will result in failed searches of your author/user from ActivityPub clients. To be clear, the following must return different content:

curl -I https://dustinrue.com/author/ruedu
curl -I https://dustinrue.com/author/ruedu -H "Accept: application/activity+json"

Adjust these URLs for your author page URLs and ensure the first curl returns HTML content while the second one returns JSON content. While writing this post I noticed that the plugin is still outputting that the content type is text/html when it should say application/activity+json. Despite this inconsistency, clients will use the returned content.

If the curl calls are returning different content, next pay attention to the x-nginx-cache header to ensure that it is actually caching. You can add another utility header to your Nginx config to assist with this:

add_header x-accept $vary_key always;

This add_header will output what value the map landed on so you can ensure things are being picked up properly.

Conclusion

I hope this is enough to help guide you in improving your WordPress + ActivityPub experience.

Yesterday I was reminded that when a URL is shared on Mastodon, every instance that has a user following you, that server will make a request to your site at least once in an effort to get some additional embed information. If your site is WordPress based, like this one, then you will likely see two requests. The first request to your site will request the URL that was added to the post while the second one follows any embed information WordPress is exposing in order to get some additional meta data. Since Mastodon is a federated system, every Mastodon server or instance will need to gather this data in order for it to be displayed to its users.

If you are a user that has a lot of followers then posting a link to your blog or site will likely result in a mini DDoS has hundreds of Mastodon instances request this information from your server. If you have not taken precautions this can potentially take down your site as it is overloaded with requests! Years ago this would have been referred to as being “slash dotted” (links on https://slashdot.org) or “fireballed” (links on https://daringfireball.net).

Fortunately you can very effectively deal with this situation on your own or by working with your hosting provider. In this post, I am going to describe how I handle the situation using Cloudflare, which is the CDN provider I have chosen to put my site behind. I am not going into full detail on how to implement all options and I am not selling Cloudflare or associated with them beyond being a customer. What I share here will be applicable to any CDN or will at least serve as inspiration for how to handle it in your configuration.

As I said previously, this site is using WordPress and is behind Cloudflare. To make it easy on myself I have also purchased their Automatic Platform Optimization for WordPress feature. I got into this option initially because I wanted to understand it better but have since kept it because it works well. The biggest feature of APO for WordPress is that it enables full page caching for your site. This is a must if you want to get the best possible experience for users globally. Using APO is absolutely not necessary, you can simply use Nginx micro caching instead or any other caching solution, but the key here is to have full page caching so that repeated requests to your site do not incur actual processing time by WordPress.

APO will, out of the box, cache full pages of your site but what it will not protect is the meta data URL used to provide additional information for embeds. To prevent Mastodon servers from crushing your site with embed meta data requests, there is one additional endpoint you need to force to be cached. Here is how I forced Cloudflare to cache the correct URL for me.

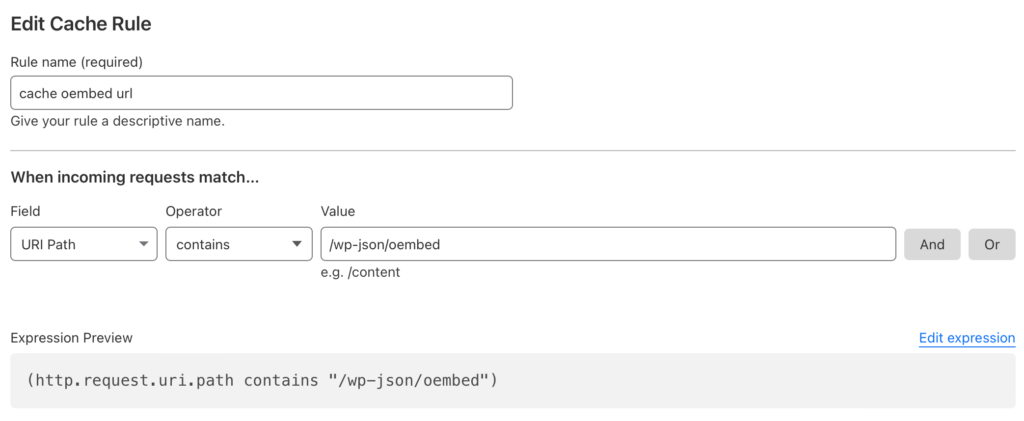
Login into Cloudflare and click on the domain for your site. Find the caching section of the menu and click on Cache Rules. Add a new rule and define what is shown in the screenshot

Screenshot showing a cloudflare configuration screen for caching an oembed request from Mastodon, or any system that would do this. Add a name for your rule, set the Field to URI Path contains the path /wp-json/oembed

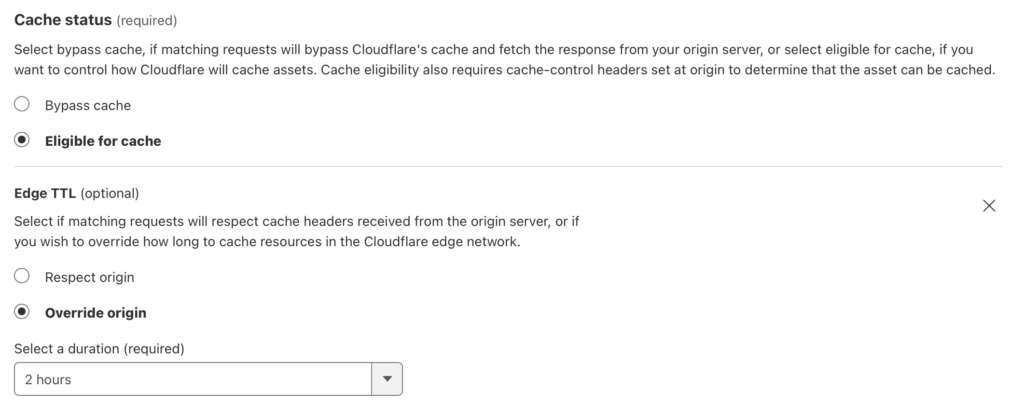
From here, tell Cloudflare what to do with this match

Screenshot showing another Cloudflare configuration screen. Here you should set the Cache status to "Eligible for cache" and "Override origin" set to 2 hours. 2 hours is the minimum option on a free plan

Note that 2 hours is the lowest cache time I can specify on an otherwise free Cloudflare plan so that is what I set it to. With these options filled out you can click save and you are done. Anything looking for this URL will now either get a cached copy of the response or will cause the content to be cached for future requests.

Of course, you don’t need to use Cloudflare to make this work. Savvy users can also translate these URLs to Nginx or Apache configuration to perform the trick. The goal is to ensure your WordPress site is better able to handle when you have shared a link to Mastodon and there are many options. Using Cloudflare is one option that has worked well for me. I encourage everyone that hosts a blog, either self-hosted or through some managed provider, to ensure that page caching and the oembed URL for WordPress is cached.

Quick tip on a rather specific situation I found myself in though I believe it could come up for a lot of people using WordPress trying to integrate with ActivityPub networks. If you are:

  • Running WordPress
  • Using a page caching solution like Cloudflare APO or manually configured
  • Running an ActivityPub plugin and/or webfinger

Then you will likely run into an issue with your site not being reliably discoverable when searched for. Using Matthias Pfefferle‘s ActivityPub, Webfinger and Nodeinfo plugins to get your WordPress site exposed as an ActivityPub server will add a few routes to your site. One of the routes is the author pages of WordPress which exist at /author/<author username>. However, this path when hit with a browser will return HTML. ActivityPub instances on the other hand will be looking for a different content type called application/activity+json. Unfortunately, many caching layers will not provide a Vary on Accept which you will need in order to return different data depending on what type of content the requester is looking for.

To resolve this on my site, which uses Cloudflare for CDN, I added a page rule that disallows caching for my author page. This works because I am the only author on the site. A full “proper” solution would be to set a Vary on the Accept header for that path, which Cloudflare does not support.

You may want to be very specific about what Vary headers are used, on what paths and what you actually accept a Vary header on and so on. Allowing for a wide or unlimited range of values can result in people easily breaking cache at the CDN sending requests to your origin servers.

I have been running this blog on this domain for over ten years now but the “hardware” has changed a bit. I have always done a VPS but where it lives has changed over time. I started with Rackspace and then later moved to Digital Ocean back when they were the new kid on the block and offered SSD based VPS instances with unlimited bandwidth. I started on a $5 droplet and then upgraded to a pair of $5 droplets so that I could get better separation of concerns and increase the total amount of compute I had at my disposal. This setup has served me very well for the past five years or so. If you are interested in checking out Digital Ocean I have a referral code you can use – https://m.do.co/c/5016d3cc9b25

As of this writing, the site is hosted on two of the lowest level droplets Digital Ocean offers which cost $5 a month each. I use a pair of instances primarily because it is the cheapest way to get two vCPU worth of compute. I made the change to two instances back when I was running xboxrecord.us (XRU) as well as a NodeJS app. Xboxrecord.us and the associated NodeJS app (which also powered guardian.theater at the time), combined with MySQL, used more CPU than a single instance could provide. By adding a new instance and moving MySQL to it I was able to spread the load across the two instances quite well. I have since shutdown XRU and the NodeJS app but have kept the split server arrangement mostly because I haven’t wanted to spend the time moving it back to a single instance. Also, how I run WordPress is slightly different now because in addition to MySQL I am also running Redis. Four services (Nginx, PHP, Redis and MySQL) all competing for CPU time during requests is just a bit too much for a single core.

Making the dual server arrangement work is simple on Digital Ocean. The instance that runs MySQL also runs Redis for object and page caching for WordPress. This means Nginx and PHP gets its own CPU and MySQL and Redis get their own CPU for doing work. I am now effectively running a dual core system but with the added overhead, however small, of doing some work across the private network. Digital Ocean has offered private networking with no transfer fees between instances for awhile now so I utilize that move data between the two instances. Digital Ocean also has firewall functionality that I tap into to ensure the database server can only be reached by my web server. There is no public access to the database server at all.

The web server is, of course, publicly available. In front of this server is a floating IP, also provided by Digital Ocean. I use a floating IP so that I can create a new web server and then simply switch where the floating IP points so make it live. I don’t need to change any DNS and my cut overs are fairly clean. Floating IPs are free and I highly recommend always leverage floating IPs in front of an instance.

Although the server is publicly available, I don’t allow for direct access to the server. To help provide some level of protection I use Cloudflare in front of the site. I have used Cloudflare for almost as long as I’ve been on Digital Ocean and while I started out on their free plan I have since transitioned to using their Automatic Platform Optimization system for WordPress. This feature does cost $5 a month to enable but what it gives you, when combined with their plugin, is basically the perfect CDN solution for WordPress. I highly recommend this as well.

In all, hosting this site is about $15 a month. This is a bit steeper than some people may be willing to pay and I could certainly do it for less. That said, I have found this setup to be reliable and worry free. Digital Ocean is an excellent choice for hosting software and keeps getting better.

Running WordPress

WordPress, if you’re careful, is quite light weight by today’s standards. Out of the box it runs extremely quickly so I have always done what I could to ensure it stays that way so that I can keep the site as responsive as possible. While I do utilizing caching to keep things speedy you can never ignore uncached speeds. Uncached responsiveness will always be felt in the admin area and I don’t want a sluggish admin experience.

Keeping WordPress running smoothly is simple in theory and sometimes difficult in practice. In most cases, doing less is always the better option. For this reason I install and use as few plugins as necessary and use a pretty basic theme. My only requirement for the theme is that it looks reasonable while also being responsive (mobile friendly). Below is a listing of the plugins I use on this site.

Akismet

This plugin comes with WordPress. Many people know what this plugin is so I won’t get into it too much. It does what it can to detect and mark command spam as best it can and does a pretty good job of it these days.

Autoptimize

Autoptimize combines js and css files into single files as much as possible. This reduces the total number of requests required to load content. This fulfills my “less is more” requirement.

Autoshare for Twitter

Autoshare for Twitter is a plugin my current employer puts out. It does one thing and it does it extremely well. It shares new posts, when told to do so, directly to Twitter with the title of the post as well as a link to it. When I started I would do this manually. Autoshare for Twitter greatly simplifies this task. Twitter happens to be the only place I share new content to.

Batcache

Batcache is a simple page caching solution for WordPress for caching pages at the server. Pages that are served to anonymous users are stored in Redis, with memcache(d) also supported. Additional hits to server will be served out of the cache until the page expires. This may seem redundant since I have Cloudflare providing full page caching but caching at the server itself ensures that Cloudflare’s many points of presence get a consistent copy from the server.

Cloudflare

The Cloudflare plugin is good by itself but required if you are using their APO option for WordPress. With this plugin, API calls are made to Cloudlfare to clear the CDN cache when certain events happen in WordPress, like saving a new post.

Cookie Notice and Compliance

Cookie Notice and Compliance for that sweet GDPR compliance. Presents that annoying “we got cookies” notification.

Redis Object Cache

Redis Object Cache is my preferred object caching solution. I find Redis, combined with this plugin, to be the best object caching solution available for WordPress.

Site Kit by Google

Site Kit by Google, another plugin by my employer, is the best way to integrate some useful Google services, like Google Analytics and Google Adsense, into your WordPress site.

That is the complete set of plugins that are deployed and activated on my site. In addition to this smallish set of plugins I also employ another method to keep my site running as quickly as I can, which I described in Speed up WordPress with this one weird trick. These plugins, combined with the mentioned trick, ensure the backend remain as responsive as possible. New Relic reports that the typical, average response time of the site is under 200ms even if the traffic to the site is pretty low. This seems pretty good to me while using the most basic droplets Digital Ocean has to offer.

Do you host your own site? Leave a comment describing what your methods are for hosting your own site!

Today I’d like to discuss what I often see as one of the largest contributors to poor backend WordPress performance. Often times I see this particular issue contributing to 50% or more of the total time the user waits for a page to load. The problem? Remote web or API calls.

In my previous post, I talk about using Akismet to handle comment spam on this site. In order for Akismet to work at all it needs to be allowed to access an outside service using API calls. While API calls are necessary for some plugins to work properly I often see plugins or themes that make unnecessary remote calls. Some plugins and themes like to phone home for analytics reasons or to check for updates. Even WordPress core will make remote calls in order to determine the latest version of WordPress or to check for available theme and plugin updates even if you have otherwise disabled this functionality. These remote calls add a lot of extra time to requests or can even cause your site to become unavailable if API endpoints take too long to respond.

This site is very basic and runs a minimal set of plugins. Because of this, I am able to get away with a rather ham-fisted method of dealing with remote API calls so that I can ensure my site remains as responsive as possible given the low budget hosting arrangement I use. This one weird trick is to simply disallow remote calls at all except for the ones absolutely necessary for my plugins to operate properly.

In my wp-config.php file I have defined the following:

define( 'WP_HTTP_BLOCK_EXTERNAL', true );
define( 'WP_ACCESSIBLE_HOSTS', 'api.cloudflare.com,rest.akismet.com,*.rest.akismet.com' );

The first define tells WordPress to block all http requests that use wp_remote_get or similar. This has the immediate affect of blocking the majority of remote web calls. While this works for any plugin that uses WordPress functions for accessing remote data, any plugin that makes direct web requests using libraries like curl or guzzle will not be affected.

The second define tells WordPress what remote domains are allowed to be accessed. As you can see, the two plugins that are allowed to make remote calls are Cloudflare and Akismet. Allowing these domains allows these two plugins to function normally.

By blocking most remote calls I get the benefit if preventing my theme and core from phoning home on some page loads and while I’m in the admin. This trick alone, without making any other optimizations, makes WordPress feel much more snappy to use and allows pages that are uncached to be built much more quickly. Blocking remote calls has the side effect of preventing core’s ability to check the core and plugin versions but I am in the WordPress world enough that I am checking on these things manually anyway so the automated checks just aren’t necessary. I’d rather trade the automated checks for a continuously better WordPress experience.

What can you do as a developer?

This trick is decidedly heavy handed and only works as someone operating a WordPress site. Developers may want to consider their use of remote web calls and may be wondering, what can I do to ensure WordPress remains as responsive as possible? The primary question a developer should always ask when creating a remote request is “is the data from the remote request necessary right now?” Meaning, is the data the remote request is getting necessary for the current page load or could it be deferred to some background process like WordPress’s cron system and then cached? The issue with remote requests isn’t that they are being performed, it is that they are often performed on what I call “the main thread” where the main thread is the request a user has made and must then wait for the results. Remote requests that are made in the background will not be felt by end users. In addition, background requests can be performed once rather than for every request. In addition to improving page load times for end users you may also find you can get away with less hardware.

If you need help determine how many remote calls are being performed there are some options. You can certainly write an mu-plugin that simply logs any remote requests being made but what I used was a free New Relic subscription. I used New Relic on this site to determine what remote calls were being performed and then configured what domains were allowed based on that information. By blocking unnecessary remote requests I was able to cut my time to first byte timings in half.

Do you have any simple tricks you use to improve WordPress performance? Leave the info in the comments below!

At the beginning of November I decided to give comments on posts a try again. In the past, allowing comments on the site has been an issue as the overhead of managing spam comments was more than I wanted to deal with. It required almost daily attendance as spam was a constant stream of junk even with tools like Akismet installed, enabled and configured.

I am happy to report that Akismet is greatly improved and it is doing an excellent job of blocking and removing spam comments so that I don’t even need to see them. If you, like me, have had a negative experience trying to manage comments in the past then maybe it is time to try them again with an updated Akismet setup.

This one is, primarily, for all the people responsible for ensuring a WordPress site remains available and running well. “Systems” people if we must name them. If you’re a WordPress developer you might want to ride along on this one as well so you and the systems or DevOps team can be speaking a common language when things go bad. Often times, systems people will immediately blame developers for writing bad code but the two disciplines must cooperate to keep things running smoothly, especially at scale. It’s important for systems AND developers to understand how code works and scales on servers.

What I’m about to cover is some common performance issues that I see come up and then be misdiagnosed or “fixed” incorrectly. They’re the kind of thing that causes a WordPress site to become completely unresponsive or very slow. What I cover may seem obvious to some, and they are certainly very generalized, but I’ve seen enough bad calls to know there are a number of people out there that get tripped up by these situations. None of the issues are necessarily code related nor are they strictly WordPress related, they apply to many PHP based apps; it’s all about how sites behave at scale. I am going to explore WordPress site performance issues since that’s where my talents are currently focused.

In all scenarios I am expecting that you are running something getting a decent amount of traffic at the server(s). I am assume you are running a LEMP stack consisting of Linux, Nginx, PHP-FPM and MySQL. Maybe you even have a caching layer like Memcached or Redis (and you really should). I’m also assuming you have basic levels of visibility into the app using something like New Relic.

Let’s get started.

Continue reading