In this post I’m going to quickly describe the process of getting Gitlab’s Kubernetes Integration connected to a k3s based Kubernetes setup. Once connected you can use k3s for your build pipelines or deployments as you see fit.
In my example setup I have installed Gitlab locally on a VM and have created another VM which will run k3s. Both systems have non-public IP addresses. My Gitlab server is made available using yet another VM acting as a proxy using Nginx. This tutorial should work for you as long as you either have a similar setup or the Gitlab server can talk directly to the k3s server over the Internet. If you are going over the Internet be sure to take the necessary precautions to protect your k3s system.
Further, I will not discuss how to setup Gitlab, I assume you already have that installed.
With these requirements out of the way let’s get started. If your k3s instance will be on the same network as your Gitlab server, you will need to configure Gitlab to allow for local connections. This can be done by:
- Visiting
/admin/application_settings/networkon your Gitlab instance. - Expanding the
Outbound Requestssection - Checking both options for allowing requests to the local network
- Clicking
Save changes
Next, create a VM that will run k3s. Any modern Linux based system should work and in my setup I am using a CentOS 7. Since the machine will be used for doing builds I recommend creating a fairly strong machine. The more cores and memory the better. Most importantly the system should have fast storage with local SSD being the most ideal. When running builds in k3s all of your builds will happen in Docker containers and the effort involved with downloading and expanding Docker images can be disk intensive.
With your system of choice up and running do the following
- Optionally: Remove any existing firewall software in favor of using what your service provider providers. For example, if you are on AWS it is easier to use security groups than try to manage firewall settings on the systems themselves.
- Install k3s per directions provided at https://k3s.io. It is as simple as running
curl -sfL https://get.k3s.io | sh - - After a small while you’ll have a system running Kubernetes and all the required utilities installed and configured. You should find kubectl available and be able to ask the system what pods are running with
kubectl get pods. Hint, there will be none.
You must now create the service-account user that Gitlab uses when interacting with your k3s system. To do so create a file called service-account.yaml with the contents:
apiVersion: v1
kind: ServiceAccount
metadata:
  name: gitlab-admin
  namespace: kube-system
---
apiVersion: rbac.authorization.k8s.io/v1beta1
kind: ClusterRoleBinding
metadata:
  name: gitlab-admin
roleRef:
  apiGroup: rbac.authorization.k8s.io
  kind: ClusterRole
  name: cluster-admin
subjects:
- kind: ServiceAccount
  name: gitlab-admin
  namespace: kube-system
And apply it to k3s using kubectl apply -f service-account.yaml.
Next, we’ll prepare some values that Gitlab will require when adding the Kubernetes cluster. First, lets grab the user token for the service account. To do so run the following:
kubectl -n kube-system describe secret $(kubectl -n kube-system get secret | grep gitlab-admin | awk '{print $1}')
The output should be similar to this:
Name:         gitlab-admin-token-tktqt
 Namespace:    kube-system
 Labels:
 Annotations:  kubernetes.io/service-account.name: gitlab-admin
               kubernetes.io/service-account.uid: 81dac73b-fde3-427c-adb2-ac2edc596896
 Type:  kubernetes.io/service-account-token
 Data
 ca.crt:     526 bytes
 namespace:  11 bytes
 token:      eyJhbGciOiJSUzI1NiIsImtpZCI6InBRYlRmcUZDRGJsRWJLbmRYVUtSM1RxLVNtMEdMb2MyOWI2bkh1VkQ5RVkifQ.eyJpc3MiOiJrdWJlcm5ldGVzL3NlcnZpY2VhY2NvdW50Iiwia3ViZXJuZXRlcy5pby9zZXJ2aWNlYWNjb3VudC9uYW1lc3BhY2UiOiJrdWJlLXN5c3RlbSIsImt1YmVybmV0ZXMuaW8vc2VydmljZWFjY291bnQvc2VjcmV0Lm5hbWUiOiJnaXRsYWItYWRtaW4tdG9rZW4tdGt0cXQiLCJrdWJlcm5ldGVzLmlvL3NlcnZpY2VhY2NvdW50L3NlcnZpY2UtYWNjb3VudC5uYW1lIjoiZ2l0bGFiLWFkbWluIiwia3ViZXJuZXRlcy5pby9zZXJ2aWNlYWNjb3VudC9zZXJ2aWNlLWFjY291bnQudWlkIjoiODFkYWM3M2ItZmRlMy00MjdjLWFkYjItYWMyZWRjNTk2ODk2Iiwic3ViIjoic3lzdGVtOnNlcnZpY2VhY2NvdW50Omt1YmUtc3lzdGVtOmdpdGxhYi1hZG1pbiJ9.kaKTMEXX5pE4r0EoJycVDud1of1XWVDM7GXRXYV9kM9poducSeNzi1CleTRNkGx8qbDnf5ZdFdRD1GKy8gnYhDsuTLUsLhUvwy24V4PtW9fTtemc3zIIadCi0u7QQ5lL908KR20m2dQiqx9W_QX7ThhKSvMy-P80wBwmxcZF-hIL4qMkJKLP27Pfg3nhrtyHDhIkSznj8y9U-_5brTDHRBWWLgGE-kZcJu5RBAOTSs_jYftq5MuqBbTJDMGgnu_yW3rIqFcO9r2kzdodVuiFYpGH5kNYI48yM8XQf1Ch2ALwW7UWMkpL_G09WZ5F9ZBVh04TnQ-2CVEc-XrOa6fjfw
The important information here is the “token” value. Keep this value handy for later.
Next, we need to get the certificate information from k3s. When a Kubernetes cluster is created it generates an SSL certificate. In order for Gitlab to communicate with the Kubernetes API it must be given the certification information. To get the certificate information do the following on your k3s system:
cat /etc/rancher/k3s/k3s.yaml- Grab the
certificate-authority-datavalue and base64 decode it by usingecho <certificate data> | base64 -d - Note the resulting value after base64 decoding
We’re now ready to input everything into Gitlab. You have three choices for how to configure a Kubernetes cluster in Gitlab: the entire Gitlab instance, a project group or a specific project. For this example I will install the cluster into Gitlab at the instance level.
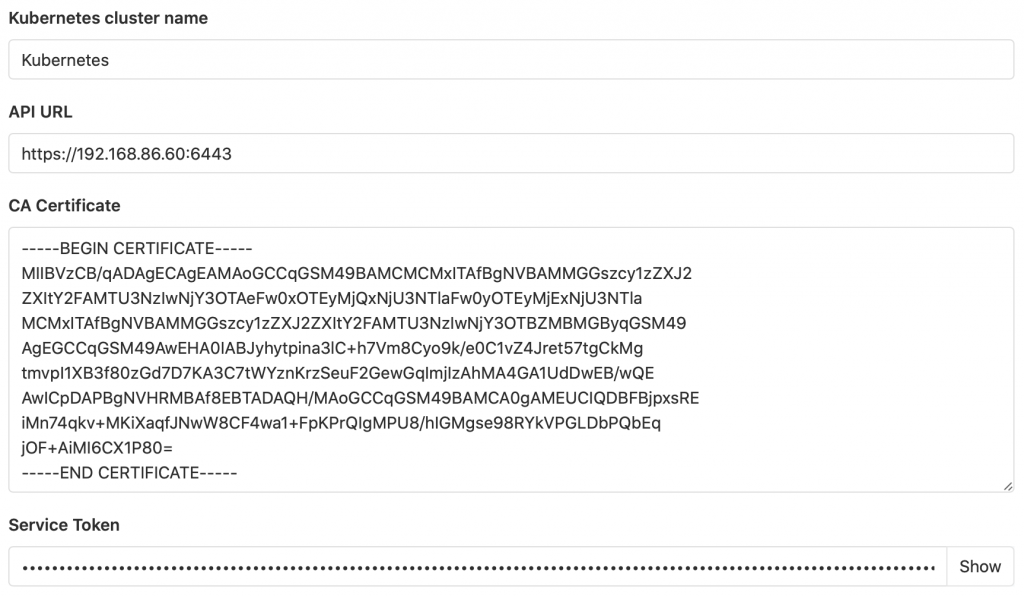
Visit the admin area for your cluster and click Kubernetes (or for a group the group settings page -> kubernetes and for a project the project -> operations -> kubernetes screen). Click the “Add Kubernetes Cluster” button and fill in the required information:
- Enter a name for your cluster
- Enter the API URL. You can simply use the IP address of the k3s system or if you’re being fancy the DNS name you may have supplied
- In CA Certificate enter in the decoded certificate value you got before
- In the Service Token enter in the token information you recored. Do not attempt to base64 decode this value.
- When finished your screen will look similar to the screenshot below
Last, make sure the RBAC enabled cluster option is selected. Optionally, depending on how you intend to use the cluster, you can select the Gitlab managed option. For my setup I only use Kubernetes for gitlab-runner. You can now click save.
At this point you have now connected Gitlab to a k3s based Kubernetes setup. You can install Tiller and then Gitlab Runner. Depending on your use case you can install the other available apps as well.