TLDR; The fix for this is to ensure you are forcing your CDN to properly handle “application/activity+json” in the Accept header vs anything else. In other words, you need to Vary on Accept, but it’s best to limit it to “application/activity+json” if you can.

With the release of ActivityPub 1.0.0 plugin for WordPress I hope we’ll see a surge in the number of WordPress sites that can be followed using your favorite ActivityPub based systems like Mastodon and others. However, if you are hosting your WordPress site on Cloudflare (and likely other CDNs) and you have activated full page caching you are going to have a difficult time integrating your blog with the greater Fediverse. This is because when an ActivityPub user on a service like Mastodon performs a search for your profile, that search will land on your WordPress author page looking for additional information in JSON format. If someone has visited your author page recently in a browser then there is the chance Mastodon will get HTML back instead resulting in a broken search. The reverse of this situation can happen too. If a Mastodon user has recently performed a search and later someone lands on your author page, they will see JSON instead of the expected results.

The cause of this is because Cloudflare doesn’t differentiate between a request looking for HTML or one looking for JSON, this information is not factored into how Cloudflare caches the page. Instead, it only sees the author page URL and determines that it is the same request and returns whatever it has. The good news is, with some effort, we can trick Cloudflare into considering what type of content the client is looking for while still allowing for full page caching. Luckily the ActivityPub has a nice undocumented feature to help work around this situation.

To fix this while keeping page caching you will need to use a Cloudflare worker to adjust the request if the Accept header contains “application/activity+json”. I assume you already have page caching in place and you do not have some other plugin on your site that would interfere with page caching, like batcache, WP SuperCache and more. For my site I use Cloudflare’s APO for WordPress and nothing else.

First, you will want to ensure that your “Caching Level” configuration is set to standard. Next, you will need to get setup for working with Cloudflare Workers. You can follow the official guide at https://developers.cloudflare.com/workers/. Next, create a new project, again using their documentation. Next, replace the index.js file contents with:

export default {
  async fetch(req) {
    const acceptHeader = req.headers.get('accept');
    const url = new URL(req.url);

    if (acceptHeader?.indexOf("application/activity+json") > -1) {
      url.searchParams.append("activitypub", "true");
    }

    return fetch(url.toString(), {
      cf: {
        // Always cache this fetch regardless of content type
        // for a max of 5 minutes before revalidating the resource
        cacheTtl: 300,
        cacheEverything: true,
      },
    });
  }
}

You can now publish this using wrangler publish. You can adjust the cacheTtl to something longer or shorter to suite your needs.

Last step is to associate the worker with the /author route of your WordPress site. For my setup I created a worker route of “*dustinrue/author*” and that was it. My site will now cache and return the correct content based on whether or not the Accept header contains “application/activity+json”.

Remember that Cloudflare Workers do cost money though I suspect a lot of small sites will easily fit into the free tier.

Yesterday I was reminded that when a URL is shared on Mastodon, every instance that has a user following you, that server will make a request to your site at least once in an effort to get some additional embed information. If your site is WordPress based, like this one, then you will likely see two requests. The first request to your site will request the URL that was added to the post while the second one follows any embed information WordPress is exposing in order to get some additional meta data. Since Mastodon is a federated system, every Mastodon server or instance will need to gather this data in order for it to be displayed to its users.

If you are a user that has a lot of followers then posting a link to your blog or site will likely result in a mini DDoS has hundreds of Mastodon instances request this information from your server. If you have not taken precautions this can potentially take down your site as it is overloaded with requests! Years ago this would have been referred to as being “slash dotted” (links on https://slashdot.org) or “fireballed” (links on https://daringfireball.net).

Fortunately you can very effectively deal with this situation on your own or by working with your hosting provider. In this post, I am going to describe how I handle the situation using Cloudflare, which is the CDN provider I have chosen to put my site behind. I am not going into full detail on how to implement all options and I am not selling Cloudflare or associated with them beyond being a customer. What I share here will be applicable to any CDN or will at least serve as inspiration for how to handle it in your configuration.

As I said previously, this site is using WordPress and is behind Cloudflare. To make it easy on myself I have also purchased their Automatic Platform Optimization for WordPress feature. I got into this option initially because I wanted to understand it better but have since kept it because it works well. The biggest feature of APO for WordPress is that it enables full page caching for your site. This is a must if you want to get the best possible experience for users globally. Using APO is absolutely not necessary, you can simply use Nginx micro caching instead or any other caching solution, but the key here is to have full page caching so that repeated requests to your site do not incur actual processing time by WordPress.

APO will, out of the box, cache full pages of your site but what it will not protect is the meta data URL used to provide additional information for embeds. To prevent Mastodon servers from crushing your site with embed meta data requests, there is one additional endpoint you need to force to be cached. Here is how I forced Cloudflare to cache the correct URL for me.

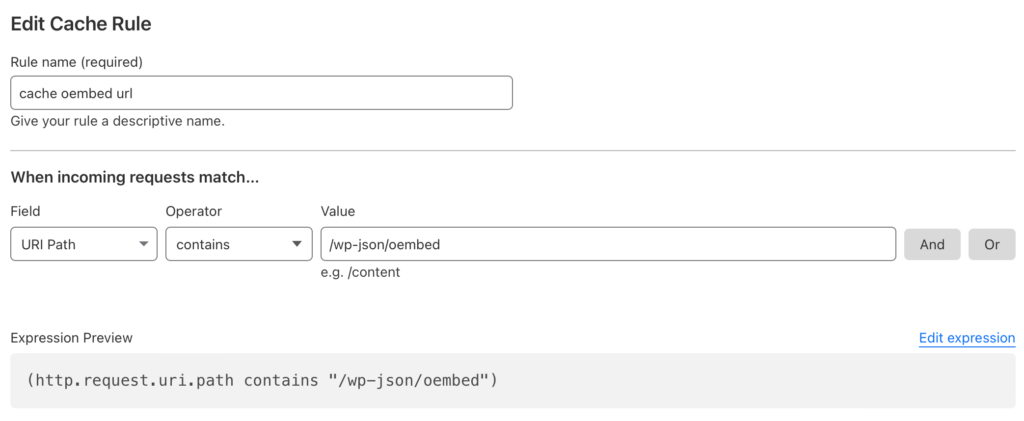
Login into Cloudflare and click on the domain for your site. Find the caching section of the menu and click on Cache Rules. Add a new rule and define what is shown in the screenshot

Screenshot showing a cloudflare configuration screen for caching an oembed request from Mastodon, or any system that would do this. Add a name for your rule, set the Field to URI Path contains the path /wp-json/oembed

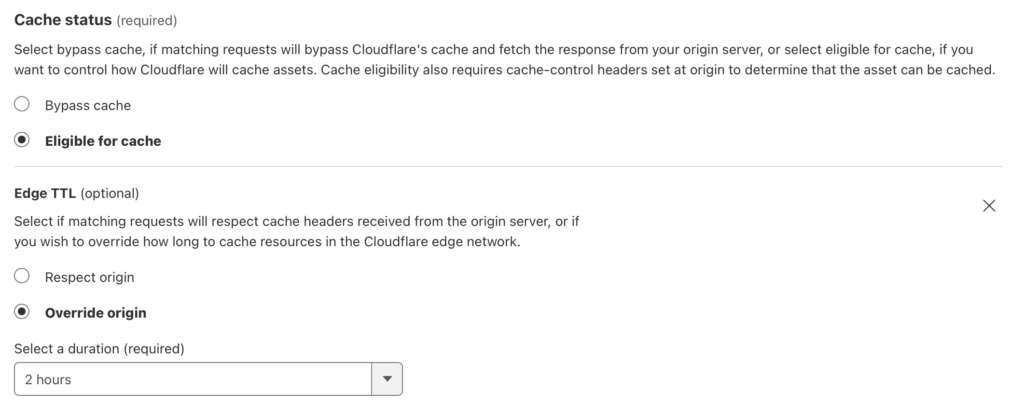
From here, tell Cloudflare what to do with this match

Screenshot showing another Cloudflare configuration screen. Here you should set the Cache status to "Eligible for cache" and "Override origin" set to 2 hours. 2 hours is the minimum option on a free plan

Note that 2 hours is the lowest cache time I can specify on an otherwise free Cloudflare plan so that is what I set it to. With these options filled out you can click save and you are done. Anything looking for this URL will now either get a cached copy of the response or will cause the content to be cached for future requests.

Of course, you don’t need to use Cloudflare to make this work. Savvy users can also translate these URLs to Nginx or Apache configuration to perform the trick. The goal is to ensure your WordPress site is better able to handle when you have shared a link to Mastodon and there are many options. Using Cloudflare is one option that has worked well for me. I encourage everyone that hosts a blog, either self-hosted or through some managed provider, to ensure that page caching and the oembed URL for WordPress is cached.

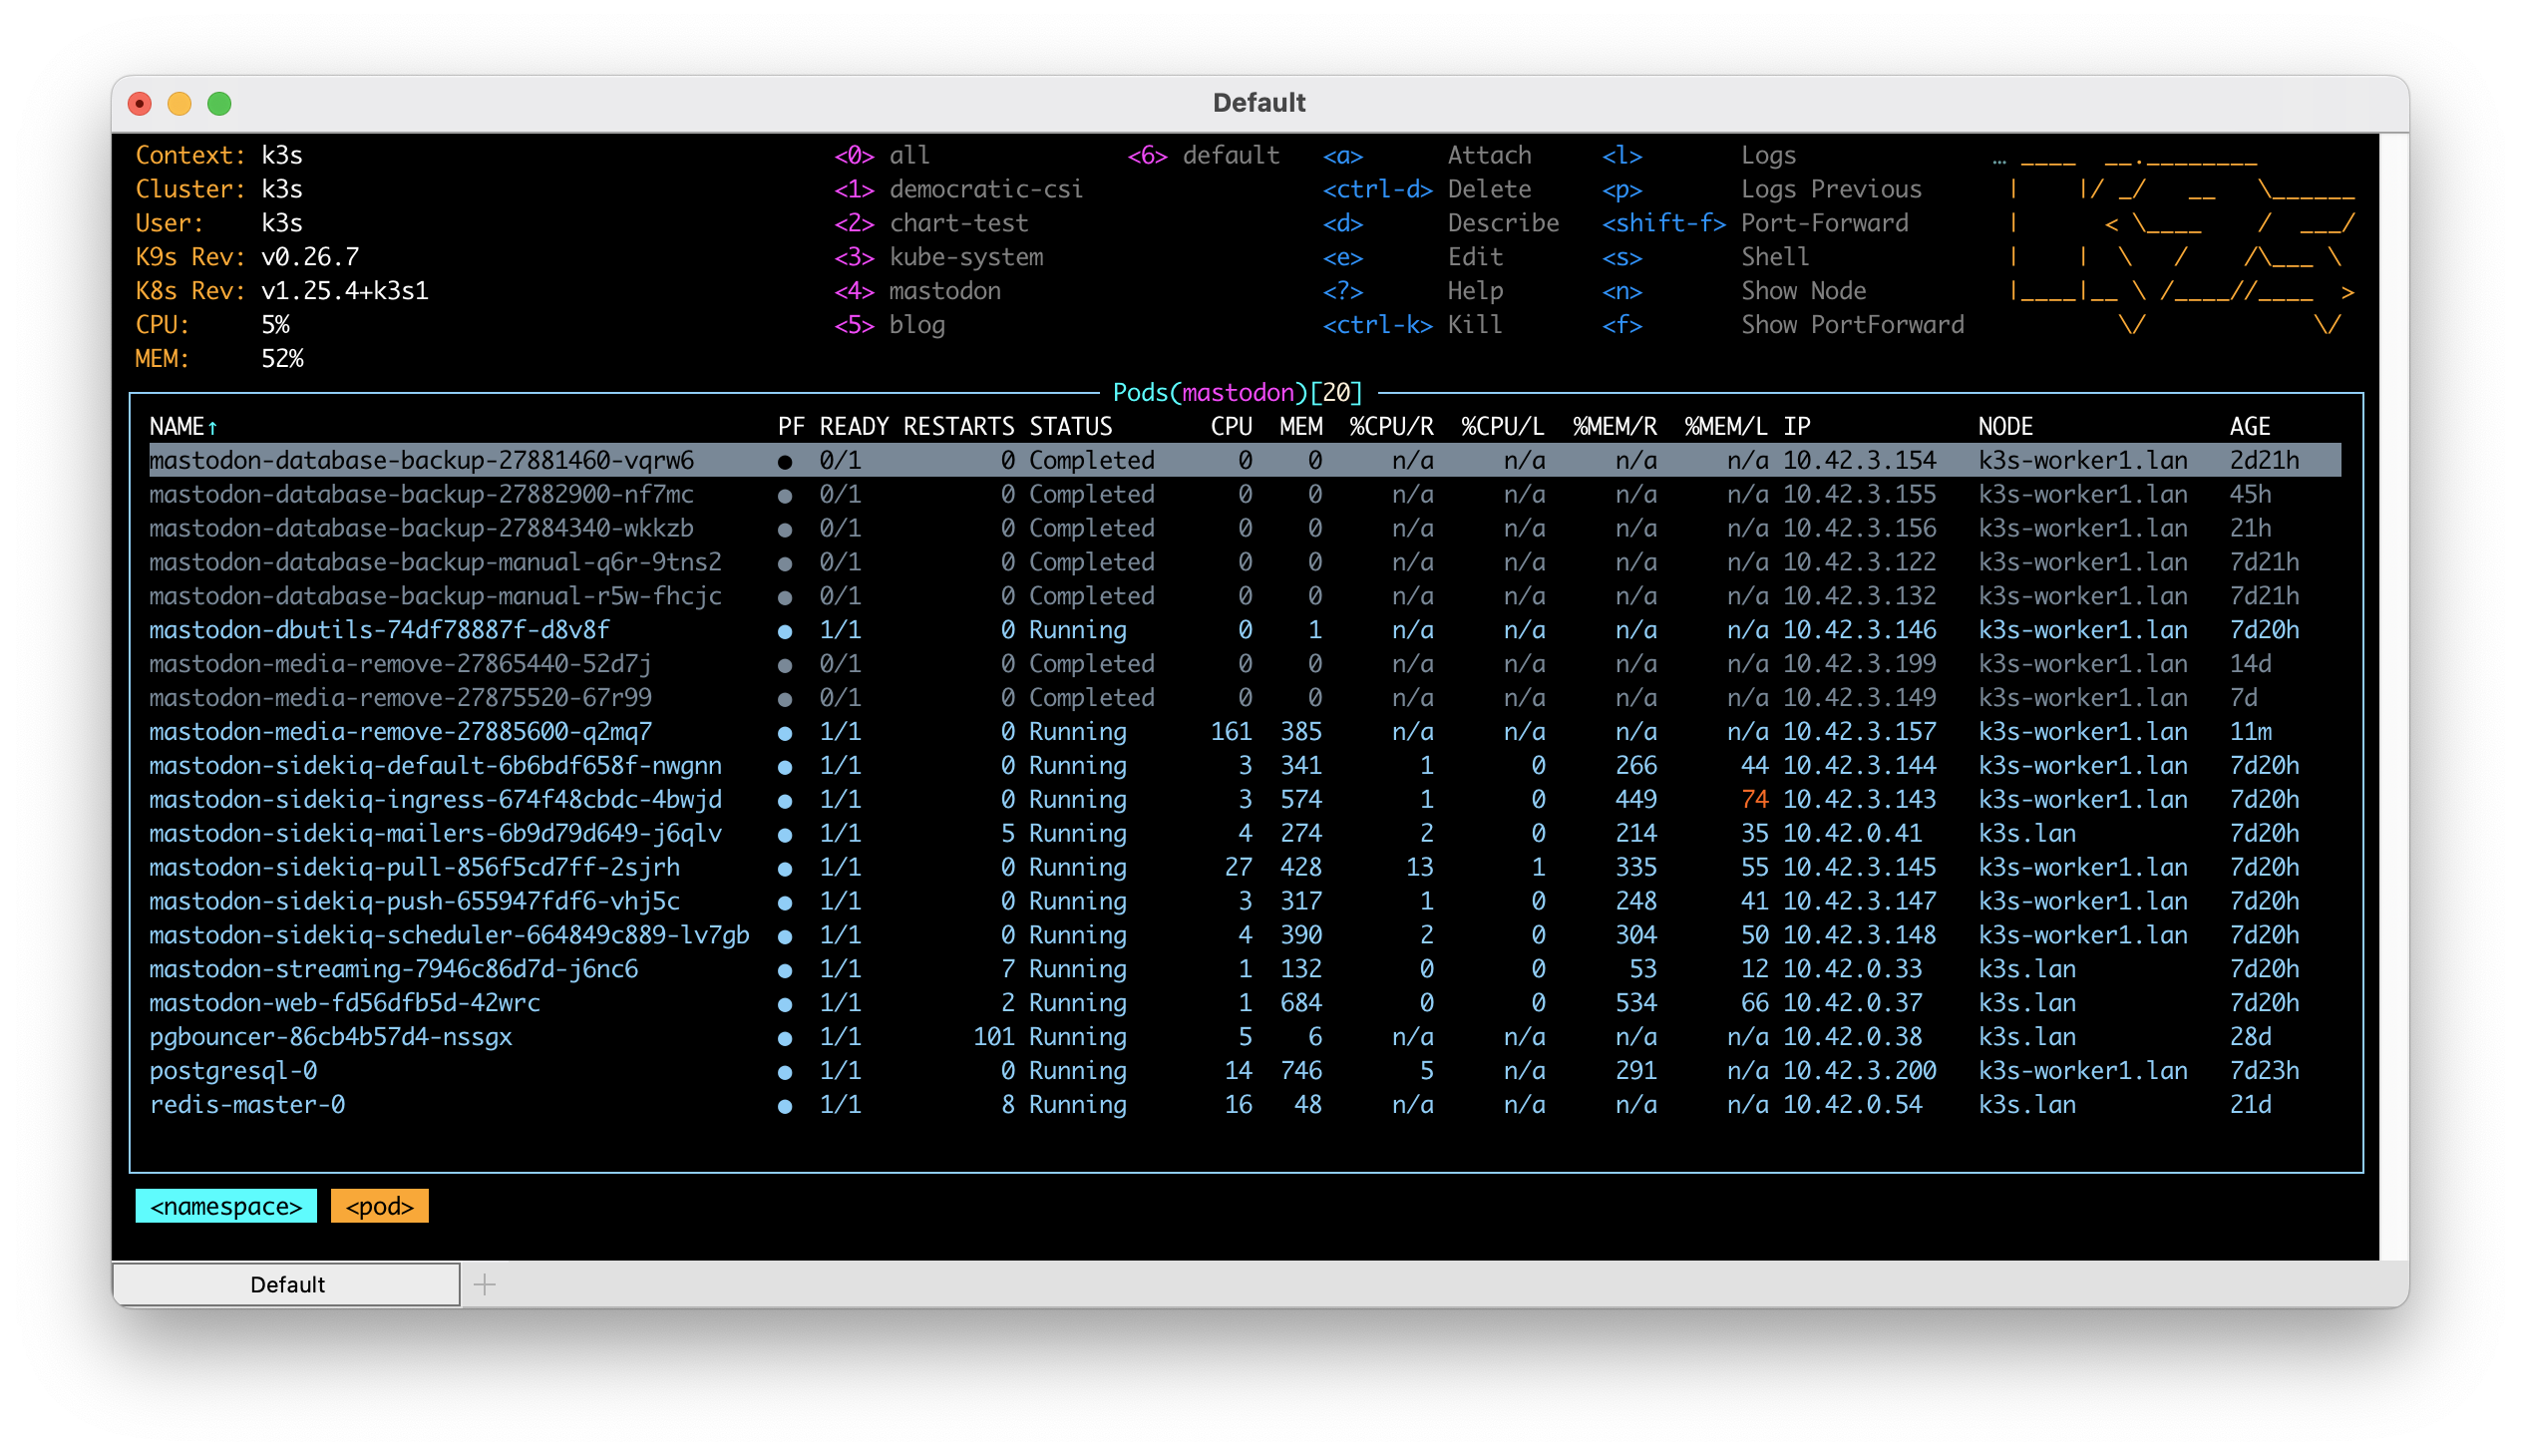
Since about mid December 2022 I have been running my own private instance of Mastodon. I thought I would detail how I did it and what it has cost me so far.

When I first learned about Mastodon I was excited to get to understand it better, particularly how it is hosted and scaled. For Mastodon, I decided right away that the best way to better my understanding was to host it myself and to do so on my favorite platform, Kubernetes. I started by creating my helm chart (https://github.com/dustinrue/mastodon-helm-chart) and installed the core software in my home lab which consists of k3s. The chart I created is based on the official helm chart (https://github.com/mastodon/chart). I created my own because I, again, wanted to learn about the moving pieces of a Mastodon installation but also because I was unhappy with the official chart integrating Redis and PostgreSQL as dependencies. In addition, it doesn’t break out the Sidekiq processes in a way that makes sense…but more on that later.

Before we can get to deep into what I did, we should probably first discuss some of the major components of a Mastodon instance or server. Mastodon is a collection of services working together to form a full solution which includes:

  • A web service which provides the user interface but is also the sort of API server for all things Mastodon. In a full production setup it is important that this be highly available.
  • A streaming service which feeds data to the web frontend as it arrives and is processed. This is almost important but doesn’t seem to be critical. In other words, you can survive a bit of downtime here, you’ll just have a less than great experience.
  • A number of Sidekiq queues. There are numerous Sidekiq queues which are the heart of how data moves in a Mastodon instance. These queues, as of this writing, include a scheduler, ingress, mailer, push, pull and default. Each queue has a specific purpose and each queue is again not absolutely critical to the availability of your Mastodon instance. This means that you can easily take down each queue temporarily to deal with some issue. While a queue is down know that nothing that queue is responsible for will be processed. The special scheduler queue, if not running, will likely prevent most other queues from doing anything at all.
  • Redis is a glue that keeps data flowing between processes. It is also a critical piece to keep running though losing data within it, while not ideal, is ok. Keeping it running is critical because all of the other Mastodon processes expect it to be available and will fail to start without it. In a full production setup I recommend ensuring it is running in a highly available fashion.
  • PostgreSQL is the last required piece of software when running Mastodon. Like Redis, it is what I could consider to be critical to your setup. If running a full production setup you will want to cluster it to maintain availability first with performance a secondary consideration.
  • You need some system for dealing with email. Mastodon needs to send email for account confirmation and some administrative or moderation work. For my system I am using Send In Blue (https://www.sendinblue.com) which has a free tier.

Mastodon also supports other, optional services which you can read about at https://docs.joinmastodon.org/admin/optional/.

As you can likely see, running Mastodon is not simple yet it isn’t overwhelming either. I believe running Mastodon can be done inexpensively, especially a private instance, but to run it in production correctly, there is definitely a base cost you need to consider so that you can remove as much failure points as possible. In addition, there are many other pieces you will likely want if running a large installation like how to monitor metrics, keeping track of Sidekiq queue depth and processing times and more.

Having spent some time on Mastodon during the great Twitter migration I witnessed some of the struggles of a number of instance admins as a their instances struggled to meet the demands of new users and users who had created accounts before but were suddenly active. I saw a few notable patterns emerge that contributed to their scaling woes including:

  • Not using a CDN or object storage system initially
  • Not installing pgbouncer in front of PostgreSQL
  • Not installing Sidekiq into separate processes running each queue

There are some really excellent guides and references on how to scale Mastodon (https://hazelweakly.me/blog/scaling-mastodon/ to name but one) but many of the recommendations will require you to do or have done one, if not all, of the above mentioned steps. Each of these items are disruptive in a way that you probably do not want to be trying to handle them while in a panic of trying to get your instance running again. If you are running or plan to run a public instance where you allow anyone to sign up then I highly recommend getting at least those three items out of the way from day one. Doing so will help ensure that scaling up from there is much, much easier as most items will then become adding additional servers to run more Sidekiq processes or tuning parameters.

When I created my helm chart, I took these lessons and applied them as conscious decisions in the design of the chart. Though not at all necessary for a small or single user instance, my chart breaks out all of the current Sidekiq queues into separate processes. This layout ensures the hard work of separating the processes out is done and the rest is a matter of scaling and tuning.

As of this writing, my helm chart also installs a weekly cronjob to clean up media files and, optionally, a cronjob for backing up the database to some shared storage in your Kubernetes cluster. Though it is ultimately incomplete, I feel the helm chart is a good start.

As for actually running Mastodon for myself I created a subdomain for my instance to live at. I then installed Mastodon, using my helm chart, into my k3s cluster. Ignoring the cost of my ISP and the computers I have, running Mastodon is quite minimal. My home lab provides everything I need to make Mastodon work including persistent storage using TrueNAS. For media storage, I created a Cloudflare R2 bucket and URL for public access. Mastodon is configured to send media content to R2 which is then served from the CDN URL. This keeps all of the heavy storage separate from the rest of the system. My last bill for R2 was just $0.06 which was for the approximately 20GB of content I have stored there. I do expect my next bill to be more because the average amount of data stored in R2 will be higher.

Since my installation is just a private one, I installed PostgreSQL and Redis as single instances within my k3s cluster. Both instances are extremely basic Bitnami based installed using their available helm charts. PostgreSQL is backed by persistent storage provided by TrueNAS. For email, my k3s cluster runs an installation of Postfix. Postfix is configured to send email through Send In Blue and services that I run in my cluster are configured to talk to Postfix. This allows me to have a single mail relay that I need to maintain the configuration for.

Ingress is provided by Cloudflare and cloudflared tunnels. A tunnel is configured on a different VM I have running and then configured in the Cloudfare side on how to route traffic to the Kube cluster with the correct hostname included.

All said, this setup has proven reliable for me since mid December. In a future post I’ll discuss how I got my private instance to feel a bit more included in the Fediverse by adding relays. Please leave a comment if you feel I missed something or got something wrong.
Quick tip on a rather specific situation I found myself in though I believe it could come up for a lot of people using WordPress trying to integrate with ActivityPub networks. If you are:

  • Running WordPress
  • Using a page caching solution like Cloudflare APO or manually configured
  • Running an ActivityPub plugin and/or webfinger

Then you will likely run into an issue with your site not being reliably discoverable when searched for. Using Matthias Pfefferle‘s ActivityPub, Webfinger and Nodeinfo plugins to get your WordPress site exposed as an ActivityPub server will add a few routes to your site. One of the routes is the author pages of WordPress which exist at /author/<author username>. However, this path when hit with a browser will return HTML. ActivityPub instances on the other hand will be looking for a different content type called application/activity+json. Unfortunately, many caching layers will not provide a Vary on Accept which you will need in order to return different data depending on what type of content the requester is looking for.

To resolve this on my site, which uses Cloudflare for CDN, I added a page rule that disallows caching for my author page. This works because I am the only author on the site. A full “proper” solution would be to set a Vary on the Accept header for that path, which Cloudflare does not support.

You may want to be very specific about what Vary headers are used, on what paths and what you actually accept a Vary header on and so on. Allowing for a wide or unlimited range of values can result in people easily breaking cache at the CDN sending requests to your origin servers.

For a number of years I have self-hosted a few things out of my house. This has always meant that I need a way to allow public access to resources hosted on my home lab. In the past this has meant having a single system on my network that could act as a sort of gateway to everything else. This system runs Nginx and a number of vhost configurations to route traffic to the correct VM running whatever it is I’m looking for.

For this to work, I have to insert port forwards into my router so that traffic destined for port 80 or 443 is forwarded to the Nginx proxy. In addition to this, I have to run a script on the proxy that checks my current public IP address and if it has changed, update a DNS record within Cloudflare. This has served me well for years but I have always wondered if there was another option.

As it turns out, there is and it is called Cloudflare Tunnels. As someone who has used Cloudflare for years as a free CDN in front of my blog, I was super happy when Cloudflare made most of their Zero Trust functionality free for small users. Their Zero Trust platform consists of a number of elements but today I’m going to concentrate on just the Tunnel piece.

With the sudden increase in interest in Mastodon as a social media platform I decided to play around with the software and running it myself. Even though I don’t plan on running it on my own any time soon and am totally happy throwing money at some instance admins (which you should consider doing https://hub.fosstodon.org/support/), I thought it would be a fun exercise. Anyway, once I had the software running I needed a way to get it accessible to the public. This is where I turned to Cloudflare Tunnels.

Of course, for any of this to work you will need a Cloudflare account with a domain configured (which is free…and I am in no way connected with Cloudflare other than I am a customer). A Cloudflare tunnel works using an agent running on a host inside of your internal network that is then authenticated with your Cloudflare account. Creating the tunnel is simple:

  • Sign into your Cloudflare account
  • Click Zero Trust
  • Access and then Tunnels
  • Click the Create Tunnel button
  • Give the tunnel a name and click Save
  • Choose your operating system from the list and then paste in the commands you see. If you are using a Raspberry Pi you may need to get the latest release from https://github.com/cloudflare/cloudflared/releases. Once installed use the second command for if you have an existing installation of cloudflared. Advanced users can simply add the tunnel themselves.
  • Once cloudflared is running on your system it will show up as connected
  • Click Next

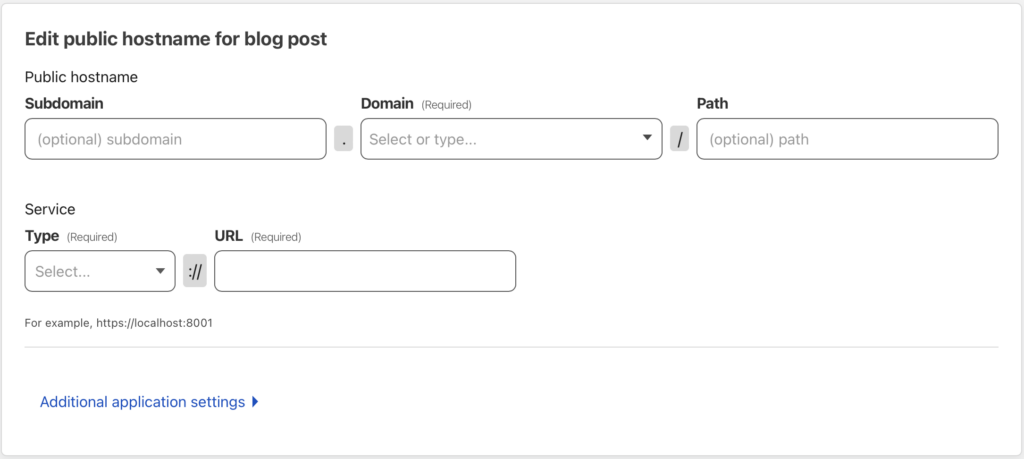
On the next screen you will be given the option to connect a hostname to the tunnel. For this post I will describe how I setup access to my mastodon.dustinrue.com instance. You will be presented with the following screen:

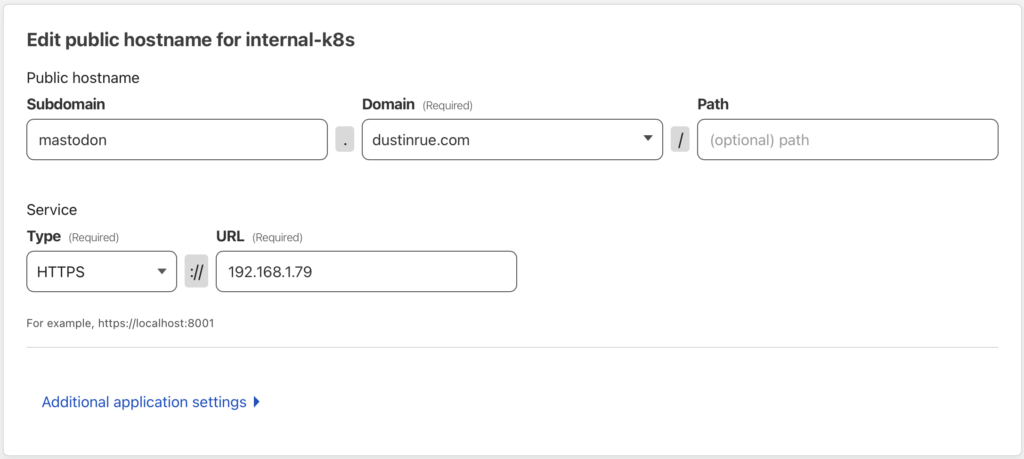
For my mastodon.dustinrue.com instance, I entered mastodon as the subdomain and selected my dustinrue.com domain. In the service section I selected https and gave it the IP address of my internal k3s system. My final config looked similar to this:
I use HTTPS because my internal k3s system’s ingress controller uses cert-manager to create certificates. From here I needed to add some additional application settings to ensure everything worked correctly. Note: you don’t want to use an existing subdomain here (unless you really know what you are doing) because Cloudflare is going to want to insert a new DNS record to make the tunnel work.

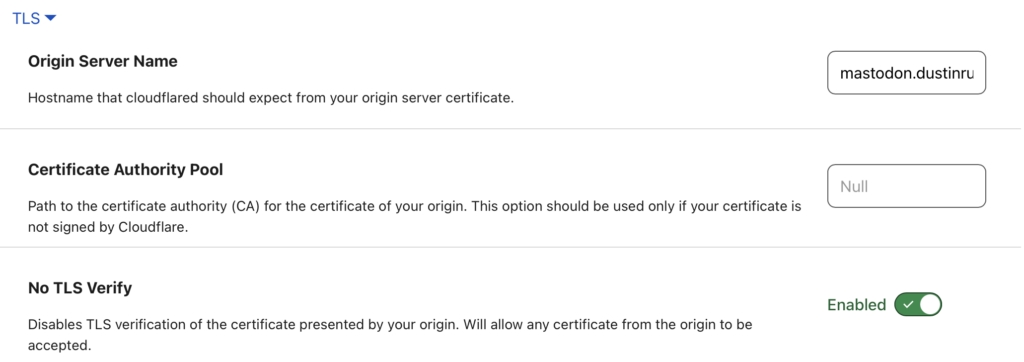
Since I am using an SSL service type, I need to specify the name to send as part of the request so that the ingress controller knows what resources is being accessed. Also, although I do use cert-manager I didn’t setup a TLS record for cert-manager to use so it just applied a self-signed cert. This is fine in this case because the public will see the certificate that Cloudflare provides, not what my k3s cluster has. For these reasons, my TLS section is configured like this:

The Origin Server Name and No TLS Verify are the important options.

In addition to the TLS settings, the regular HTTP section also needs some attention. For this, my settings look like this:

From here, click Save. Cloudflare will insert the correct DNS record for your domain and the connection from the public to your resource will be made. If everything is configured correctly then you will be able to access your resource at the subdomain you provided. Remember that all of the same rules apply here, everything in the path needs to be aware of whatever vhost you are using. The trick here is that there are no port forwards in your router and there is a protected path between Cloudflare into your home network, your home network remains unexposed to the public.

I hope this quick guide is enough to get you going on using Cloudflare tunnels. In a future post I will describe how to use the same system but for SSH connections. This is a powerful tool when combined with Cloudflare Zero Trust because it allows you to define who is allowed to access systems. Zero Trust can also be used to protect specific routes on a site (or the entire site) if you want. For my blog, I use Zero Trust to protect the admin and login pages.

Chris Wiegman asks, what are you building? I thought this would be a fun question to answer today. Like a lot of people I have a number of things in flight but I’ll try to limit myself to just a few them.

PiPlex

I have run Plex in my house for a few years to serve up my music collection. In 2021 I also started paying for Plex Pass which gives me additional features. One of my favorite features or add-ons is PlexAmp which gives me a similar to Spotify like experience but for music I own.

Although I’m very happy with the Plex server I have I wondered if it would be feasible to run Plex on a Raspberry Pi. I also wanted to learn how Pi OS images were generated using pi-gen. With that in mind I set out to create a Pi OS image that preinstalls Plex along with some additional tools like Samba to make it easy to get up and running with a Plex server. I named the project PiPlex. I don’t necessarily plan on replacing my existing Plex server with a Pi based solution but the project did serve its intended goal. I learned a bit about how Pi OS images are created and I discovered that it is quite possible to create a Pi based Plex server.

ProxySQL Helm Chart

One of the most exciting things I’ve learned in the past two years or so is Kubernetes. While it is complex it is also good answer to some equally complex challenges in hosting and scaling some apps. My preferred way of managing apps on Kubernetes is Helm.

One app I want install and manage is ProxySQL. I couldn’t find a good Helm chart to get this done so I wrote one and it is available at https://github.com/dustinrue/proxysql-kubernetes. To make this Helm chart I first had to take the existing ProxySQL Docker image and rebuild it so it was built for x86_64 as well as arm64. Next I created the Helm chart so that it installs ProxySQL as a cluster and does the initial configuration.

Site Hosting

I’ve run my blog on WordPress since 2008 and the site has been hosted on Digital Ocean since 2013. During most of that time I have also used Cloudflare as the CDN. Through the years I have swapped the droplets (VMs) that host the site, changed the operating system and expanded the number of servers from one to two in order to support some additional software. The last OS change was done about three years ago and was done to swap from Ubuntu to CentOS 7.

CentOS 7 has served me well but it is time to upgrade it to a more recent release. With the CentOS 8 controversy last year I’ve decided to give one of the new forks a try. Digital Ocean offers Rocky Linux 8 and my plan is to replace the two instances I am currently running with a single instance running Rocky Linux. I no longer have a need for two separate servers and if I can get away with hosting the site on a single instance I will. Back in 2000 it was easy to run a full LAMP setup (and more) on 1GB of memory but it’s much more of a challenge today. That said, I plan to use a single $5 instance with 1 vCPU and 1GB memory to run a LEMP stack.

Cloudflare

Speaking of Cloudflare, did you know that Cloudflare does not cache anything it deems “dynamic”? PHP based apps are considered dynamic content and HTML output by software like WordPress is not cached. To counter this, I created some page rules a few years ago that forces Cloudflare to cache pages, but not the admin area. Combined with the Cloudflare plug-in this solution has worked well enough.

In the past year, however, Cloudflare introduced their automatic platform optimization option that targets WordPress. This feature enables the perfect mix of default rules (without using your limited set of rules) for caching a WordPress site properly while breaking the cache when you are signed in. This is also by far the cheapest and most worry free way to get the perfect caching setup for WordPress and I highly recommend using the feature. It works so well I went ahead and enabled it for this site.

Multi-Architecture Docker Images

Ever since getting a Raspberry Pi 4, and when rumors of an Arm powered Mac were swirling, I’ve been interested in creating multi-architecture Docker images. I started with a number of images I use at work so they are available for both x86_64 and arm64. In the coming weeks I’d like to expand a bit on how to build multi-architecture images and how to replace Docker Desktop with a free alternative.

Finishing Up

This is just a few of the things I’m working on. Hopefully in a future post I can discuss some of the other stuff I’m up to. What are you building?

Does your WordPress site load in under a second? This one can despite running, for years, on one of the lower VPS tiers available at DigitalOcean thanks to Cloudflare. DigitalOcean’s server offerings are excellent for the price and I’ve always found the performance perfectly acceptable given what I’m paying each month. That said, Cloudflare offers a free CDN tier with just the right mix of features to be appealing and useful. No matter how good your server is you will always benefit from a CDN’s ability to cache content and get it physically closer to your audience. This post goes into detail about how to get the best possible performance from Cloudflare and WordPress by tweaking a few settings and installing a single plugin.

I have no association with Cloudflare and I’m not hear to sell it to you but for this post to make any sense you’ll need to have a WordPress site running through at least Cloudflare’s free CDN offering. If this sounds like you then lets continue.

Continue reading