When you create a k3s cluster using colima it will default to using Docker for the runtime. This means that any Docker image you build or pull will be available to k3s. This greatly simplifies testing locally built images being referenced by Helm charts or Kustomize (or whatever you are using).

This is not a feature unique to colima, but rather a feature of k3s if it is told to use the Docker runtime. You can read more at https://docs.k3s.io/advanced#using-docker-as-the-container-runtime.

Since about mid December 2022 I have been running my own private instance of Mastodon. I thought I would detail how I did it and what it has cost me so far.

When I first learned about Mastodon I was excited to get to understand it better, particularly how it is hosted and scaled. For Mastodon, I decided right away that the best way to better my understanding was to host it myself and to do so on my favorite platform, Kubernetes. I started by creating my helm chart (https://github.com/dustinrue/mastodon-helm-chart) and installed the core software in my home lab which consists of k3s. The chart I created is based on the official helm chart (https://github.com/mastodon/chart). I created my own because I, again, wanted to learn about the moving pieces of a Mastodon installation but also because I was unhappy with the official chart integrating Redis and PostgreSQL as dependencies. In addition, it doesn’t break out the Sidekiq processes in a way that makes sense…but more on that later.

Before we can get to deep into what I did, we should probably first discuss some of the major components of a Mastodon instance or server. Mastodon is a collection of services working together to form a full solution which includes:

  • A web service which provides the user interface but is also the sort of API server for all things Mastodon. In a full production setup it is important that this be highly available.
  • A streaming service which feeds data to the web frontend as it arrives and is processed. This is almost important but doesn’t seem to be critical. In other words, you can survive a bit of downtime here, you’ll just have a less than great experience.
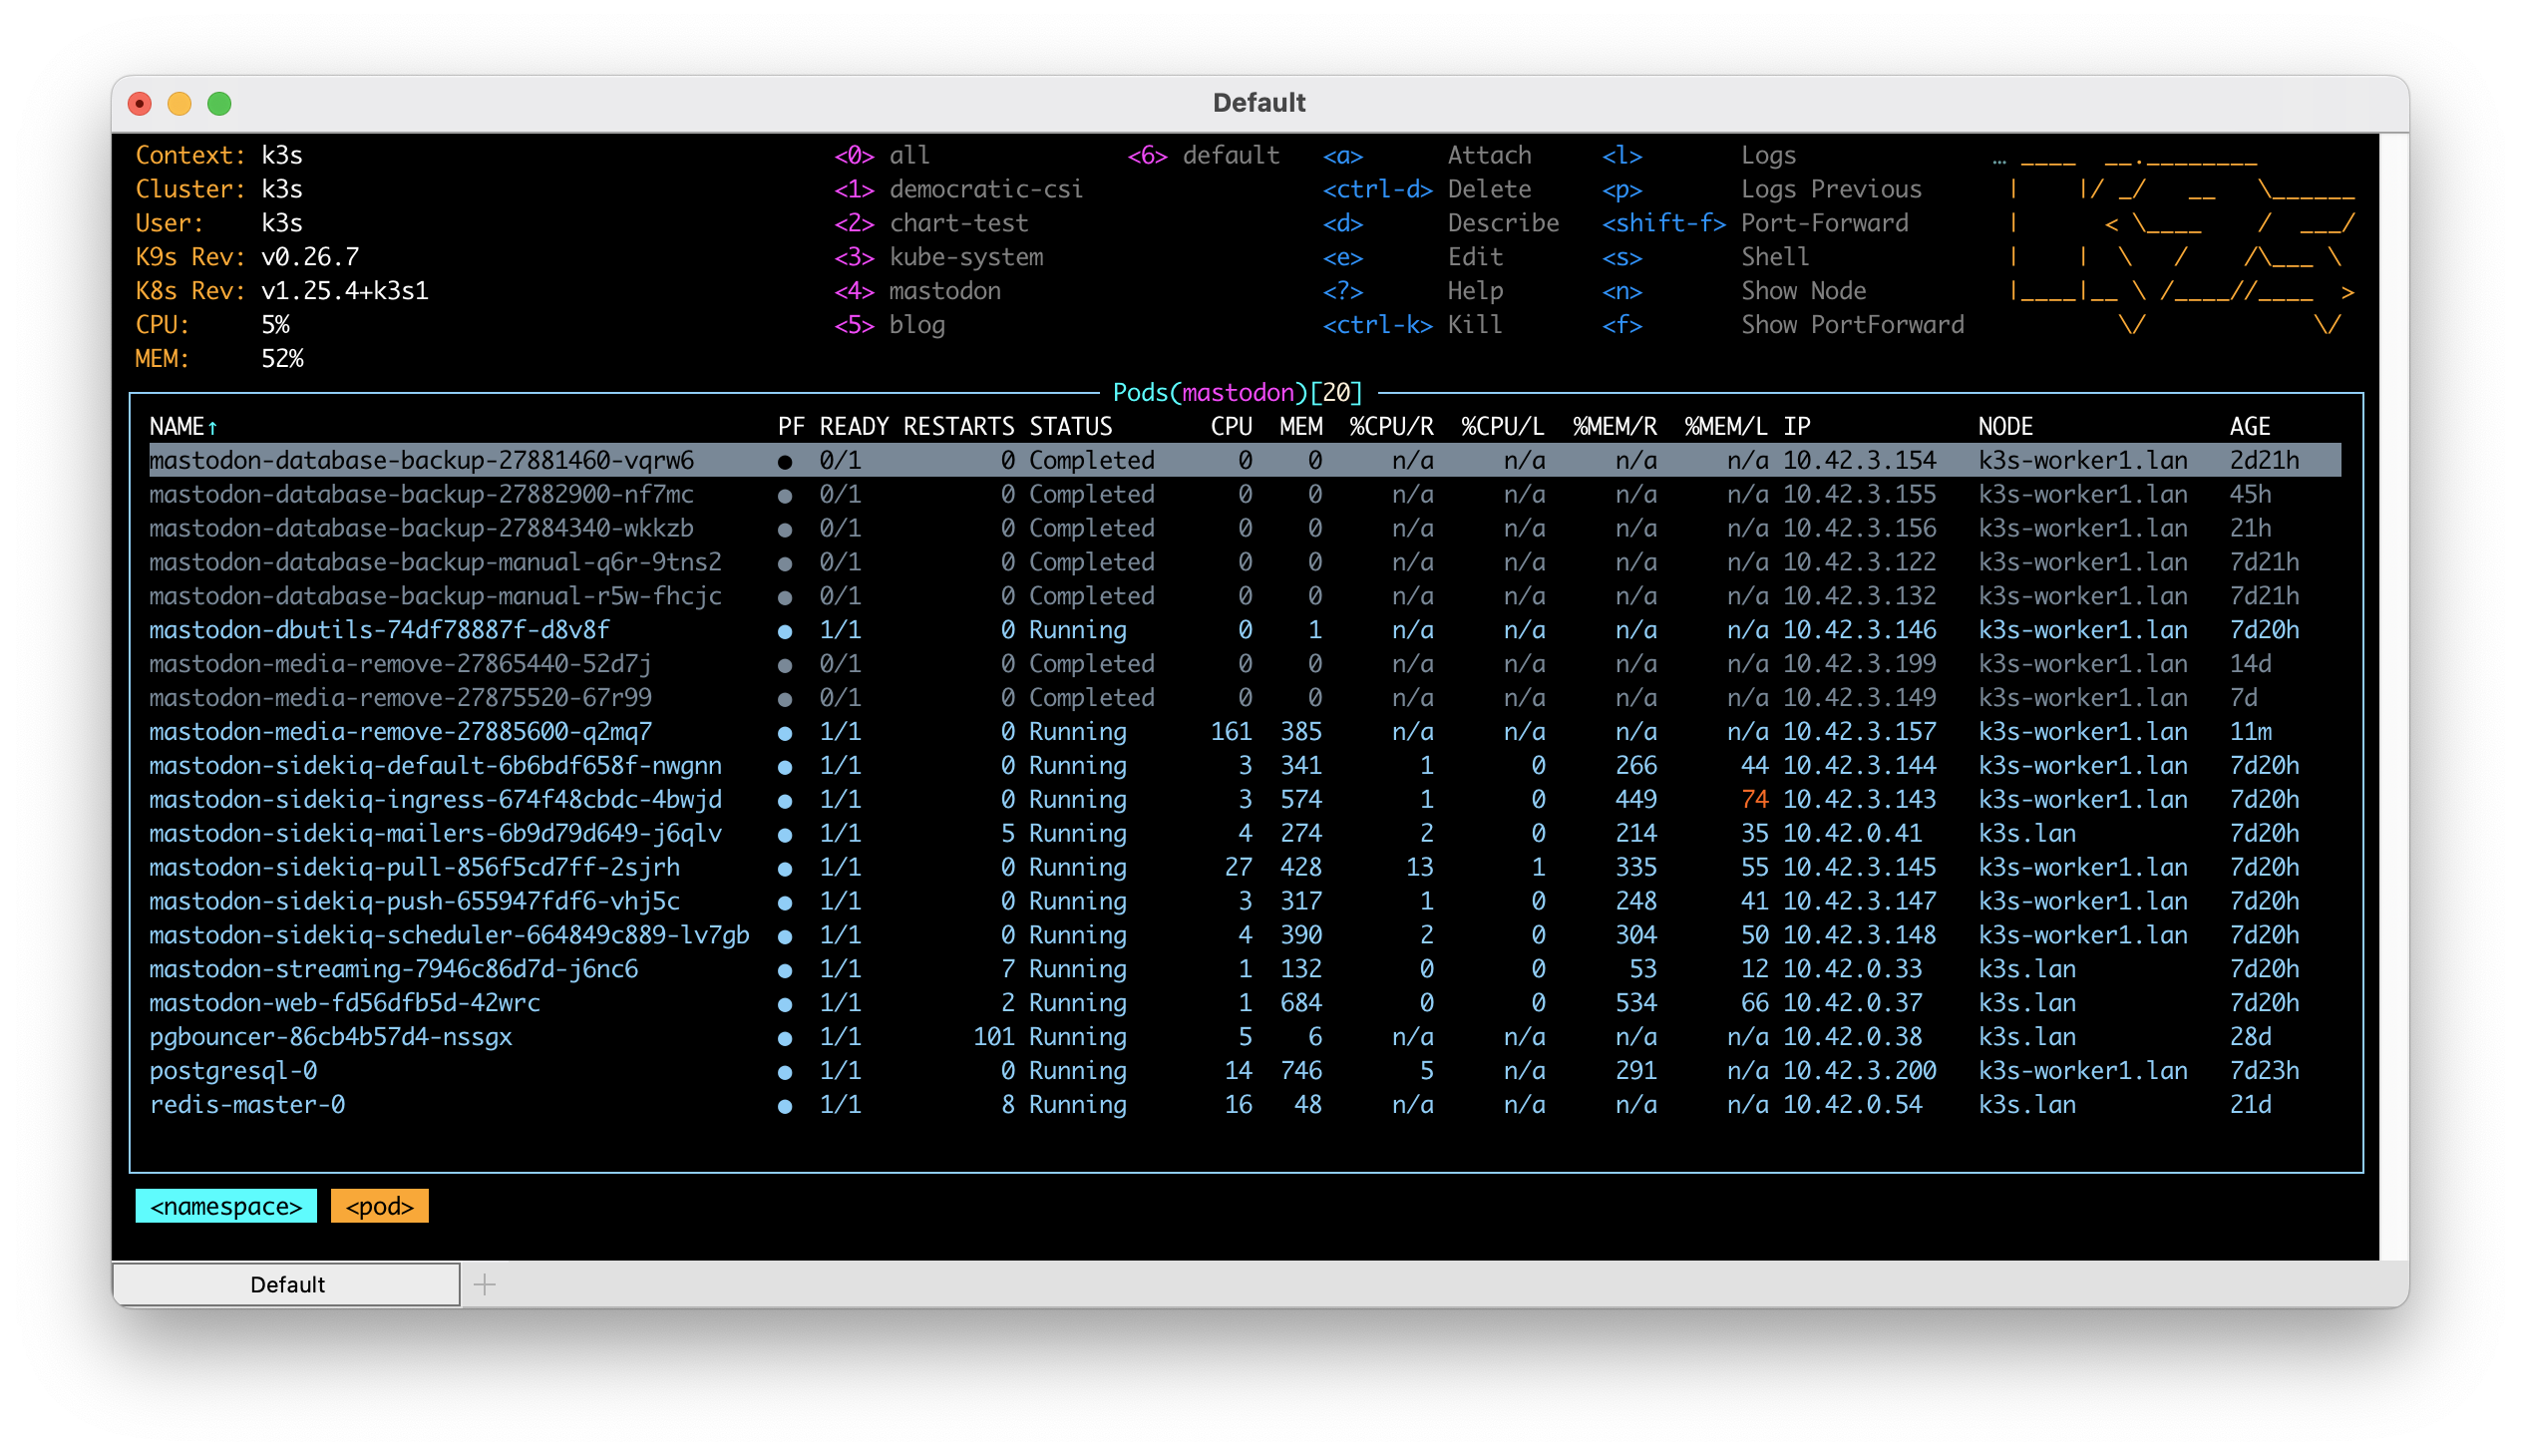
  • A number of Sidekiq queues. There are numerous Sidekiq queues which are the heart of how data moves in a Mastodon instance. These queues, as of this writing, include a scheduler, ingress, mailer, push, pull and default. Each queue has a specific purpose and each queue is again not absolutely critical to the availability of your Mastodon instance. This means that you can easily take down each queue temporarily to deal with some issue. While a queue is down know that nothing that queue is responsible for will be processed. The special scheduler queue, if not running, will likely prevent most other queues from doing anything at all.
  • Redis is a glue that keeps data flowing between processes. It is also a critical piece to keep running though losing data within it, while not ideal, is ok. Keeping it running is critical because all of the other Mastodon processes expect it to be available and will fail to start without it. In a full production setup I recommend ensuring it is running in a highly available fashion.
  • PostgreSQL is the last required piece of software when running Mastodon. Like Redis, it is what I could consider to be critical to your setup. If running a full production setup you will want to cluster it to maintain availability first with performance a secondary consideration.
  • You need some system for dealing with email. Mastodon needs to send email for account confirmation and some administrative or moderation work. For my system I am using Send In Blue (https://www.sendinblue.com) which has a free tier.

Mastodon also supports other, optional services which you can read about at https://docs.joinmastodon.org/admin/optional/.

As you can likely see, running Mastodon is not simple yet it isn’t overwhelming either. I believe running Mastodon can be done inexpensively, especially a private instance, but to run it in production correctly, there is definitely a base cost you need to consider so that you can remove as much failure points as possible. In addition, there are many other pieces you will likely want if running a large installation like how to monitor metrics, keeping track of Sidekiq queue depth and processing times and more.

Having spent some time on Mastodon during the great Twitter migration I witnessed some of the struggles of a number of instance admins as a their instances struggled to meet the demands of new users and users who had created accounts before but were suddenly active. I saw a few notable patterns emerge that contributed to their scaling woes including:

  • Not using a CDN or object storage system initially
  • Not installing pgbouncer in front of PostgreSQL
  • Not installing Sidekiq into separate processes running each queue

There are some really excellent guides and references on how to scale Mastodon (https://hazelweakly.me/blog/scaling-mastodon/ to name but one) but many of the recommendations will require you to do or have done one, if not all, of the above mentioned steps. Each of these items are disruptive in a way that you probably do not want to be trying to handle them while in a panic of trying to get your instance running again. If you are running or plan to run a public instance where you allow anyone to sign up then I highly recommend getting at least those three items out of the way from day one. Doing so will help ensure that scaling up from there is much, much easier as most items will then become adding additional servers to run more Sidekiq processes or tuning parameters.

When I created my helm chart, I took these lessons and applied them as conscious decisions in the design of the chart. Though not at all necessary for a small or single user instance, my chart breaks out all of the current Sidekiq queues into separate processes. This layout ensures the hard work of separating the processes out is done and the rest is a matter of scaling and tuning.

As of this writing, my helm chart also installs a weekly cronjob to clean up media files and, optionally, a cronjob for backing up the database to some shared storage in your Kubernetes cluster. Though it is ultimately incomplete, I feel the helm chart is a good start.

As for actually running Mastodon for myself I created a subdomain for my instance to live at. I then installed Mastodon, using my helm chart, into my k3s cluster. Ignoring the cost of my ISP and the computers I have, running Mastodon is quite minimal. My home lab provides everything I need to make Mastodon work including persistent storage using TrueNAS. For media storage, I created a Cloudflare R2 bucket and URL for public access. Mastodon is configured to send media content to R2 which is then served from the CDN URL. This keeps all of the heavy storage separate from the rest of the system. My last bill for R2 was just $0.06 which was for the approximately 20GB of content I have stored there. I do expect my next bill to be more because the average amount of data stored in R2 will be higher.

Since my installation is just a private one, I installed PostgreSQL and Redis as single instances within my k3s cluster. Both instances are extremely basic Bitnami based installed using their available helm charts. PostgreSQL is backed by persistent storage provided by TrueNAS. For email, my k3s cluster runs an installation of Postfix. Postfix is configured to send email through Send In Blue and services that I run in my cluster are configured to talk to Postfix. This allows me to have a single mail relay that I need to maintain the configuration for.

Ingress is provided by Cloudflare and cloudflared tunnels. A tunnel is configured on a different VM I have running and then configured in the Cloudfare side on how to route traffic to the Kube cluster with the correct hostname included.

All said, this setup has proven reliable for me since mid December. In a future post I’ll discuss how I got my private instance to feel a bit more included in the Fediverse by adding relays. Please leave a comment if you feel I missed something or got something wrong.
One of the requirements when setting up a Mastodon instance is that you are able to send outgoing email. If you are running a personal instance you easily get away with running something like Mailhog which will simply capture all emails being sent and present it to you in a nice web interface. While setting up my personal Mastodon instance I decided to setup a real smarthost/relay for my k3s cluster. I did this using Postfix configured to route mail through a smarthost. Search the web for details on how to do this, there are a lot of how-tos out there explaining the process if you are not familiar with it.

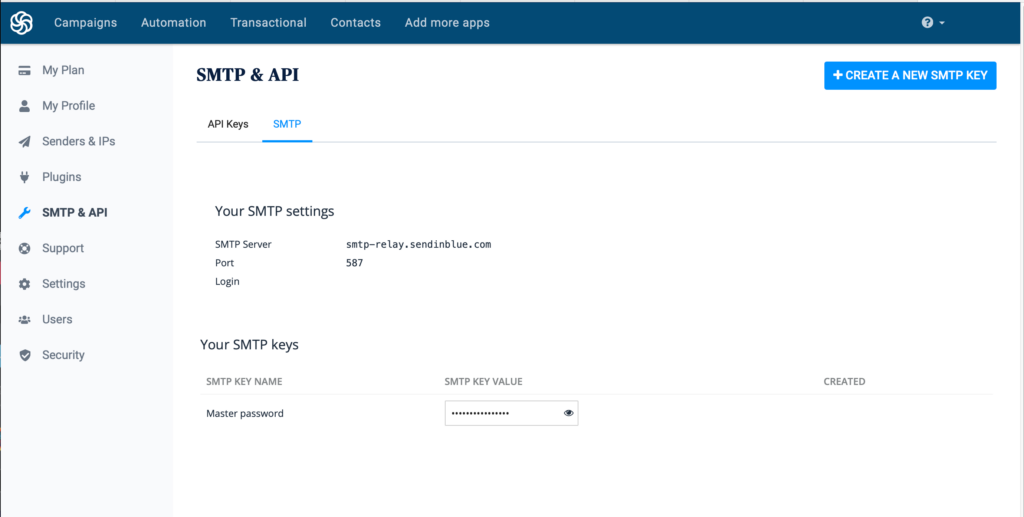
In the past I would have used my gmail account as my smtp relay. Earlier in 2022, Gmail removed the ability to do this so I needed to find a replacement. I ended up settling on https://www.sendinblue.com because they offer a free tier that allows for 300 emails per day. Since everything I do in my cluster is personal there is no way I’ll ever hit that limit. Even if I were to hit the limit I don’t mind if the email messages simply stop working until the next day. I found setup to be easy. Simply create an account (giving them a bit of information) and then visiting the SMTP & API page, clicking SMTP and getting my credentials to put into Postfix.

SendInBlue SMTP/API interface

I am not affiliated SendInBlue in any way, just sharing something I found that allows you to quickly setup an SMTP relay for free.

Jeff Geerling has been on fire the past year doing numerous Pi based projects and posting about them on his YouTube channel and blog. He was recently given the opportunity to take the next TuringPi platform, called Turing Pi 2, for a spin and post his thoughts. This new board takes the original Turing Pi and makes it a whole lot more interesting and is something I’m seriously thinking about getting to setup in my own home lab. The idea of a multi-node, low power Arm based cluster that lives on a mini ITX board is just too appealing to ignore.

The board is appealing to me because it provides just enough of everything you need to build a reasonably complete and functional Kubernetes system that is large enough to learn and demonstrate a lot of what Kubernetes has to offer. In a future post, I hope to detail a k3s based Kubernetes cluster configuration that provides enough functionality to mimic what you might build on larger platforms, like say an actual cloud provider like Digital Ocean or AWS.

Anyway, do yourself a favor and go checkout Jeff’s coverage of the Turing Pi 2 which can be found at https://www.jeffgeerling.com/blog/2021/turing-pi-2-4-raspberry-pi-nodes-on-mini-itx-board.

For nearly as long as I’ve been using Linux I have had some system on my home network that is acting as a server or test bed for various pieces of software or services. In the beginning this system might be my DHCP and NAT gateway, later it might be a file server but over the years I have almost always had some sort system running that acted as a server of some kind. These systems would often be configured using the same operating system that I was using in the workplace and running similar services where it made sense. This has always given me a way to practice upgrades, service configuration changes and just be as familiar with things as I possibly could.

As I’ve moved along in my career, the services I deal with have gotten more complex and what I want running at home as grown more complex to match. Although my home lab pales in comparison to what others have done I thought it would still be fun to go through what I have running.

Hardware

Like a lot of people, the majority of the hardware I’m running is older hardware that isn’t well suited for daily use. Some of the hardware is stuff I got free, some of it is hardware previously used to run Windows and so on. Unlike what seems to be most home lab enthusiasts, I like to keep things as basic as possible. If a consumer grade device is capable of delivering what I need at home then I will happily stick to that.

On the network side, my home is serviced with cable based Internet. This goes into an ISP provided Arris cable modem and immediately behind this is a Google WiFi access point. Nothing elaborate here, just a “basic” WiFi router handles all DHCP and NAT for my entire network and does a fine job with it. After the WiFi router is a Cisco 3560g 10/100/1000 switch. This sixteen year old managed switch does support a lot of useful features but most of my network is just sitting on VLAN 1 as I don’t have a lot of need for segmenting my network. Attached to the switch are two additional Google WiFi access points, numerous IoT devices, phones, laptops and the like.

Also attached to the switch are, of course, items that I consider part of the home lab. This includes a 2011 HP Compaq 8200 Elite Small Form Factor PC, an Intel i5-3470 based system built around 2012 and a Raspberry Pi 4. The HP system has a number of HDD and SSD drives, 24GB memory, a single gigabit ethernet port and hosts a number of virtual machines. The built Intel i5-3470 system has 16GB memory, a set of three 2TB HDDs and a single SSD for hosting the OS. The Pi4 is a 4GB model with an external SSD attached.

Operating Systems

Base operating system on the HP is Proxmox 7. This excellent operating system is best describe as being similar to VMware ESXi. It allows you to host as many Virtual Machines as your hardware will support, can be clustered and even migrate VMs between cluster nodes. Proxmox is definitely a happy medium between having a single system and being a full on cloud like OpenStack. I can effectively achieve a lot of a cloud stack would provide but with greater simplicity. Although I can create VMs and manually install operating systems, I have created a number of templates to make creating VMs quicker and easier. The code for building the templates is at https://github.com/dustinrue/proxmox-packer.

On the Intel i5-3470 based system is TrueNAS Core. This system acts as a Samba based file store for the entire home network including remote Apple Time Machine support, NFS for Proxmox and iSCSI for Kubernetes. TrueNAS Core is an excellent choice for creating a NAS. Although it is capable of more, I stick just to just the basic file serving functionality and don’t get into any of the extra plugins or services it can provide.

The Raspberry Pi 4 is running the 64bit version of Pi OS. Although it is a beta release it has proven to work well enough.

Software and Services

The Proxmox system hosts a number of virtual machines. These virtual machines provide:

Kubernetes

On top of Proxmox I also run k3s to provide Kubernetes. Kubernetes allows me to run software and test Helm charts that I’m working on. My Kubernetes cluster consists of a single amd64 based VM running on Proxmox and the Pi4 to give me a true arm64 node. In Kubernetes I have installed:

  • cert-manager for SSL certifications. This is configured against my DNS provider to validate certificates.
  • ingress-nginx for ingress. I do not deploy Traefik on k3s but prefer to use ingress-nginx. I’m more familiar with its configuration and have good luck with it.
  • democratic-csi for storage. This package is able to provide on demand storage for pods that ask for it using iSCSI to the TrueNAS system. It is able to automatically create new storage pools and share them using iSCSI.
  • gitlab-runner for Gitlab runner. This provides my Gitlab server with the ability to do CI/CD work.

I don’t currently use Kubernetes at home for anything other than short term testing of software and Helm charts. Of everything in my home lab Kubernetes is the most “lab” part of it where I do most of my development of Helm charts and do basic testing of software. Having a Pi4 in the cluster really helps with ensuring charts are targeting operating systems and architectures properly. It also helps me validate that Docker images I am building do work properly across different architectures.

Personal Workstation

My daily driver is currently an i7 Mac mini. This is, of course, running macOS and includes all of the usual tools and utilities I need. I detailed some time ago the software I use at https://dustinrue.com/2020/03/whats-on-my-computer-march-2020-edition/.

Finishing Up

As you can see, I have a fairly modest home lab setup but it provides me with exactly what I need to provide the services I actually use on a daily basis as well as provide a place to test software and try things out. Although there is a limited set of items I run continuously I can easily use this for testing more advanced setups if I need to.

Arm processors, used in Raspberry Pi’s and maybe even in a future Mac, are gaining in popularity due to their reduced cost and improved power efficiency over more traditional x86 offerings. As Arm processor adoption accelerates the need for Docker images that support both x86 and Arm will become more and more a necessity. Luckily, recent releases of Docker are capable of building images for multiple architectures. In this post I will cover one way to achieve this by combining a recent release of Gitlab (12+), k3s and the buildx plugin for Docker.

I am taking inspiration for this post from two places. First, this excellent writeup was a great help in getting things start – https://dev.to/jdrouet/multi-arch-images-with-docker-152f. This post was also instrumental in getting this going – https://medium.com/@artur.klauser/building-multi-architecture-docker-images-with-buildx-27d80f7e2408.

I assume you already have a working installation of Gitlab with the container registry configured. Optionally, you can use Docker Hub but I won’t cover that in detail. Using Docker Hub involves changing the repository URL and then logging into Docker Hub. You will also need some system available capable of running k3s that is using at least Linux 4.15+. For this you can use either Ubuntu 18.04+ or CentOS 8. There may be other options but I know these two will work. The kernel version is a hard requirement and is something that caused me some headache. If I had just RTFM I could have saved myself some time. For my setup I installed k3s onto a CentOS 8 VM and then connected it to Gitlab. For information on how to setup k3s and connecting it to Gitlab please see this post.

Once you are running k3s on a system with a supported kernel you can start building multi-arch images using buildx. I have created an example project available at https://github.com/dustinrue/buildx-example that you can import into Gitlab to get you started. This example project targets a runner tagged as kubernetes to perform the build. Here is a breakdown of what the .gitlab-ci.yml file is doing:

  • Installs buildx from GitHub (https://github.com/docker/buildx) as a Docker cli plugin
  • Registers qemu binaries to emulate whatever platform you request
  • Builds the images for the requested platforms
  • Pushes resulting images up to the Gitlab Docker Registry

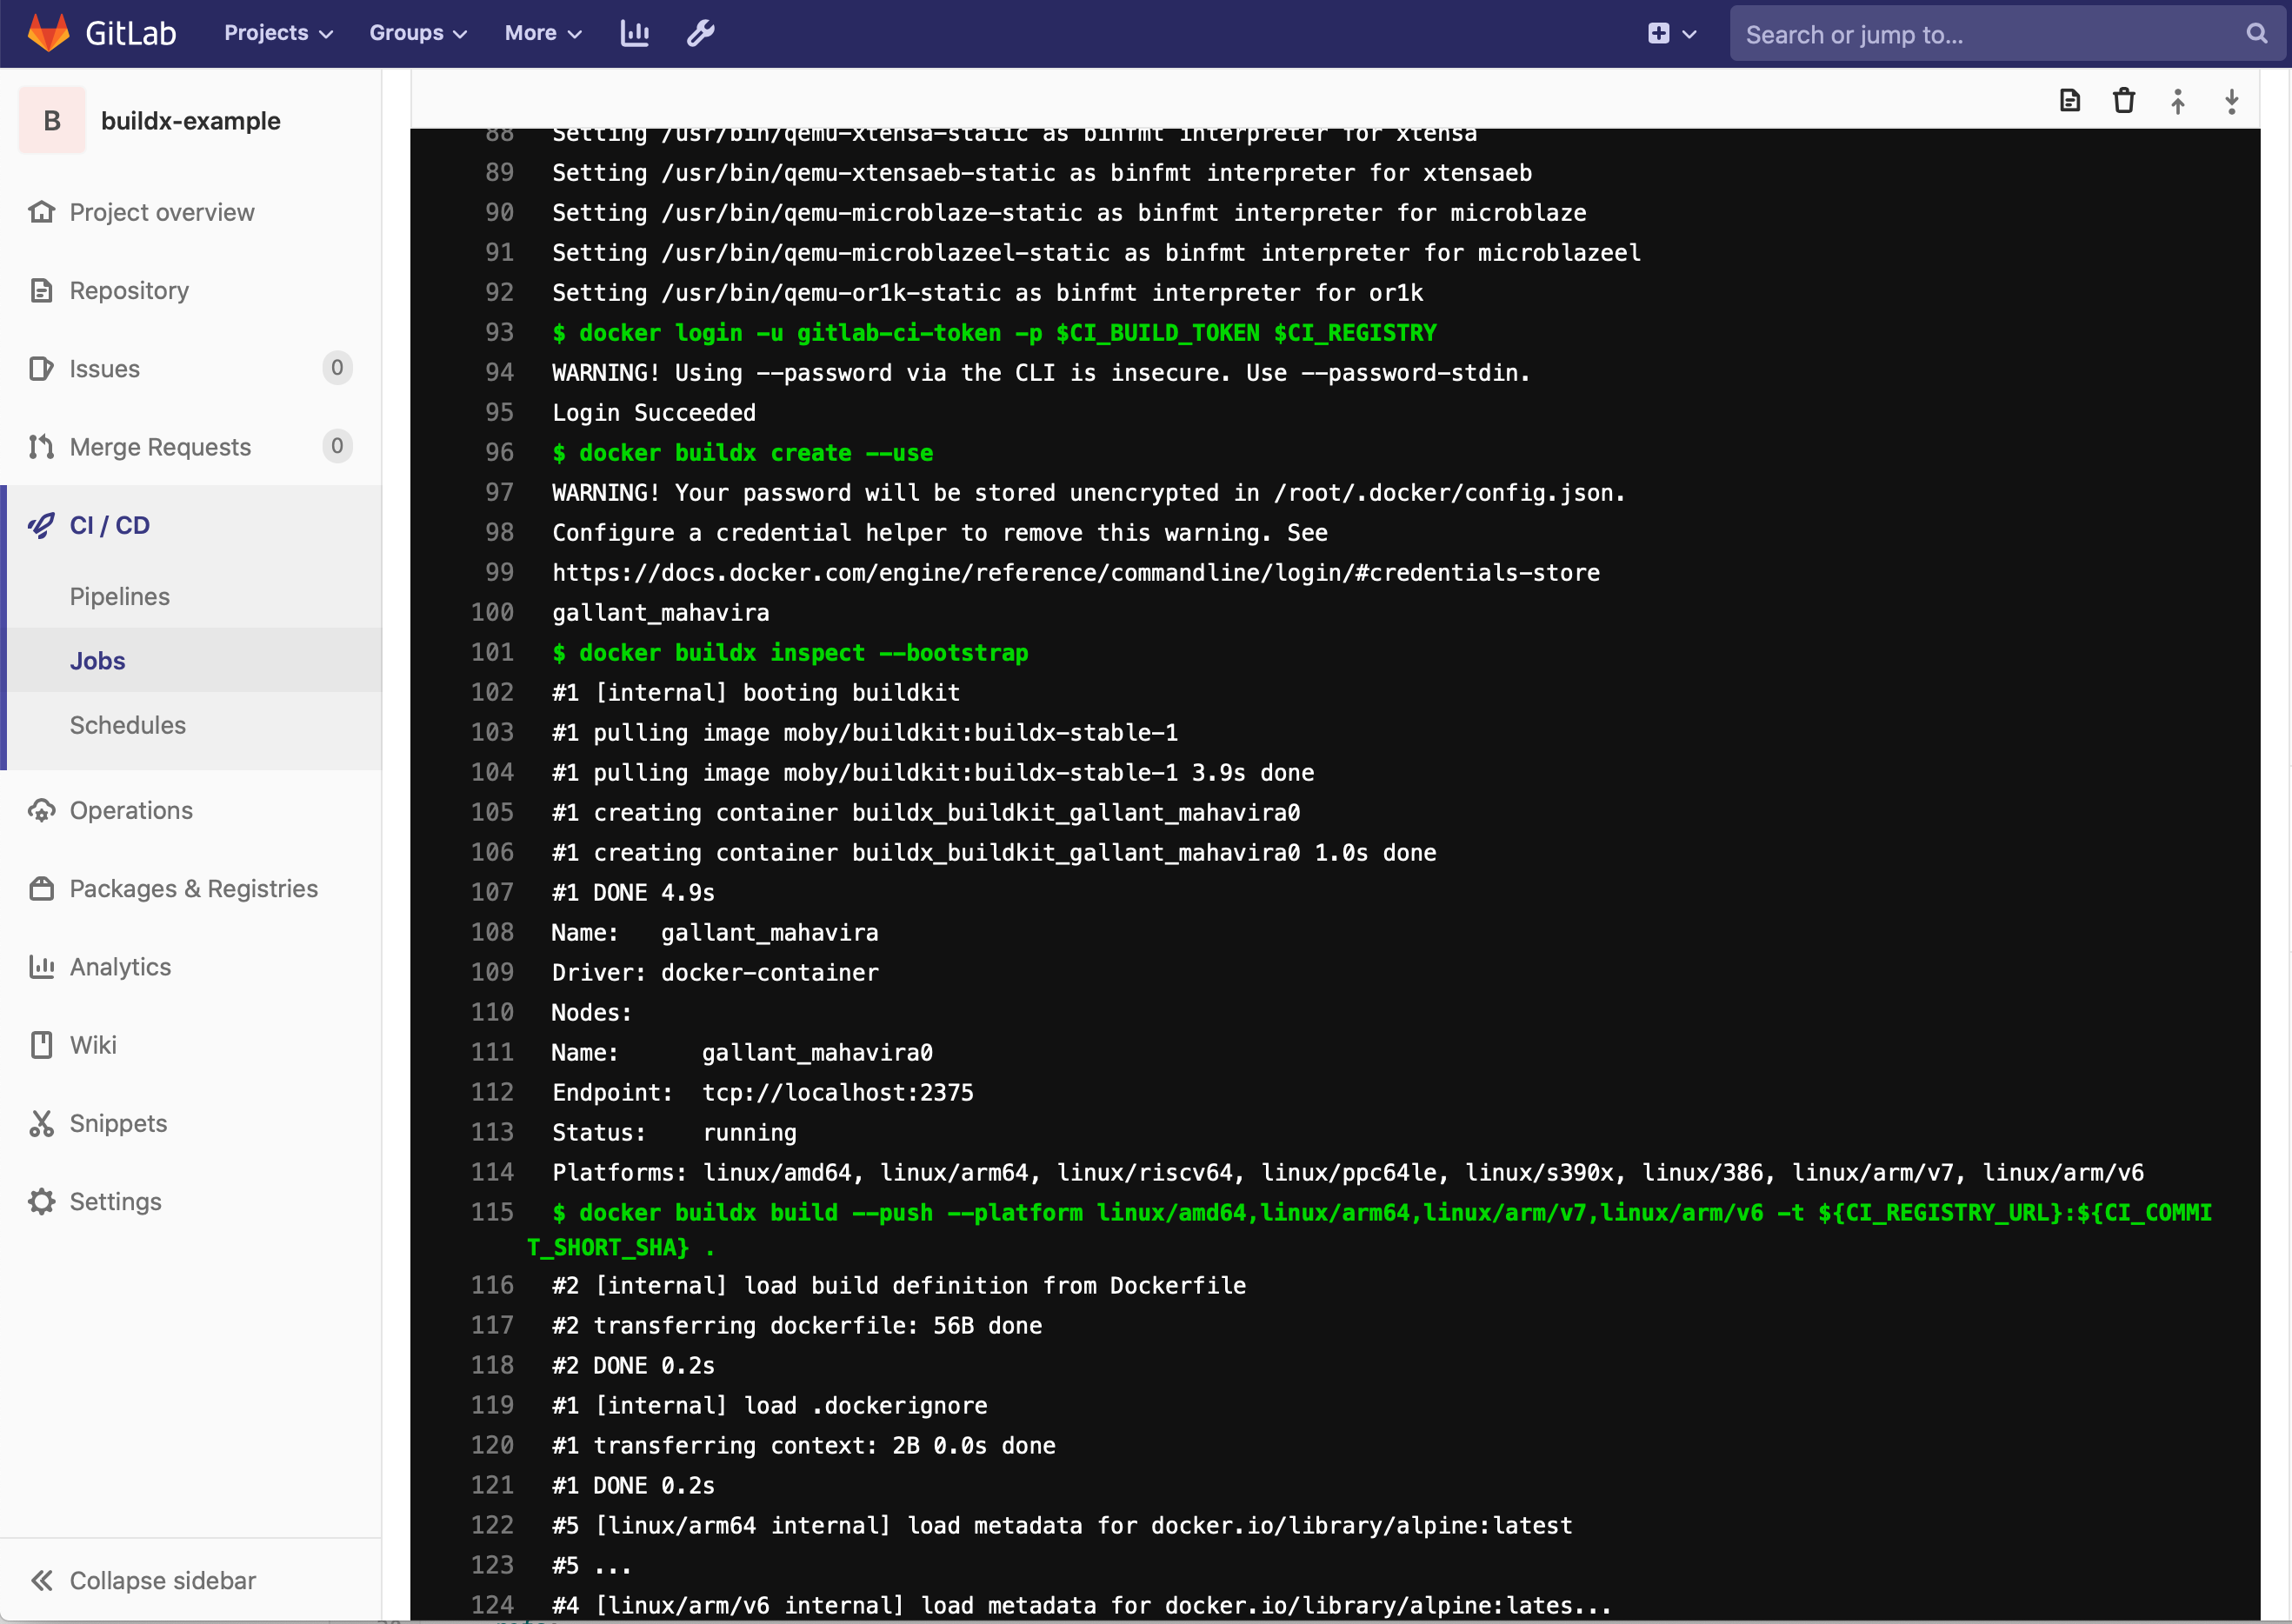
Unlike the linked to posts I also had to add in a docker buildx inspect --bootstrap to make things work properly. Without this the new context was never active and the builds would fail.

The example .gitlab-ci.yml builds multiple architectures. You can request what architectures to build using the --platform flag. This command, docker buildx build --push --platform linux/amd64,linux/arm64,linux/arm/v7,linux/arm/v6 -t ${CI_REGISTRY_URL}:${CI_COMMIT_SHORT_SHA} . will cause images to be build for the listed architectures. If you need a list of available architectures you can target you can add docker buildx ls right before the build command to see a list of supported architectures.

Once the build has completed you can validate everything using docker manifest inspect. Most likely you will need to enable experimental features for your client. Your command will look similar to this DOCKER_CLI_EXPERIMENTAL=enabled docker manifest inspect <REGISTRY_URL>/drue/buildx-example:9ae6e4fb. Be sure to replace the path to the image with your image. Your output will look similar to this if everything worked properly:

{
   "schemaVersion": 2,
   "mediaType": "application/vnd.docker.distribution.manifest.list.v2+json",
   "manifests": [
      {
         "mediaType": "application/vnd.docker.distribution.manifest.v2+json",
         "size": 527,
         "digest": "sha256:611e6c65d9b4da5ce9f2b1cd0922f7cf8b5ef78b8f7d6d7c02f793c97251ce6b",
         "platform": {
            "architecture": "amd64",
            "os": "linux"
         }
      },
      {
         "mediaType": "application/vnd.docker.distribution.manifest.v2+json",
         "size": 527,
         "digest": "sha256:6a85417fda08d90b7e3e58630e5281a6737703651270fa59e99fdc8c50a0d2e5",
         "platform": {
            "architecture": "arm64",
            "os": "linux"
         }
      },
      {
         "mediaType": "application/vnd.docker.distribution.manifest.v2+json",
         "size": 527,
         "digest": "sha256:30c58a067e691c51e91b801348905a724c59fecead96e645693b561456c0a1a8",
         "platform": {
            "architecture": "arm",
            "os": "linux",
            "variant": "v7"
         }
      },
      {
         "mediaType": "application/vnd.docker.distribution.manifest.v2+json",
         "size": 527,
         "digest": "sha256:3243e1f1e55934547d74803804fe3d595f121dd7f09b7c87053384d516c1816a",
         "platform": {
            "architecture": "arm",
            "os": "linux",
            "variant": "v6"
         }
      }
   ]
}

You should see multiple architectures listed.

I hope this is enough to get you up and running building multi-arch Docker images. If you have any questions please open an issue on Github and I’ll try to get it answered.